


")
Straight weave craftsmen make straw beds, which are used in the straw very widely. Their main use is in the manufacture of straw household goods. This kind of weave, you can see the bottoms of the trays and congenic, on the walls of the boxes. The simple layers are made of rectangular shape, the size of such a layer is limited by the size of straw ribbons. However, with the acquisition of some experience you can learn to take out the straw in layers, making their shape difficult.
There are many types of straight weave. Consider two of them — "checkerboard" and "Parkett" (to create other types of weaves you attach your own imagination).
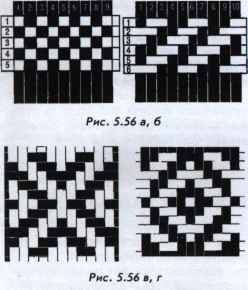
The weave shown below.
1. Prepare 18 straw tape width of 8 mm and a length of 15 cm For the operation of the tape should be dry or slightly damp. Attach the 9 strips in parallel to each other vertically without gaps and overlays. For fixing you can use the clip with a small clamp, you can also pin the ribbon on the paper sheet of ordinary office paper clips or tape (figure 5.56 a).
2. Take one strip of the remaining 9 strips. Bring it under all the even-numbered vertical straw (2, 4, 6, 8). Align the tape horizontally at the upper edge of the vertical strips (the clip).
3. Take a second free tape. Bring it under all the odd-numbered vertical straw (1, 3, 5, 7, 9). Press a second horizontal strip to the first so that there are no gaps (figure 5.56 a).
Then continue braiding, repeating steps 2, 3. The finished seam should not have gaps between the strips. All of the tapes in a layer are of the same width. Straw tape lay face to his and back down.
Weave", Parkett".
1. Prepare vertical straw tape as described in the previous example (figure 5.56 b).
2. Take one strip of the remaining 9 strips. Move it under the vertical tape 1, then lay on top of the ribbons 2 and 3 are brought under the strips 4 and 5. Continue to follow a given rhythm, conceding 2 straw ribbon top and bottom to the end of the row, the latest, the 9th, the tape will stay single (figure 5.56 b).
3. Take a second free tape. Lay it on top of vertical strips 1 and 2, then move under the strips 3 and 4. Continue to follow a given rhythm, conceding 2 straw ribbon top and bottom to the end of the row (figure 5.56 b).
Next, continue weaving the pattern. Each new horizontal ribbon twist offset to the right by one vertical strip (figure 5.56 b). Your pattern in the weave would be shifting to the right tracks.
Figure 5.56 C, d shows examples of more complex reservoirs with straight weave "herringbone" and "square". Crossed wires are slightly different fabrication technology. Their set is convenient to start with the medium weave of strips, vertical and horizontal, gradually increasing tape one, right and left, top and bottom. The rhythm of the weave is clear from the diagram.
You can invent your own drawings weave. The manufacture of articles of straw layers is patterned modelling techniques of weaving, so you have every reason to borrow the drawings of the patterns of weaving.
Made layers can be slightly dampened with the spray, seal all the strips together and dried under pressure. If you will use only one surface of the layer prior to drying, it can be pasted on the paper, evenly coat the entire surface with white glue. With glued on paper layers easier to work with: they do not crumble and are easy to cut out elements for future products.