


")
Straw have a limited length, and in the process of weaving there is a need for renewal. There are several ways of extending ending Solomin:
connection "wrasse". In this connection the terminating end of the straw is split in half new culm (figure 5.52 a). Link length should be approximately 1.5—2.5 cm;
connection "overlap". In this connection the ends of the new straw terminated and are superimposed on one another (figure 5.52 b). Depending on the kind of weaving a new straw may be superimposed over the old ones or be placed under it;
connection "in the hole". In this connection the end of the straw inserted into the straw ended or put on it (figure 5.52). 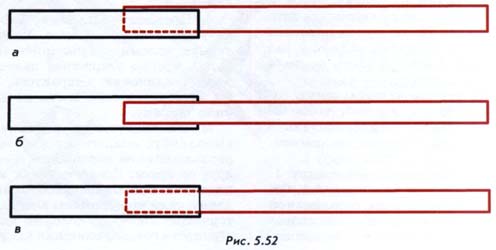
Each of the links has its own characteristics. Connection "wrasse" and "overlap" are often used for flat weaving. Connection "in the hole" — for the bulk of the weaving.
Consider the most typical examples of extension of flat weaving.
When renewing any tangles avoid connecting several Solomin on one section of the weaving. Therefore, starting a long weave, make sure that all of the straw involved in weaving, were of different lengths and the minimum difference in length was 4-6 cm.
The extension of the braided "pigtail" of 3 Solomin. The braided "pigtail" of 3 Solomin has a small width — this is its peculiarity that makes it difficult to extend Solomin in the network, as in other narrow braids. The most convenient way of extending the working of the straw at the narrow braids — "Brassa". 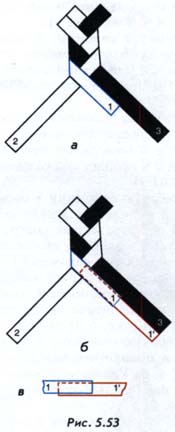
1. Take 3 straws of the same diameter and of different lengths, adjacent lengths of straws should be different between 6-10 cm Tie the straw into a flat beam and proplatit braided "pigtail" with a length of 4-5 cm When the short straw weaving will take you to position 1 (figure 5.53 a), it is necessary to take out.
2. Nastavljeno trim a straw 1 so that its length was approximately 2-3 netting width diagonally.
3. Take a new straw 1 is equal to the diameter culm 1. Connect it "wrasse" culm 1 so that the split end of the straw 1 has to be on top of the straw 1 (figure 5.53 b). The lower part of the straw 1 which is inserted in a straw 1, previously lightly greased glue. Try the length of the connection make the maximum length of the straw 1.
4. Continue weaving "braid", braiding connection. Redstavleny straw braid his hair blond gently clasp the fingers of the connection. Try to keep the weave in this place has not changed the width.
Place the following compounds perform similar to the first and placed at a distance of 3-4 cm from each other. After your network has acquired the desired length, tie the straw together. All the tails sticking out of straws on the surface of the finished plaiting, carefully trim with nail scissors, braid laminate.
Renewal of flat braids with the straight edge of 5 or more straws. Wide flat braids with a smooth edge, as you remember, can be performed from even and odd number of straws, while the drawings of weaves may be repeated. The only difference is that the pattern of the braiding of even number of straws, which is obtained by braiding the right and left working Solomin in different directions, going to get braided lines from an odd number of straws in the braiding work Solomin right and left to one side. About this distinction we have already spoken, when considering the scheme of weaving. It is very important when vypletenii long straw ribbons.
To extend wide flat weave that runs from the large number of straws easier when these work weaving the straw on the right and left trailing at one side.
If you want to carry a straw basket that has a basket weave, you can initially focus on two design options and to perform netting of 6 Solomin or weaving 7 Solomin. However, if you need long netting, you need to stop in the scheme for 7 Solomin, by which the workers straw braided to one side.
To extend the netting, use the renewal option Solomin overlap. 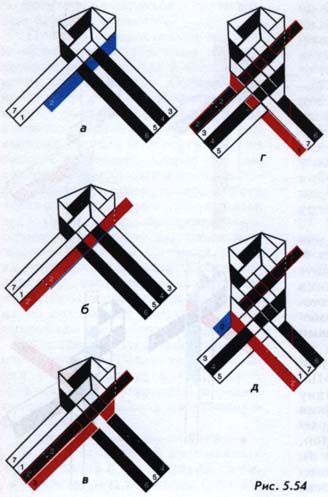
1. Take 7 straws of the same diameter and different lengths. The minimal difference of the lengths of the straws should be 6— 10 cm. Tie the straw in a flat beam and proplatit braid the basket weave of the odd number of straws length of 4— 5 cm When the short straw in the weave will take the position 2 (figure 5.54 a), it is necessary to take out.
2. Take a new long stubble of equal diameter with a short culm. Lay it on top of the straw 2, repeating its weave. Short end of the straw extends over the edge of the basket, 1.5—2 cm (figure 5.54 b).
3. Continue to basket weave 7 Solomin scheme, braiding straw 3, 7, 4, 1 (figure 5.54). Continue to weave until Solomina 2-2 will not take the extreme position (figure 5.54 g).
4. Weave continue working culm 2, leaving the short end of the straw 2 in favour of the netting (figure 5.54 a).
Place the following compounds perform similar to the first and place them at a distance of 3— 4 cm from each other. After your network has acquired the desired length, tie the straw together. All protruding ends of straws on the surface of the finished plaiting, carefully trim with nail scissors. Prune the tips of the straws to bend your finger through the braid. Trim and straighten the netting, you will see that the cut end is hidden under weaves. After all the speakers the ends of straws trimmed, braided laminate.
The extension of flat braided scalloped of 4 or more straws. The scheme of extension of flat braided scalloped performed from even and odd number of straws is the same. Consider the example of her braids "catfish" made from 4 Solomin (figure 5.55). 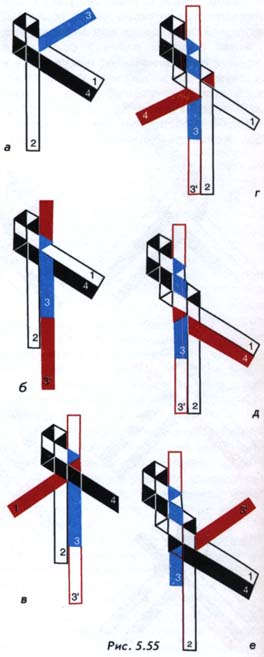
1. Take two straws of the same diameter. Using the scheme of weaving flat wicker "catfish" (p. 157), follow steps 1-6 (figure 5.16 a—e). At the beginning of the weaving length of all straws should be different and vary by 6-7 cm between adjacent straws.
The first netting we will extend a straw 3 (figure 5.55 a).
2. Working from a straw 3 fold itself around the straw 1. The crest line is on the outside of the straw 1. Twist the working straw 3 straws between 1 and 4 (figure 5.55 b).
3. Take a new straw one 3 diameter culm 3. Place it overlap under a straw 3 so that the provisions Solomin 3 and 3 were the same and they are located strictly one under another, not protruding laterally (figure 5.55 b). Non-working end 3 of the straw protrudes above the netting 1.5—2 cm, and working the long end of the straw 3" comes out from under the straw 3 in its entire length.
4. Continue weaving the "catfish" scheme (figure 5.55 b—d), braiding the link. Redstavleny straw braid his hair blond gently, firmly holding the connection, try to weave in this place has not changed the width.
5. When nastavljena straw will occupy the position shown in figure 5.55 d, further netting is culm 3, the short end of the straw 3 is exposed outside of the netting. 3 fold straw from the straw itself around 4 and proplatit between the straws 4 and 1 (figure 5.55).
Continue stitching. To take out the straw ending with the right side netting and left. To do this, the above circuit use in mirroring.
After netting all the protruding ends of the straws neatly cut, as described above, the braided laminate.
Select your language