


")
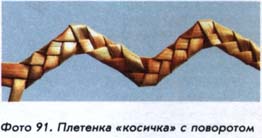
Braid "braid" with a twist (photo 91).
1. Take 3 long straws of equal diameter. Tie in flat beam. In his right hand leave the straw 2, and in the left hand take 1 straw (figure 5.50 a).
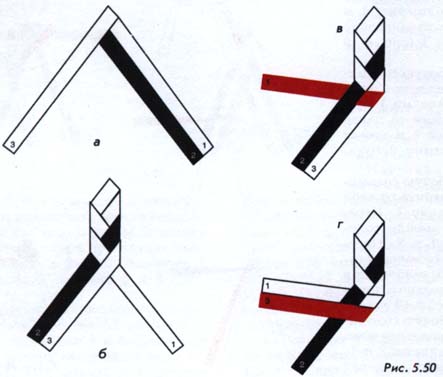
2. Proplatit braid "braid" 5 steps right 3 steps, left 2 steps (figure 5.50 b).
3. Working straw 1 fold to itself (the crest line is along the outer edge of the straw 3).
Proplatit working straw straws 1 between 3 and 2 (figure 5.50).
4. Working straw 3 fold to itself. Put a straw 3 parallel working Solomin 1 (figure 5.50 d).
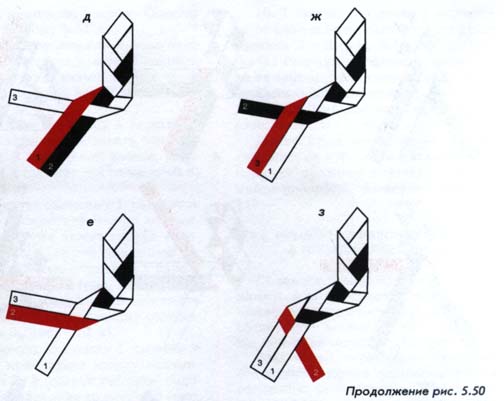
5. Working straw 1 fold yourself and place in parallel Solomin 2 (figure 5.50 d).
6. Working straw 2 fold to him and lay on top of the straw 1 parallel Solomin 3 (figure 5.50).
7. Working straw 3 fold to him and lay on top of the straw 2 parallel Solomin 1 (figure 5.50 g).
8. Working straw 2 fold to itself. Proplatit working straw 2 straws between 3 and 1 (figure 5.50 b).
Then repeat steps 4 through 8 in a mirror image.
The size of the zigzag can be increased, making smooth areas of the netting is longer. Performing the rotations in one direction, it is possible to obtain closed contours in the form of rectangles and squares.
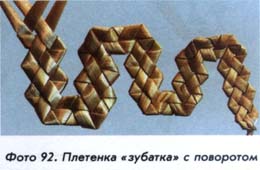
Braid "catfish" with a twist (photo 92).
1. Take the 4 long straws of equal diameter. Tie them into a flat beam and proplatit plot weaving "catfish" so that you have vipiteno 3 full cloves: 2 right and 1 left. Working straw 1 fold myself and proplatit between the straws of 3 and 2 (figure 5.51 a).
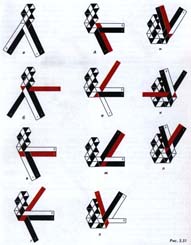
2. Working straw 3 fold myself and proplatit between the straws 1 and 4 (figure 5.51 b).
3. Working straw 2 fold to itself and proplatit between the straws 1 and 4 (it lies on top of the straw 1 and will be held under culm 4) (figure 5.51).
4. Working straw 1 fold yourself and proplatit between straws 2 and 3 (she will be on top of the straws 4 and 2 and will be held under culm 3) (figure 5.51 d).
5. Working straw 1 fold yourself and proplatit between the straws of 3 and 2 (it lies on top of the straw 3 and will be held under culm 2). Put a straw 1 working in parallel Solomin 4 (figure 5.51 d).
6. Working from a straw 4 fold itself, and proplatit between straws 2 and 3 (figure 5.51).
7. Working straw 1 fold yourself and proplatit between 2 and 3 straws. Put a straw 1 working in parallel Solomin 4 (figure 5.51 g).
8. Working straw 2 fold to itself and proplatit between the straws 1 and 4 (figure 5.51 b).
9. Working straw 3 fold myself and proplatit between 1 and 4 straws. Put a straw 3 parallel working Solomin 4 (figure 5.51).
10. Working straw 1 fold myself and proplatit between the straws of 3 and 2 (figure 5.51).
11. Working straw 1 fold myself and proplatit between the straws of 3 and 2. Put a straw 1 working in parallel Solomin 4 (figure 5.51 l).
Further proplatit the required number of teeth is symmetrical to the first straight section and a turn, repeating steps 3— 11.