


")
Spread the straw in his hands. The straw 1 and 2 hold with his right hand, and 3 take a straw in your left hand (figure 5.29 a). Working 1 fold a straw through a straw guide 2 toward you and lay in your left hand parallel to Solomin 3 (figure 5.29 b).

1. Working 3 fold through a straw guide straw 1 to itself and place the right hand parallel Solomin 2 (figure 5.29).
2. Working 2 fold a straw through a straw guide 3 toward you and lay in your left hand parallel to Solomin 1 (figure 5.29 d).
3. Working 1 fold a straw through a straw guide 2 toward you and lay in your right hand parallel to Solomin 3 (figure 5.29 d).
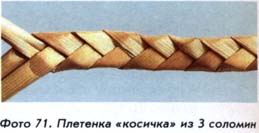
You began to form the weave "pigtail". Workers of the straw are from the outside of the netting, taking alternately the right and left position relative to its middle. Bend the working straw form at braids smooth edge. To weave more dense, slightly pull it over the loose ends of straws, throwing them in different directions from the center.
Adhering to in the future of the scheme, beginning in figure 5.29 b, you get a braid "braid", the maximum length of which is determined by the length of straws involved in weaving.
If, instead of the excesses of workers Solomin apply them the bends, the braid will be wavy with textured edge.
Method of extending Solomin will be discussed in the appropriate section. After netting the remaining loose ends and tie with string. Braid laminate.
Network with two guides (photo 72). For the braids, there are two ways to get started weaving. In the first method 3 of the straw, as in the previous case, tie in a flat beam (in this method, the end of the braids will have tails).

The second method will allow you to arrange the end of the netting in the corner.
Take a straw and fold it (figure 5.30 a). The two ends of the kinked straw to replace the straw 2 related.
Third stubble tie Solomin 1 at the place of inflection (figure 5.30 b). Further, the process of weaving place of dressing will hide under the netting will hide and the small end of the straw 3 in the place of bandaging. The angle of the breeding Solomin 1 and 2 can be set arbitrarily, it can be changed in the process of weaving, shaping different shape braids.
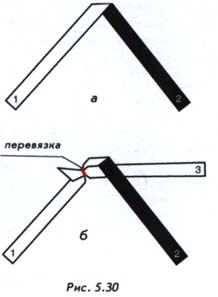
In the network working culm will constantly straw 3. The straw 1 and 2 will always guide straws (figure 5.30 b 5.31 a).

1. Working straw 3 fold to itself. Lay it parallel to its previous position, reversing direction to the opposite. Twist working culm 3 of the straw 2, and 1. The result of the straw 3 will fall on top of the straw 2 and under culm 1 (figure 5.31 b).
2. Working straw 3 fold to itself. Lay it parallel to its previous position, reversing direction to the opposite. Twist working 3 straw culm 1 and 2. The result of the straw 3 will fall on top of the straw 1 and under culm 2 (figure 5.31 b).
In figures 5.31 d—e shows further diagrams of the weaves that repeat the diagrams from figures 5.31 a and B.
After weaving the ends of the working link and guide Solomin. Solomin without extending the length of the braids is limited by the length of the straw.
The braided line is usually made from thin straw the first degree. It is used for making small decorative items. The network can be given a curved shape, forming a bend in the plane of the weave with a flat iron how flat loops. To give greater plasticity to the guidelines of the straw 1 and 2 you can insert a thin, flexible wire.
Network 1 guide (photo 73). Braid was developed by Anna Ivanova in the 1990-ies.
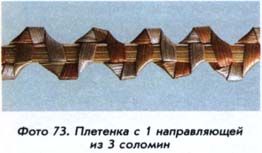
For weave take 3 straws and connect them to a flat beam.
Solomin original position shown in figure 5.32 a: straw 1 is located between the 2 straws and 3 straw 1 straw 2 behind, 3 in front of the straw straw 1. Straw 1 will constantly guide culm, straw 2 and 3 will be alternately working straws.
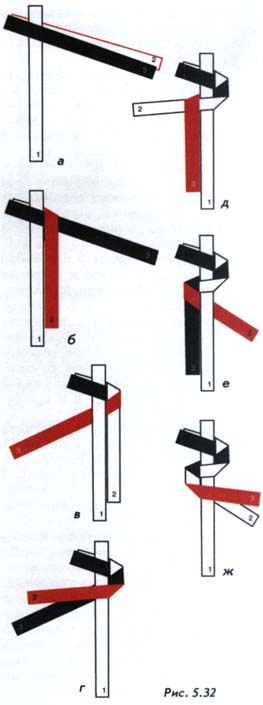
1. Working straw 2 straw 3 fold through to itself and lay parallel to the rail 1 Solomin (figure 5.32 b).
2. Working 3 fold a straw through a straw 2 to itself, the line break will take place on the side of the straw 2. Twist working culm 3 of the straw 2, and 1. Solomina 3 will fall on top of the straw 2 and under culm 1 (figure 5.32 b).
3. Working straw 2 fold to him and lay on top of the straw 1 and perpendicular to it. The crest line will pass through the side of the straw 3 (figure 5.32 g).
4. Working 3 fold a straw through a straw 2 to himself and lay parallel to the rail 1 Solomin (figure 5.32 d).
5. Working straw 2 straw 3 fold through to itself, the line break will take place on the side of the straw 3. Twist the working of the straw culm 2 3 and 1. Straw 2 will lie on top of the straw 3 and under culm 1 (figure 5.32 e).
6. Working straw 3 fold to him and lay on top of the straw 1 and perpendicular to it. The crest line will pass through the side of the straw 2 (figure 5.32 g).
Next, continue stitching, repeating from step 1.
After weaving ends Solomin tie. Solomin without extending the length of the braids is limited by the length of the working Solomin.
Braided line has a zigzag line region. To give the network plasticity in stubble guide 1 insert the thin wire. Braided line can be used for making different decorative items.