


")
In Western Europe, were widely used and spread by combined weaving. One network found combination of several types of weaving.
The combination of various types of tangles in one further expands the variety of braided, allows the craftsmen to find new combinations of textures to create new patterns weaves. Consider a few examples of combined networks that will help you to understand the principle of formation of such braids.
Braid "braid" with a simple weave (one-sided, photo 85). 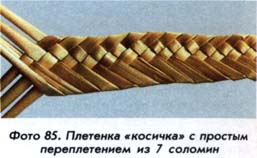
1. Take 7 long straws of equal diameter and length. Tie them in a bundle. The straw was spread in right and left hand. In one hand you have 4 of the straw and the second straw 3. Hold all the straw in the same hand, parallel to each other (figure 5.44 a). 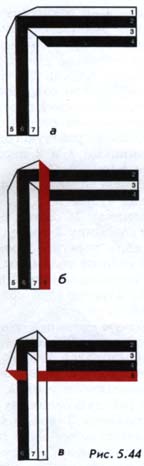
2. Working straw 1 fold under 90°. Lay straw on top of working 1 Solomin 2, 3 and 4 in parallel Solomin 7 (figure 5.44 b).
3. Working fold a straw 5 under a 90° angle. Twist working between straw 5 straws 6, 7 and 1 (it lies on top of Solomin 6 and 1 and will be held under culm 7). Put a straw 5 working in parallel Solomin 4 (figure 5.44).
Continue weaving by repeating steps 2 and 3. The pattern combines braids pictures braids "braid" and a simple weave.
Braid based on multifilament fishing line "rhombus" and "braid" (photo 86). 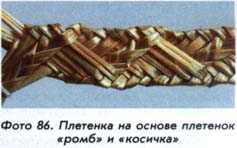
For weaving you will need a 9 long, thin straws of the first degree. Beginning weaving run as described for weaving "diamond" (figure 5.40 a—d).
1. Associate 9 Solomin in a flat beam. Follow steps 1-4 (page 188) for 1, 2, 3, 4 and 5 working Solomin. In the right hand, you should have two of the straw 6 and 7, the left hand is 7 Solomin (figure 5.45 a). 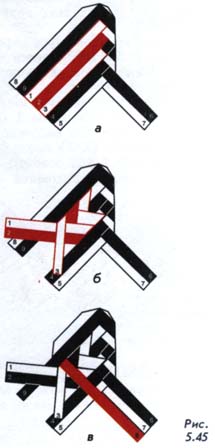
2. Of Solomin 1, 2 and 3 weave braided "pigtail" of 3 Solomin, making three proplyene workers Solomin, right and left (figure 5.45 b).
3. The straws that are in your left hand, continue weaving the "diamond". Refer to the description given on p. 188 (figure 5.45).
Continue weaving by repeating steps 1-3.
The resulting braid can be used in the manufacture of hats, baskets, straw decor sculpture.
The combined twist (photo 87). Netting is widespread in Western Europe, America and Australia. 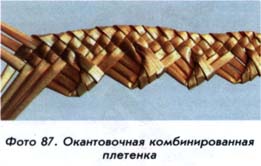
Pattern of weaving would be more clear if you use a thin straw from the 1st knee straw stem. The netting may be made of any number of straws starting with 5.
1. Take 7 long, thin straws of equal diameter and length. Tie them in a bundle. The straw was spread in right and left hand. In one hand (right) you will have 4 of the straw, and the second (left) — 3 of the straw. Hold all the straw in the same hand, parallel to each other (figure 5.46 a). 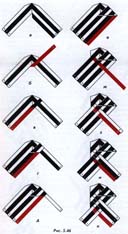
2. Working straw fold 4 under an angle of 90°. Lay straw on top of working 4 Solomin 3, 2 and 1 (figure 5.46 b).
3. Working from a straw 4 fold itself around the straw 1 (crest line will pass through the outer side of the straw 1). Lay working under a straw 4 straws 1, 2 and 3 in parallel Solomin 7 (figure 5.46).
4. Steps 4-6 will combine the sequence of actions described in step 2 and 3. Working straw 3 fold under 90° angle, lay on top of Solomin 2 and 1. Then bend the working straw 3 around the straw 1 (crest line passes on the outer side of the straw 1). Put working a straw 3 straws 1 and 2 parallel Solomin 4 (figure 5.46 d).
5. Working straw 2 fold under a 90° angle, lay on top of the straw 1. Then fold working around a straw 2 straw 1 (crest line passes on the outer side of the straw 1). Put a straw under working 2 culm 1, parallel Solomin 3 (figure 5.46 d).
6. Working straw 1 fold under an angle of 90° so as to form a corner. Then bend the working straw 1 formed around the area myself. Put a straw 1 working in parallel Solomin 2 (figure 5.46).
7. Working from a straw 5 fold under 90° angle. Then twist working between straw 5 straws 6, 7, 4 and 3 (it will be held under Solomin 6 and 4 and lie on top of Solomin 7, 3, 2 and 1) (figure 5.46 g).
8. Working from a straw 6 fold itself at an angle of 90°. Then twist the working straw 6 straws between 7, 4, 3 and 2 (it will be held under Solomin 7 and 3 and lie on top of straws 4, 2 and 1) (figure 5.46 b).
9. Working from a straw 7 fold under 90° angle. Then twist the working between the straw 7 straws 4, 3, 2 and 1 (it will be held under the straws 4 and 2 and lie on top of Solomin 3 and 1) (figure 5.46).
10. Working from a straw 4 fold itself at an angle of 90°. Then twist the working straw 4 straws 3, 2 and 1 (it will be held under the straws 1 and 3 and lie on top of the straw 2) (figure 5.46).
Continue weaving by repeating steps 2-10.
Try to do this weave by changing the direction of the bend working of the straw in steps 7-10. Replace the inflection with "myself", "yourself". Next, twist the working culm three nearest to it following the guide of the straw.
Braided line has a different textured pattern on the obverse and on the reverse side. To weave more dense, slightly pull it over the loose ends of straws, throwing them in different directions from the center. After netting tie the loose ends of straws together. Weave laminate with a rolling pin.
Try to combine several known tangles. You can combine netting with a smooth edge and weave with a textured edge.
Select your language