


")
Options a variety of nettings not been exhausted given samples. They show how on the basis of a few basic techniques of bending Solomin born an endless variety of braids. You can also master the following technology of weaving, to try to become developer of its own braided lines, changing the alternating twist Solomin, combining in one netting several is already known. Most importantly, do not be afraid to experiment.
All the weaving is represented by three major groups:
decorative elements;
flat braids;
voluminous braids.
Before we proceed to the development of practical skills of weaving, consider the terms and basic techniques of manipulation with the straws, which we will use in the development of diverse technological methods of weaving.
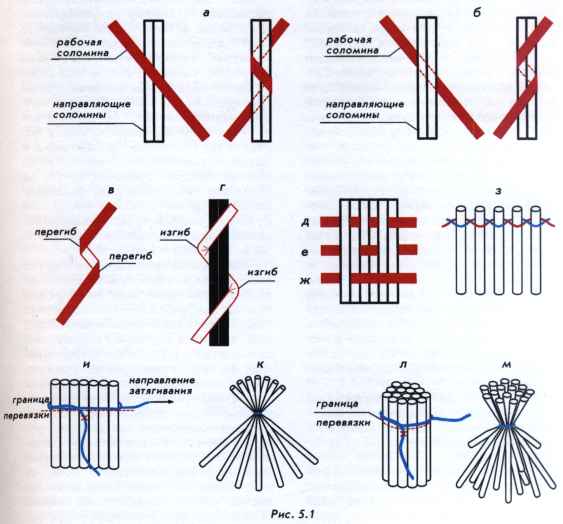
Working straw — straw, which is used for weaving.
Guides the straw — the straw that twist the working straw.
The front side of the netting (straw) — side facing to the master (visible).
The reverse side of the weaving (straw) — side facing away from the wizard (invisible).
Working straw placed on top of the rails, always lagging (figure 5.1 a).
Working straw, lying under the rails, always lagging itself (figure 5.1 b).
Bend the straw — working straw is bent to change the position, its front side becomes the back side and the back becomes the front. On the site of the kinks always form a corner with smooth sides (figure 5.1).
Bending straw — a working straw is bent to change the position, while its front side remains turned to the master. In place of curves formed a small arc with textured creases (figure 5.1 g).
Kinks and bends Solomin conducted in two directions relative to the guides by themselves to the reverse side of the weave, and to yourself, to the front side of the netting (figure 5.1 a, b).
Straw weaving is based on two main technological methods that apply to straw stalks and straw ribbons, is weaving and tying.
The rhythm and sequence of the weave set pattern and texture of the braids. In figure 5.1 d—f are examples of weaves: one straw (figure 5.1 d), two of the straw (figure 5.1 e), one above the other (figure 5.1 g). It is clear that these combinations can be many and the number of combinations of entanglements increases with the increase in the number of straws involved in weaving.
In the manufacture of small decorative items from straw and also with the decoration of sculptures using this technique as interweaving two straws thread or thin straw strips (figure 5.1 h) (this method can still be called obvineniem "rope"). In this method, each of Solomin is twisted with the two sides working thread or straw ribbons. Each of the threads has a path "through a straw", one of the strands wraps around a straw on the front side, and the second is that a straw bends around the back. At the intersections of the filaments, after diffraction of one of the straw before the next culm, the position of the upper and lower threads should be alternated. At each subsequent intersection of the thread lying on top becomes the bottom and Vice versa.
Variety of ways to weave the working culm guides, combined with her kinks or bends, is one of the main ways of the formation of tangles.
Linking is the only method used to connect the straw of straws in bundles in the manufacture of a variety of decorative elements and the implementation of the braids, when forming straw sculptures and the connection of its elements into a whole.
The straw in the beam should fit snugly to each other. When tying the string pulls the straw tubes, and in place of the beam waist formed by the thinning. Straw diverge from the place of ligation of the fan. The beams are divided into flat and round.
Flat tie beams, when a beam will be made of a variety of decorative elements having a flat shape. Flat beam more convenient when performing flat braids.
Round beams are used in the manufacture of bulk decorative elements, when performing multi-braided, as well as in sculpture.
In order to produce a flat beam, take the required number of straws, preferably not more than 6-7 (with a large number of straws would be difficult to hold). Put them in the same plane between the thumb and forefinger of the left hand (for right-handers) (figure 5.1). With your fingers push the straw along the border of the dressing. One end of the prepared thread, press your thumb to the straws (in the figure this is the place marked with a cross). The main part of the thread, which is located in the right hand, once round obviate all of the straw and then tighten bundle hold the straw with the fingers of the left hand in the same plane (the direction of tightening is shown by arrow). In the place of constriction of the straw flattened and held tightly next to each other. Next, grab the place of constriction of the fingers of the right hand, so to lock the thread in place. Tie both ends of thread in place of the beam waist with a double knot and trim them. On the site you can drop a little glue. The result is a fan-shaped beam, in which all the straw is located in the same plane (figure 5.1 K). If you need a flat beam from a large number of straws, for example, of the 12, divide them into several beams. Tie each bundle separately and then put it all together, the positioning in the same plane.
For the manufacture of a round beam, take the straw (they should be about about 14 for thin Solomin and 8 to 10 for thicker). Hold the beam along the stems, capturing the palm and fingers of the left hand. Thumb and forefinger are on the border line of the dressing (figure 5.1 l). One end of the prepared strings with the index finger press to the held the straws (in the figure this is the place marked with a cross). The main part of the thread, which is located in the right hand, once round obviate all of the straw and then tighten the beam (the direction of tightening is shown by arrow). When tightening all straw tubes have flattened, and the place of the tug to be as thin as possible, the free ends of straws when that fan out in all directions. Additionally tighten the thread end that is held with the left hand. Tie both ends of thread in place of the beam waist with a double knot and trim them. Secure the knot with a small drop of glue. The resulting bundle of straw will be placed the fan in different directions (figure 5.1 m).
These simple techniques are universal to all netting.