


")
The seam "forward needle" consists of a series of stitches and omissions. And the stitches and gaps between them are usually the same length. Stitches performed both from right to left and left to right. Attach the string to one edge of the fabric. Then do 1 stitch length 5-6 mm. For what grab the needle from 3 to 6 threads of the fabric. Withdraw the needle and thread to wrong side. Miss the same thread and pierce the needle with the working thread on the front side, pull the 2nd stitch. So do the other stitches. On the wrong side of the stitches should be the same length as the front. Stitch length can be different.
The seam "forward a needle" is used in the white surface in the contouring of a pattern. Here the stitches have to be long, 1-2 mm. in addition, this seam is used in computer embroidery. They can perform the whole pattern. The stitches are allowed to be placed in 2 rows (Fig. 1).
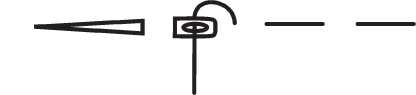
Figure 1. The seam "forward a needle"
Seam "back needle" looks like a continuous series of stitches. Make a stitch from right to left on the front side, then stitch on the reverse side. In front of the 2nd stitch on the front side of the thread put from left to right. Insert the needle into the end of the 1st stitch and pull on the front side just to the left of the 2nd stitch. Purl stitch happens 2 times longer than the front. All stitches must be of the same length (Fig. 2).
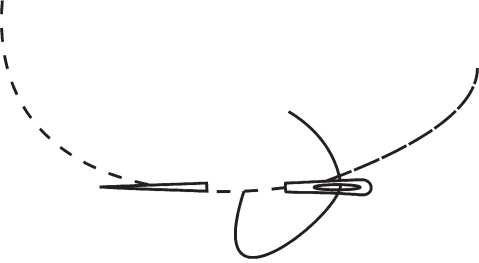
Figure 2. Seam "back needle"
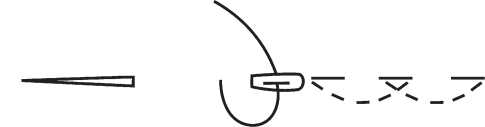
In a linen-like surface when performing motif of the "scattering" seam "back needle" is carried out differently. Run from right to left the 1st stitch, taking 5 threads. Next, pull the needle on the front side 10 of the threads of the fabric. Make the second stitch the same length as the 1st, in the direction from left to right. On the face of the seam is like the seam "forward a needle", only will be more convex (Fig. 3).
In the old days, the images were transferred using soap, aluminum, chalk, soaking. Light fabric rubbed the back aluminum spoon, after placing it under the fabric with embroidery. Dark fabrics were rubbed with chalk, soap, wax.