


")
Take a sheet of paper, equal in length to measure the length of the front to the waist plus 25-30 cm (75 cm) and a width equal to half the circumference of the hips plus 12-15 cm (66 cm).
1. The line of mid front and back. At a distance of 3 cm from the lateral edges of the paper draw a vertical line mid-front and back (figure 8).
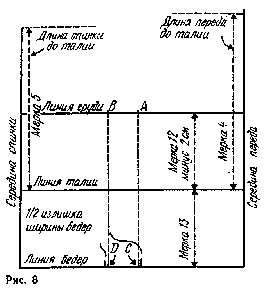
2. Line of the hips. At a distance of 5 cm from the bottom edge of the paper draw a horizontal line of the hips.
3. The waist line. Waist line guide parallel to the hip line at a distance equal measure 13 (20 cm).
4. The line of the chest. The Breasts is carried out parallel to the waist line above it at a distance equal to 12-measure minus 2 cm (22-2=20 cm ).
5. The width of the chest. The basic pattern must be a surface scan half of the figure subject to the allowance for freedom of movement.
Therefore, to measure the bust add 8 cm is the minimum necessary to clothing with set-in sleeves (96+8=104 cm ).
The resulting value is split in half, then in half again (52:2=26 cm ). To get the width of the front to medium in size, to the resulting value (26 cm ) add 2 cm (26+2=28 cm ), and to get the width of the back , subtract 2 cm (26-2=24 cm ).
Then in the drawing from the line of mid front put on the chest a large size (28 cm) and set point A. From the line mid-back put on the chest less (24 cm) and mark the point B.
The difference between the width of the front and back varies depending on physique. To determine this difference can be by measuring the width of the back or using the dependency below, which gives value added to the front and subtracted from the back on every quarter chest, see
Chest Stock chest Stock
80 1,5 110 2,5
95 2 125 3
6. The width of the hips. From points A and b slide down vertical dashed line to the intersection with the line of the hips and place the points C and D. Line AC and BD are drawn through points marking the width of the front and back. The sum of the lengths of these segments is less than the circumference of the hips. Therefore, the hips need to postpone additional cuts. The allowance on the line of the hips is 4 cm less allowance for freedom of movement at the chest.
To measure 3 add 4 cm (97+4=101 cm). Divide this amount in half, as the drawing back and the front is built for the half piece (101:2=50.5 cm). Compare this value with that which designates in the drawing the width of the front and back (52-50,5=1.5 cm). In the example, this gives a surplus equal to 1.5 cm. and subtract half of the values obtained (0.75 cm on each side) from the width of the front and back (see hatched areas at the points C and D) . If the width of the front and back less hip, the missing value add, starting from points C and D .
7. Length front to Tali and . Measure the length of the front to the waist 4 (46 cm) aside from the waist line up through the middle of the front. Through the top point of this line and swipe to the left horizontal dashed line, is approximately equal to 20 cm.
8. Back length to waist. Measure 5 put from the waist up through the middle of the backrest (42 cm) and using the resulting point swipe to the right horizontal dashed line, is approximately equal to 20 cm.
9. The middle of the tucks at the waist front. Before distribution of the excess width at the waist find the middle Darts on the front and the back (figure 9). While the top of the tuck pointing from the apex of the chest to the waist, use the measure 10 (the distance between the most protruding points of the chest). To do this, on the chest from the middle of the front set aside half of the 10 measurements (21:2=10.5 cm). Put a point R. From it, swipe down to the hip line, the vertical dashed line.
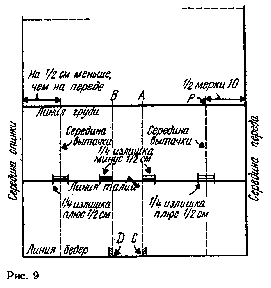
10. The middle of the Darts at the waist line of the back . On the chest from the middle of the back right put the cut, used when finding the middle of the tuck at the waist line of the front, minus 0.5 inch back width less than the width of the front (10,5-0,5=10 cm). Just like before, draw a vertical dashed line.
11. The line width of the waist. To determine the drawing of the line width of the waist to measure the waist circumference of 2 add allowance for free customized fit (68+3=71 cm). The resulting value is split in half because the drawing is based on half of the bodice (71:2=35.5 cm ).
Subtract the resulting value from the sum of the widths of the front and back of the chest and get the solution tucks in. and waist (52-35,5=16.5 cm ). This quantity spread on the two side Darts on the front and the back. Solution tucks distributed differently for different shapes. There is no infallible way of its distribution by measuring the figure. More precisely only the position of the Darts can be determined by fitting.
Method approximate the distribution of Darts on the drawing with some features of a Constitution the following: divide the value of the solution tucks at the waist line into four parts (16,5:4=4.1 cm, for simplicity we take 4 cm ). For tucks in the lateral slices from the value take 0.5 cm (4-0,5=3.5 cm) and transfer this value to the line of the waist to the right from the line side of the slice forehand and the left from the line side of the cut backs.
To construct the Darts at the back and the front waist to the resulting value add 0,5 cm (4+0,5=4,5). Transfer this value to the drawing, distributing it equally to the right and to the left of the lines means the Darts at the waist line. The proposed method of distribution value of the solution tucks at the waist used for shapes medium size model physique.
The value of the solution tucks irregular and varies in accordance with the posture of a person. However, for shapes with a normal posture and a sunken tummy tuck at the waist on the front increases, and on the back at the same save (5 cm front and 4 cm for the back); for pereghibati figures with a slightly protruding stomach, increase the Darts at the back by reducing the tucks on the front; for the pieces with mild reduce waist Darts in the front 1 cm (4.5-1=3.5 cm ) and as increase their on the back is (4.5+1=5.5 cm ).
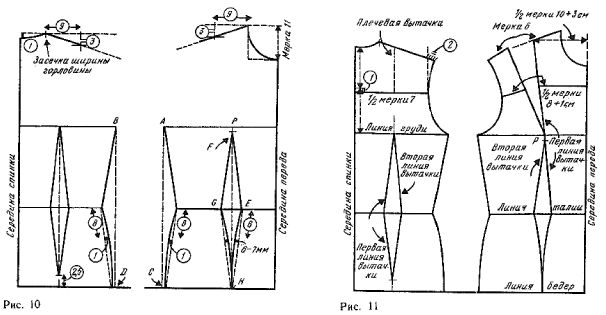
12. The lines of the side sections. For building lines of the side sections (figure 10) connect the points A and b with the ends of the line natural waist a solid straight, then the ends of the waist line connect with the ends of the hip line straight dashed lines. Down from the waist line at the dashed lines put lengths of 8 cm and from the points ostavite perpendiculars length of 1 cm from the waist line and swipe through these points slightly convex line to the intersection with the line of the hips. For some shapes the line of the side cut may be too convex*.
13. Darts at the waist line of the back. To construct the Darts at the waist line of the back of the point marking the value of the solution tucks, connect with the point of intersection of the chest line and the line of mid-tuck. The bottom contour tuck carried out, positioning the top of her mortar 2.5 cm above the hip line.
14. Tuck at the waist line of the front bodice. To construct the Darts at the waist on the front bodice from point R down put a segment of length 1.5 cm and mark the point F. This point connect points E and G on the waist line , marking the value of the solution tucks. Distance PF save for the figure with a slim waist and respectively increase (2.5 cm) for the figure with a slightly marked waist.
15 Tuck in the waist before the skirt. To construct the Darts at the waist front skirt connect points E and G with the H-point on the hip line straight dashed lines . To hold the convex tuck line , put 8 cm from the waist line downwards, then to 0.6—0.7 cm on the perpendicular, restored from the points.
In our example, the value of the solution tucks at the waist on the front is quite large (4.5 cm ). Usually the average depth of this tuck is 3-3,5 cm
16. The curved neckline of the back. Width of the neck backless approximately 6 cm This value differs slightly in products of two adjacent sizes. For products of small size this value is reduced, the large size increase 0.5 cm
Short vertical dash mark the width of the neck on the horizontal bar (6 cm). Marked point connect smooth curved line to a point located on the line of the middle of the back 1 cm below the horizontal dashed lines (figure 1 in the circle).
17. The curved neckline of the front. To build the neckline of the front, starting from the horizontal bar at the top right, put through the middle of the front measure 11, which indicate the depth of the neck (8.5 cm ). Through the point obtained draw a horizontal dashed line. These two horizontal lines, place the cut equal to the width of the neck (6.5 cm), and connect the resulting points by a dashed line. Mouth width of the front is 0.5 cm more than the width of the neck backless, in products for figures, having a bust more than 100 cm.
Draw the neckline, as shown in figure 10, i.e. swipe down the vertical line with a length of 3-4 cm, and then a smooth curve to the intersection with a line mid-front.
18. The slope of the shoulder cut. The slope of the shoulder varies among different figures, and it is impossible to determine in any dimension. The line of the shoulder cut is usually carried out based on the theoretical data.
The horizontal dashed lines front and back from the points defining the width of the neck, put in 9 see Through the resulting points swipe down vertical lines with a length of 3 cm of the ends of the mark the horizontal lines. The points defining the width of the neck, connect the obtained points of inclined straight.
19. The width of the back. On line the middle of the back midway between the lines of the chest and neck, draw a horizontal line and 1 cm below it is a horizontal line the width of the backrest (figure 11).
Put on of a line drawn half measurements 7 (36:2=18 cm ).
20. The line of the shoulder cut of the back. From the point that defines the width of the backrest, slide up the vertical dashed line. The line indicates the slope of the shoulder cut, put right 2 cm from this dashed line.
Verify the width of the shoulder cut: it must be made 6 plus 1 cm (at least). If the obtained value exceeds the scoop 6 plus 1 cm, then the back has a slight slouch. If the value obtained is insufficient, check whether the determined width of the back. Maybe you should extend the back, and thereby increase the length of the shoulder sections. If back width is large, as in our example, this means that the blades do not protrude and the shoulders back, as the dummy model shapes (for example, one should draw a line shoulder length equal to 15 cm; (14+1=15 cm).
21. Line of the armhole of the back. Draw a line to the armhole of the back, as shown in figure 11, i.e., a smooth line connecting the bottom point of the shoulder cut, the endpoint of the width of the back, and the upper point of the side cut.
For people with full hands should increase the curved lines to the end of the armhole. For people with broad shoulders and a slight fullness in the chest curve of the armhole should slightly reduce.
22. The line width of the breast. Draw a line the width of the breast, positioning it at a distance equal to 1/3 of the segment between the base of the neck and the bust line; guide line to the intersection with a line mid-front.
23. The first line of upper tuck*. Top tuck takes you through the most projecting point of the breast R and is directed usually from the shoulder cut. In this case, coupling it with a tuck at the waist line, get the line of classical topography.
Put the horizontal dashed line starting from the middle of the front half of the measurements 10 plus 3 cm (10,5+3=13.5 cm). Draw the first line of upper tuck, connecting the point R and the point of intersection of the line of the shoulder cut with a horizontal dashed line.
If the length of the shoulder slice small, then the first line of the tuck, you can move to it was not located close to the armhole.
24. A solution of (depth) tuck top. Solution tuck cannot be determined by measurement on a figure or a simple proportional calculation using any measurements. This value is accepted on the basis of the respective girths of the chest, below see
On continuation of the line of the shoulder cut put from the first line of the tuck required amount of solution (8.5 cm ). The resulting point connect straight to the point R.
For shapes with different body type solution tuck different. It depends on the position of the shoulders (deviated forward or backward) and to a lesser extent from the volume of the breast. The solution is verified during the fitting.
If the shoulders are sloped back, the chest protrudes forward, it is necessary to increase the solution Darts at 1-2 cm.
This can be done before fitting. If, on the contrary, the shoulders are tilted forward, and the width of the chest is small, you should reduce the solution tuck 1-2 cm and update it during the fitting.
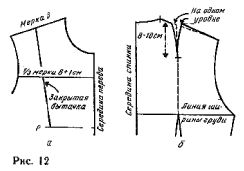
25. The line of the shoulder cut and the width of the chest. To get the correct line of the shoulder cut and the exact width of the breast, it is necessary to close the top tuck on the paper. To do this, fold the drawing in the first line of the tuck. Close the tuck, placing the first line with well marked fold on the second and kill it, and to keep the received shape. Closing tuck, will continue the line of the shoulder cut in the direction away from the neck and mark on it a segment equal measure 6 (14 cm ). The upper part of the bodice is closed with a tuck is shown in figure 12, and.
Continue the line width of the breast in the direction of the middle of the front, put on it half measurements 8 plus 1 cm (34:2+1 = 17+1 = 18 cm). Measure 8 increase by 1 cm because the tape in the withdrawal of the measurements is taut and it doesn't account for the depression in the upper part of the chest.
Cleave tuck and put the drawing, as shown in figure 11.
26. Line of the armhole of the front. Compare the shape of the lines front and back: the line of the armhole of the front is more curved, which ensures free movement of the hand; the line of the armhole of the back is more smooth, which creates additional width of the back, contributing to the movement of the hand forward.
The line of openings of the front guide, as shown in figure 12, and from the shoulder cut to the line width of the chest of the front it is almost parallel to the line of the tuck, then, curving, connected with a line the depth of the armhole (see figure 11).
If the line of the openings has an excessive curvature of the line of the shoulder cut to the line width of the breast should slightly increase the width of the chest. Obviously, when removing the measurements was an inaccuracy.
If the curvature of the line of openings above the line of the chest is smaller than usual, it is necessary to increase the curvature of the line of openings, thereby shortening the line width of the breast.
27. The shoulder dart of the back. The excess fabric at the shoulder cut of the back spread into a small landing or take away, to tuck to the length of the shoulder cut was consistent with the standards of shoulder length. To do this measure the line of the shoulder cut of the back and determine whether it is more measurements, taken with the figures (15-14=1 cm ).
From the end of tuck at the waist swipe up dashed vertical line to its intersection with the line of the shoulder cut (figure 12, b )
The line of the shoulder cut at both sides of the vertical dashed lines set the value of the solution tucks (1 cm ). Then connect the resulting points slightly curved lines with the dot on the dashed vertical at a distance of 8-10 cm from the line of the shoulder cut. The length of the tuck depends on its depth.
If the blades have a significant bulge, the depth of the tucks should be increased to 23 cm.
28. Corrects the angle of the shoulder cut of the back. Continue up the second line tuck to the level of the first line. Through the point obtained draw a new line of the shoulder cut.
You can then take the drawing of basic patterns built. This drawing should be kept uncut. Further drawings of the selected models should be performed on copies of the basic patterns.
Do not make any markings on the base template, with the exception of the drop-down list. In the individual production of clothing these measurements will allow you to control subsequently, a possible change in shape. If re-shot measurements will differ by more than 4 cm, should be re-build drawing basic patterns.
* Numbers 8 and 1 are used to construct the line side of the slice, the figure circled. This method will identify all regular figures. The numbers not circled are subject to change. * We agree to call the first line of the tuck line, located closer to the middle of the back or the front