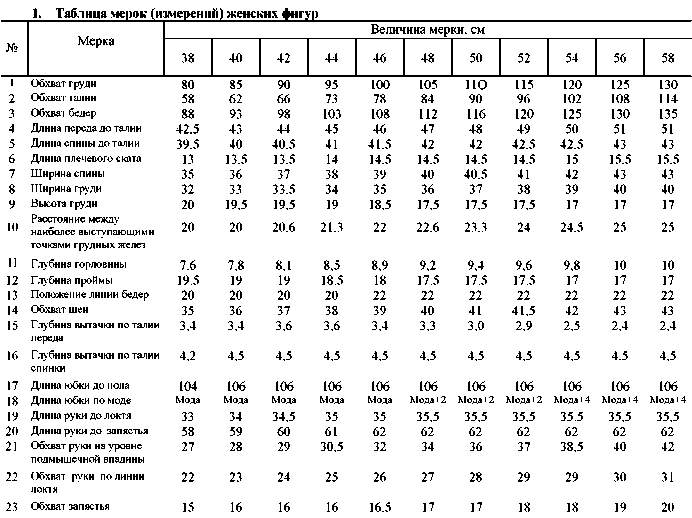
2. Front length to waist. The lengths of the front waist, specified in the table of standards obtained during the measurement of the dummy, add 0.5 cm to compensate for the decrease in the length of the front, caused by shoulder seams. When you build the basic patterns it was not included as a pattern for custom-made clothing thorough after fitting, in addition, it simplifies the construction of the drawing.
3. Back length to waist. Measure length to the waistline shoot in a variety of ways. The inaccuracy of the measurements detected during the fitting, due to the complicated shape of the human back. The visible indentation between the shoulder blades causes the need to remove the measurements with consideration of protrusion of the blades.
The most accurate method of taking measurements of the length of the back to waist is shown in figure 4, however, most often this measure off the middle of his back along the spine (this measurement are shown in table. 1 ).

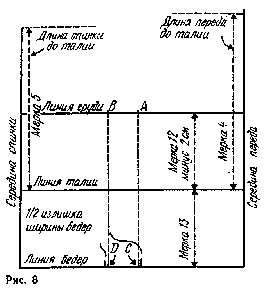
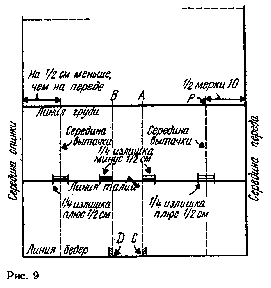
To draw a line limiting the length of the back bodice (see figure 8), we must add to the value of the 5 measurements given in table. 1, 1 cm (to strengthen neck backless ) and 0.5 cm (to compensate for the length from the shoulder seams). For example, the products 44 the size of the cut obtained at the pattern from waist line to the horizontal dashed line (see figure 9 ) , is 41+1+0,5=42,5 cm


4. The width of the chest. Merc, are given in table. 1 indicates the measurements taken with the figure.
5. The circumference of the neck. Scoop neck girth specified in the table.1, can be used when you audit a drawing, but be aware that it is also taken into account in the manufacture of detachable collars.
6. Tuck in the side. The difference between hip and waist girth, according to the amount of solutions, with front and rear Darts at the waist line divide it into four equal parts and the obtained segments move from the lines sections of the front and back.
7. The shoulder dart of the back. When the chest girth of 100 cm or more, it is advisable to partially move the shoulder dart into the neck, creating a small tuck there with a length of 5-6 cm Depth of this tuck should be equal to about 0.4 cm for the figure with a chest girth of 100 cm, and 0.7 cm for the figure with a bust that is equal to 125 cm
8. The slope of the shoulder cut. When constructing the line of the shoulder cut in the products of mass production can occur in two positions: a product tailored to the figure with high shoulders, provides most people the greatest comfort and gives the possibility of adjusting the product by lowering the shoulder lines and armholes. At the same time on the back of this product, put on a shape with a low shoulder, formed a slight slant creases. Conversely, a product tailored to the figure with low shoulders, provides a more correct position of shelves (the balance of the product), but formed a small transverse creases in the upper part of the back.
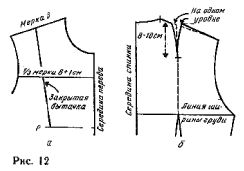
In mass production of clothing made to sacrifice comfort for appearance. Therefore, make the following amendments: manufacture standard base curve with a slope of shoulder of the cut mentioned above. Close the top tuck and slide a new line of shoulder cut from the neck to the shoulder, lowering it to 1 cm below the previously obtained points at the openings. From the top end of the second line shoulder tuck guide drawing a line, dropping it at the armhole 0.5 cm below the previously scribed line. For clothes large size, the change must be less significant : for goods on the shape with the bust, equal to 105 cm or more, about 0.8 cm on the front and 0.3 cm on the back.
9. The position of the point R. in the production of drawings of models, designed for girls and Teens, use the same basis as for women, only move the point R 1.5-2 cm higher than the base curve. After the new line of tuck, close it and check the line of the shoulder cut (see figure 12).


