


")
The beginning of the loop, i.e., the angle which should be the button position accurately on the line of mid front on the right side. When clothes buttoned, both lines of the middle of the front overlap with one another.
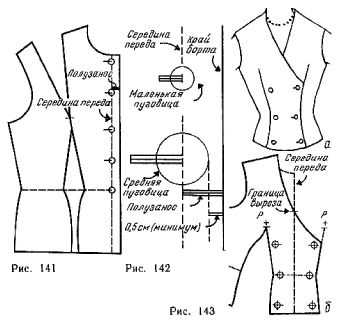
To construct the fastener, first determine the size of the button. Then mark the location of the buttons at equal distance from each other and guide a small horizontal line intersecting with the line of mid front (figure 141).
To create the impression of a higher chest, a button located on the chest, lower the bit below.
To determine the width of polutanata (distance from the line of mid front to the edge of the Board) need to take into account the following minimum values, see: for blouses — 1,5; for skirts and dresses, buttoned to the bottom, — 2; for classic jacket — 1,5; for a summer coat — 2; coat of heavy fabrics and 2.5. The width of polutanata case of medium and large buttons should be half the width of the buttons plus 0.5 cm (figure 142). Some buttons require polutanata exceeding the minimum width.
Draw a line the edge of the Board parallel to the line of mid front. When cutting the fabric draw a line mid-front and the horizontal lines indicating the position of the buttons on one shelf, and hinges on the other. This will help you when fitting.
The first button is usually placed at an equal distance from the edge of the Board and neckline. But it can be placed closer to the neck than to the Board, leaving at least 0.5 cm to the edge of the buttons.
Products with the displaced onboard fastener, shown in figure 143, and to have a greater width polutanata than products with the Central onboard fastener.
Prepare the mold, translating the top tuck in tuck at the waist and on the right leaving enough paper to build a side. Fold the pattern along the line of mid front and draw the first line tuck in the seam allowance, left to the right (figure 143, b). Identify on the figure the depth of the neckline and the distance from point R to the edge of the Board. Transfer these measurements to the pattern and swipe slightly concave line of the neck, as shown in figure 143, b (curvature necessary if you want to get a deep neckline in clothing with a wide polutanata).
Along the side mark the location of the buttons, placing them at the desired distance from the edge of the Board. Pro - lead small horizontal lines at an equal distance from each other. On one of these lines indicate the center buttons in a vertical line and then mark the same distance from the edge of the Board on each horizontal line. Move the marker locations of the buttons on the other side of the shelves.