


")
mirror — involved in building one plane of symmetry (figure 4.35 a, b, g).
turn — the composition of the outlet is based on the rotation of the ornamental element around the axis of symmetry (figure 4.35 b);
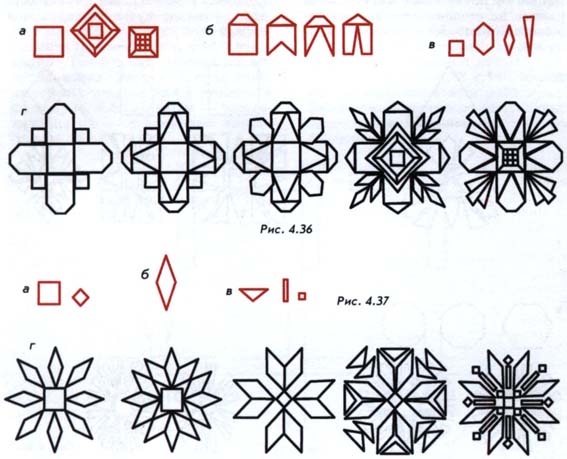
mixed — participate in the construction of both the axis and the plane of symmetry (figure 4.36).
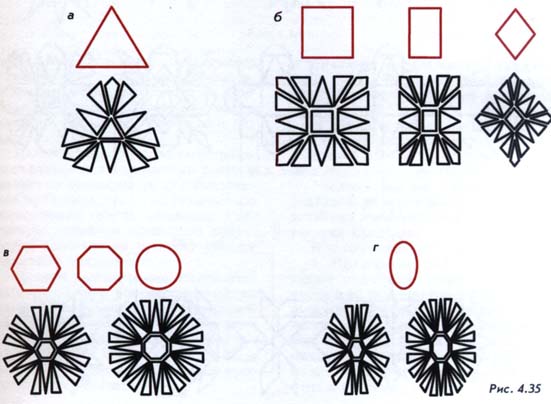
Outlet from the standpoint of composite construction can have different degrees of complexity of the composition. The most simple cross — shaped form. The complexity of the composition of the rosette is due to the increase in the number of elements and complicating the rhythm of their rotation.
Outlet proportioned to the surface which they decorate. They can act as independent decorative elements, decorating a small area of the surface, for example a postcard or a small box, and also to be a motive or element in a complex ornamental or subject compositions.
The composition of the outlets may think the author randomly or be the result of the stylization of the natural plants. In this section, we consider examples of outlets that are not tied to a specific natural forms. When creating their compositions are guided by the following scheme:
determine the shape of a rosette, the center of symmetry or the number of axes of symmetry;
think of the basic elements that enter into its composition;
complete the composition of the outlet, if it is necessary according to the plan, additional elements.
The outlet is a small composition, when working which are guided by the following principles:
1) proportionality of elements (the basic structure of the composition form the major elements are complementary small);
2) keeping up with the rhythm of the pattern and background;
3) optimal number of elements (1-3).
The shape of outlets can be set to any geometric shape having one or more axes of symmetry. In all the figures the outlet is composed of the same elements. Changing form, which in our examples is given by form the Central element, to change the character of our outlets and their perception. Some look static (square and rectangular rosettes figure 4.35 b), other gain momentum (rhombic and oval medallions in figure 4.35 b, g) is one of the ways to obtain infinite variety of compositions outlets on the basis of one and the same element.
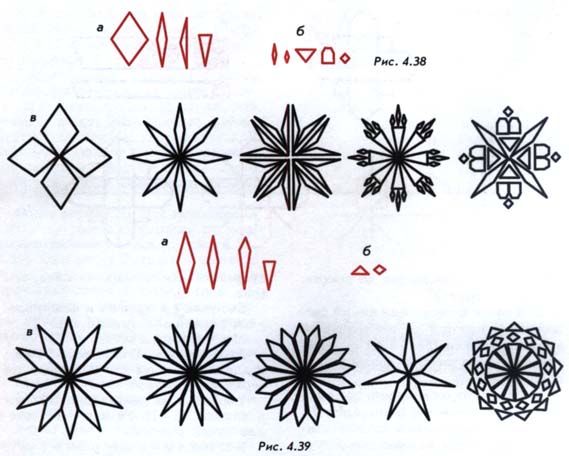
There are other ways to the development of compositions outlets. In figures 4.36—4.39 shows a series of sockets designed on the principle complications of the initial composition. Any of the elements may be complicated, is represented as a combination of several elements. In the examples given in the sockets, the composition of which is developed on the basis of the Central element and without it.
The presence or absence of Central element in the composition of the outlet affects not only their artistic interpretation, but also on the technology of execution of the element. Having considered the basic principles of the composition development of the sockets, pay attention to technology.
We begin the manufacturing process with sockets that have a Central element. The Central element (triangle, square, polygon) is formative for all sockets (figure 4.35— 4.37). It determines the position of all other elements.
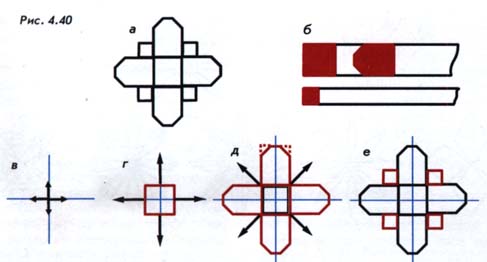
Socket with four rays (figure 4.40). The formative element of the socket is the Central square.
Materials:
1 straw tape with a width of 10 mm and a length of 15-18 cm for the manufacture of middle and rays of the sockets;
1 straw tape width of 5 mm and a length of at least 4-5 cm for the manufacture of supplementing the composition of the rosette squares.
Execution of the work.
1. Run the markup which defines the position of the sockets on the plane and its dimensions (figure 4.40). To perform the outlet enough to spend two mutually perpendicular lines. From the point of their intersection set aside along the lines of distances corresponding to half the height and width of the socket — 15 mm (beam size and half the height of the middle of the square).
2. At the point of intersection of the lines, place the square — Central element of the socket (figure 4.40 d), cutting it from straw ribbon with a width of 10 mm.
3. Along the sides of the square, place the rays of the rosettes (figure 4.40 d). The rays run from the same straw ribbon, and square.
4. Cut off the same small right-angled triangles from the upper corners of the beams (figure 4.40 d).
5. Between the beams according to the drawing place small squares (figure 4.40 e).
Socket with 8 rays and a Central element (figure 4.41).
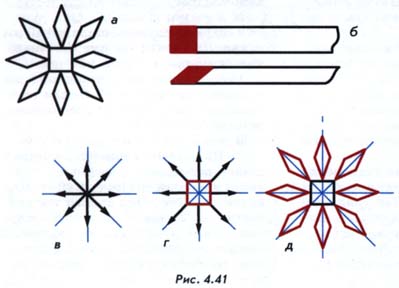
Materials: 1 straw tape with a width of 10 mm and a length of 3-4 cm for the manufacture of the middle of the outlet;
1 straw tape width of 6 mm and a length of 15-18 cm for the manufacture of beams of the socket.
Execution of the work. 1. Perform the layout on the plane (figure 4.41). To do this, swipe perpendicular to each other vertical and horizontal lines. At the point of intersection construct two perpendicular lines at an angle of 45° to the first two perpendicular lines. Along each line from the center put the distance of 15 mm, which corresponds to half the size of the outlet.
2. At the point of intersection of the lines, place the first element of the outlet — box (figure 4.41 d), which is cut from a tape with a width of 10 mm.
3. In the direction of the arrows along the lines, place the rhomboids (figure 4.41 d), which are cut off from the tape width of 6 mm.
These examples will help you to perform outlets that have a similar composition. The Central element may be replaced by any other element of a geometrical shape having the axis of symmetry. In accordance with the shape of the Central element will be to change the markup.
More difficult to perform are outlets that do not have a Central element (figure 4.38, 4.39). They can be of two types: a separately spaced beams and adjacent beams.
Socket with separately spaced rays (figure 4.42). Technology run outlets close to the technology of outlets with the Central element.
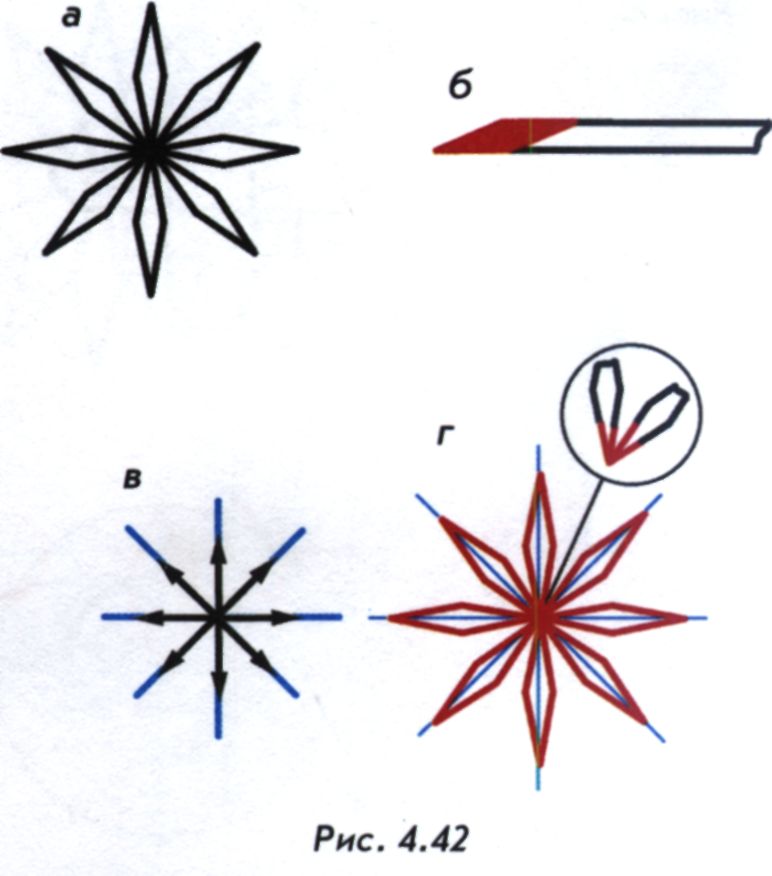
Materials:
1 straw tape width of 4 mm and a length of 18-20 cm;
wooden base, lacquer, brush, knife, pot, pencil, compass, ruler.
Execution of the work.
1. Workable layout (figure 4.42 b). To do this, build two pairs of mutually orthogonal lines at an angle of 45° to each other. If necessary, lines to mark with points the size of the diamonds.
2. Along the lines of position the elements of the outlet, cutting off them from a straw tape (figure 4.42 d). The items should exactly meet on the plane, converging at the point of intersection corners. Between the contacting parts of the diamond should not be gaps, they also don't have to find each other. With experience performing outlets will be sufficient to determine the position of the two perpendicular lines and to place all the beams.
Socket with adjacent rays (figure 4.43).
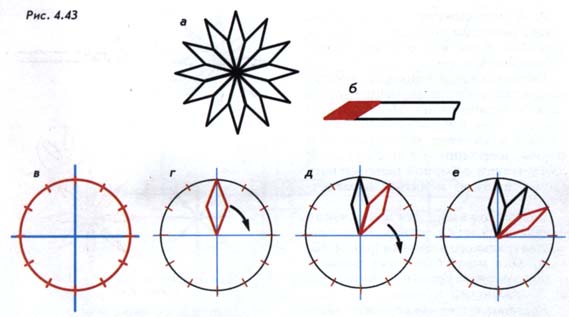
Materials:
1 straw tape width of 7 mm and a length of 18-20 cm;
wooden base, lacquer, brush, knife, pot, pencil, compass, ruler.
Execution of the work.
1. Build on the surface of two mutually perpendicular line from the center of their intersection slide compass a circle with a radius of 15 mm (figure 4.43). Divide the circle into 12 equal arcs (number of arcs corresponds to the number of rays of the sockets). The size of one arc is equal to 360°/ n, where n is the number of rays in the socket. For our example, the size of each arc is equal to 30° (360° / 12 = 30°).
2. Diamonds start to stick on the surface of one of the lines, combining with it one of the diagonals of a rhombus (figure 4.43 d). The acute angle of the rhombus is equal to 30° and corresponds to the magnitude of one arc.
Keep paste diamonds (figure 4.43 d, e). Each subsequent diamond touches the side without prior clearance. The external vertices of the rhombuses are in the cue points of a circle.