


")
Often decorated with geometric applique frames, chests, toys. The narrow elongated surface of the frame along the edge of the box, at its side surfaces harmoniously and naturally looked ornamental compositions, which were obtained by repetition of a single element or a small motif. Simple ornaments recruited folk artists of the past from the most simple geometric elements, became the basis for an amazing ornamental compositions born of imagination of modern masters.
Ornament is the most common form of decoration in the application. The main feature is its subordination to the form and purpose of the product. Ornament is involved in the creation of the artistic image of the product. Consider how the various elements are sets of simple and complex designs.
First will be considered ornamental compositions in the form of simple single-chain (figure 4.14), then more complex two and three-tiered chain, hereinafter — the borders, the intricate ornamental elements in the form of rosettes and educated on the basis of their borders with rosettes. 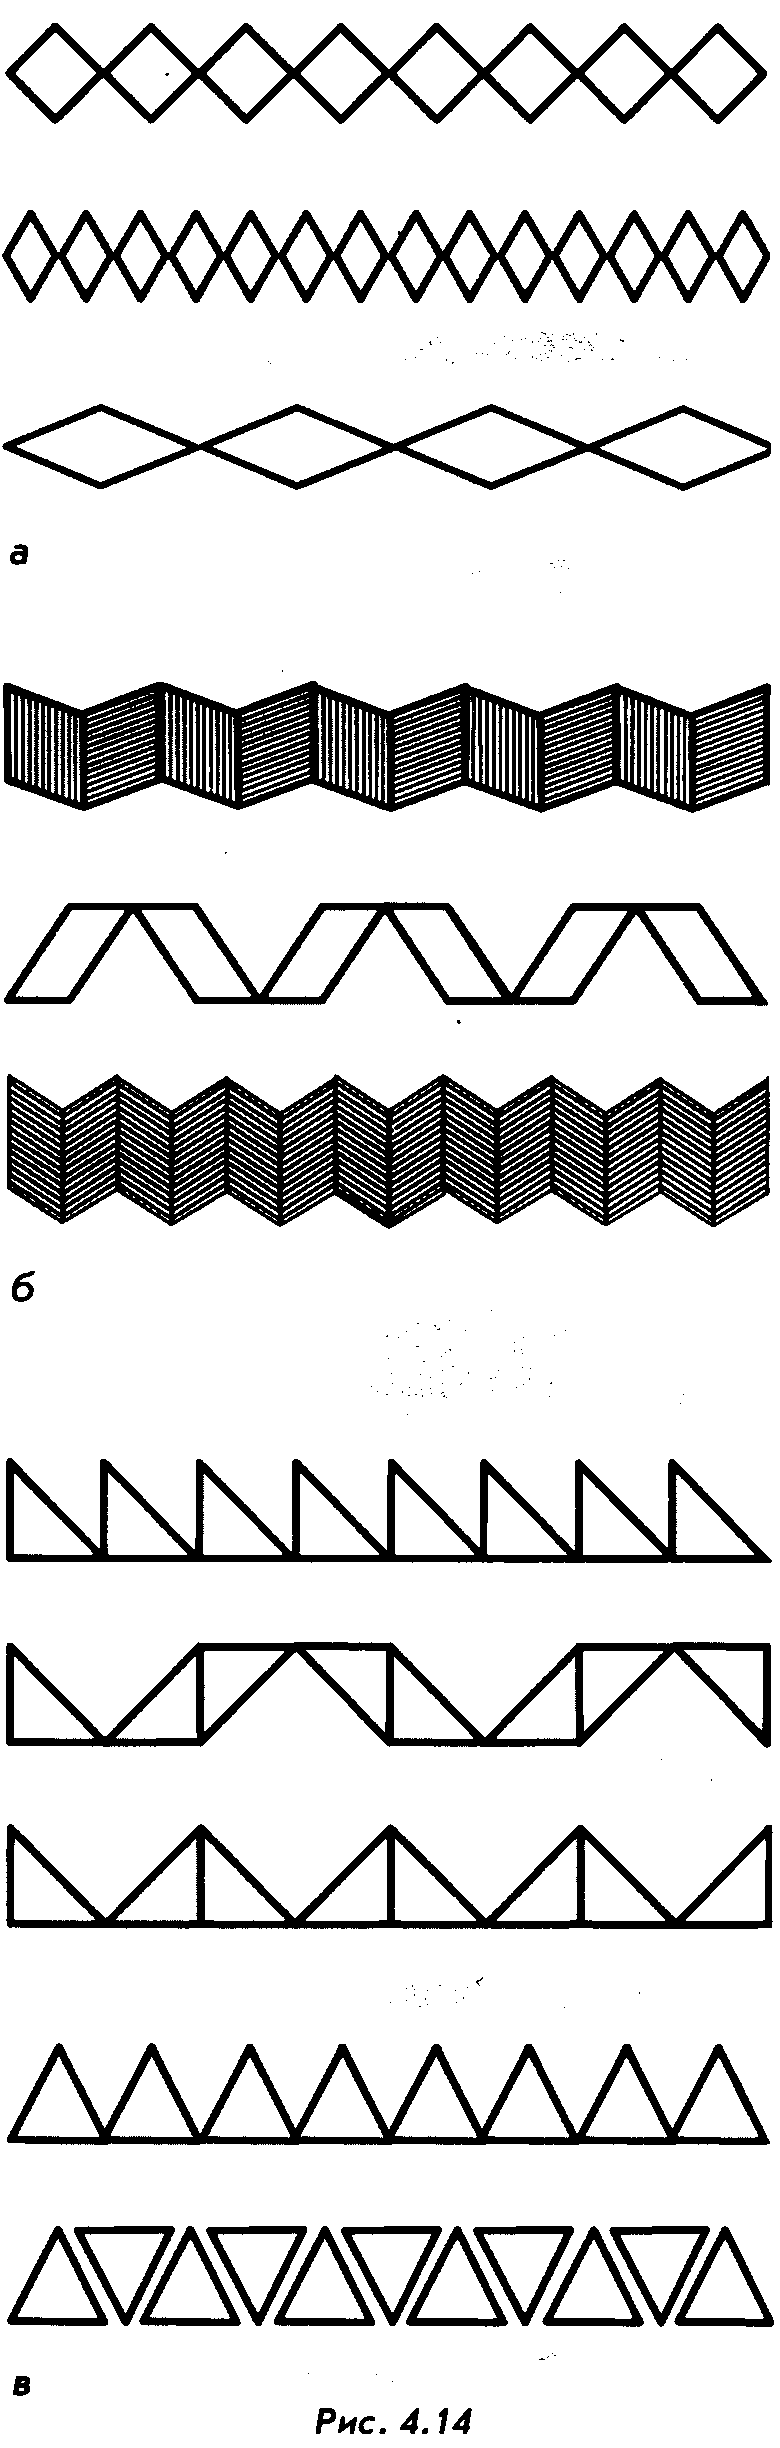
The basis of a simple chain is one geometric feature that has a rhythmic repetition. The figures shows the variations of simple chains which you can get if you use only three geometric shapes: the rhombus (figure 4.14 a), parallelogram (figure 4.14 b), triangle (figure 4.14 b). Changing the proportions of figures, their orientation on the plane or direction of the straw fibers of the tape can be achieved even in such simple ornaments a great variety of compositions.
Before you begin any of the chains, it is necessary to conduct several preparatory operations.
1. Select the source item from which to execute the chain.
2. On the prepared and primed surface on the main lines, which will serve as guides for the chain:
the line defining the middle of the ornament (for symmetrical ornaments);
line limiting the size of the ornament in width.
Lines it is best to plan in pencil, so after use they can be easily removed. The length of lines determine in advance. If you are performing a training sample, the length of your future chain must allow the well to reinforce the skills of cutting, joining and gluing of the elements. Handy is a length of 10-15 cm
If for fastening of the necessary skills you'll need additional training, repeat the chain until you feel confident in their movements.
The distance between the guides along which the chain is laid out, and their number depends on the complexity of the ornament, part sizes, and your skill.
Since the linear patterns are likely to be part of the composition located on the perimeter of the product, and laid out along the edge, you must strictly adhere to the rules: begin and end ornamental strip have the same elements.
All ornamental strip begin to give from the centerline, developing the composition evenly to the right and to the left, if necessary, up and down. If the spread pattern has complex elements, the centerline additionally, lines or dots, mark the middle of each element. Additional lines are required and in case of implementation of multi-tiered ornament.
As you acquire experience you will be able to be more free to choose elements, think of them yourself.
The first examples of simple chains which we will consider will be chains on the basis of the right of quadrilaterals: squares, rhombuses and parallelograms (figure 4.14 a, b). Chain based on the square. Figure 4.15 given a sequence of simple chains on the basis of a square.
Materials:
5-6 straw ribbons of the same color with a width of 5 mm and a length of 15-18 cm For one monochrome stripes ornament color straw ribbon is identical;
wooden or plywood blank on which you will run your samples. Experience shows that the optimal size is close to A4 (about 20x30 cm). On the surface of the workpiece can be placed the required number of samples that will serve you a small tutorial in the future. Wood surface must be sanded, tinted primer and varnish (see Primers and varnishes). 
Execution of the work.
1. With pencil and ruler on the prepared surface guiding lines mark the position of the future of the chain (figure 4.15 a). Draw lines that mark the middle of the ornamental strip, its upper and lower boundaries (the length of all lines is the same and is 15 cm). Square elements we have so that their diagonals were located vertically and horizontally, conventionally, such a position will call "on the edge".
Stick the squares start from the indicated Central axis. Place on a wooden surface where to stick the square, brush varnish or white glue.
3. Attach a straw tape (figure 4.15 b). Make sure that the vertical axis of the square coincides with the perpendicular, and the horizontal from a middle line marking the upper and lower corners of a square must be on the boundary lines (figure 4.15 b).
4. Cut a square of tape, positioning the cutter at a right angle to its longitudinal edge. After square took his seat on the plane, gently smooth it to the surface with a pen knife. Further, all actions you need to repeat from step 2. Follow the chain to the right and to the left from the first element to the end of the marking lines.
Connecting elements with each other make sure that the corners of the individual elements is not found of one another and have no gaps: they should just touch, just touching each other (figure 4.15 g). Do not change randomly the orientation of the straw tape. We mentioned above how the orientation of the fibers of the straw on the plane affects the color nuances of the compositions. If you allow negligence and randomly change the direction of the fibers in the individual elements, the chain will have color "failures".
If you first made a thread quite similar to examples by the masters, practice several times, after repeating the markup. In the future, when your hands and eyes will acquire the necessary skills, you can simplify the markup, marking only the middle line and the center of the chain. If you are performing multiple samples of the same chain, you can introduce elements of another color (having prepared in advance a straw ribbon of a different color). Such a small change will create a new colour in your sample, will change his artistic perception.
Chain based on the rhombus (figure 4.16). 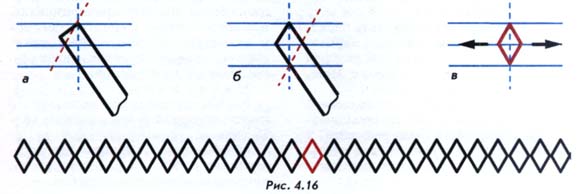
Materials:
5-6 straw ribbons of the same color with a width of 5 mm, a length of 15-18 cm;
processed and toned wooden base, lacquer, solvent, brush, pencil, ruler.
Execution of the work.
Largely this chain repeats the example above.
1. Follow the layout of the medial and boundary lines, and perpendicular to them the line denoting the middle of the chain (figure 4.16 a).
2. To obtain an element in the form of a rhombus, straw ribbon trim edge at an angle less than 90° (figure 4.16 a).
The elements of the chain begins to spread from the perpendicular, which refers to the markup the middle of the chain. The vertical axis of the element will align with the perpendicular, horizontal — median markup (figure 4.16 b). Cuts that run a cutter on the tape must be parallel to each other.
4. The chain continue to spread right and left of the middle element (figure 4.16 b).
Chain "zigzag" (figure 4.17). If you change the position of the diamond on the plane, you can get the chain a zigzag shape. The main element of the chain, as in the previous case, is a diamond. 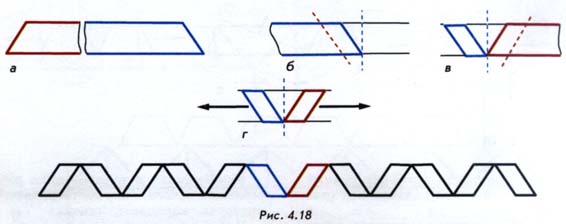
Materials:
8-10 straw ribbons of the same color width 6 mm, length 15— 18 cm.
processed and toned wooden base, lacquer, solvent, brush, pencil, ruler.
Execution of the work.
1. Make the marking lines on the surface.
2. For convenience of work with the angle cut right and left ends of the straw tape (figure 4.18 a).
3. Following the figure, parallelograms, which have a slope to the left, cut in from the right end of the tape; the parallelograms, with a tilt to the right, cut in from the left end (figure 4.18 b). Chain, as well as V. previous cases, develop from the Central perpendicular right and to the left the entire length of the layout (figure 4.18 d). Chain "zigzag" based on the parallelogram (2nd option) (figure 4.19). If you change the position of the parallelograms on the plane and will put them, having one pair of sides vertical, get a chain similar to the chain shown in figure 4.17. 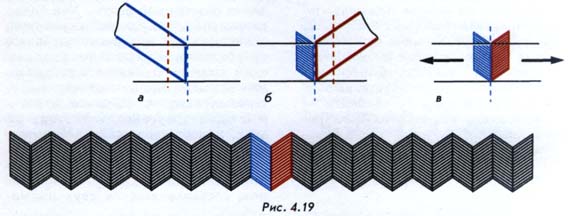 Execution of the work.
1. Follow the layout surface.
2. Prepare the ends of the straw strips, as in the previous example (figure 4.18 a).
3. The position of the tape on the plane relative to the markings and the execution order of chain elements is shown in figure 4.19 a, b, C
Chain on the basis of the trapezoid (figure 4.20). 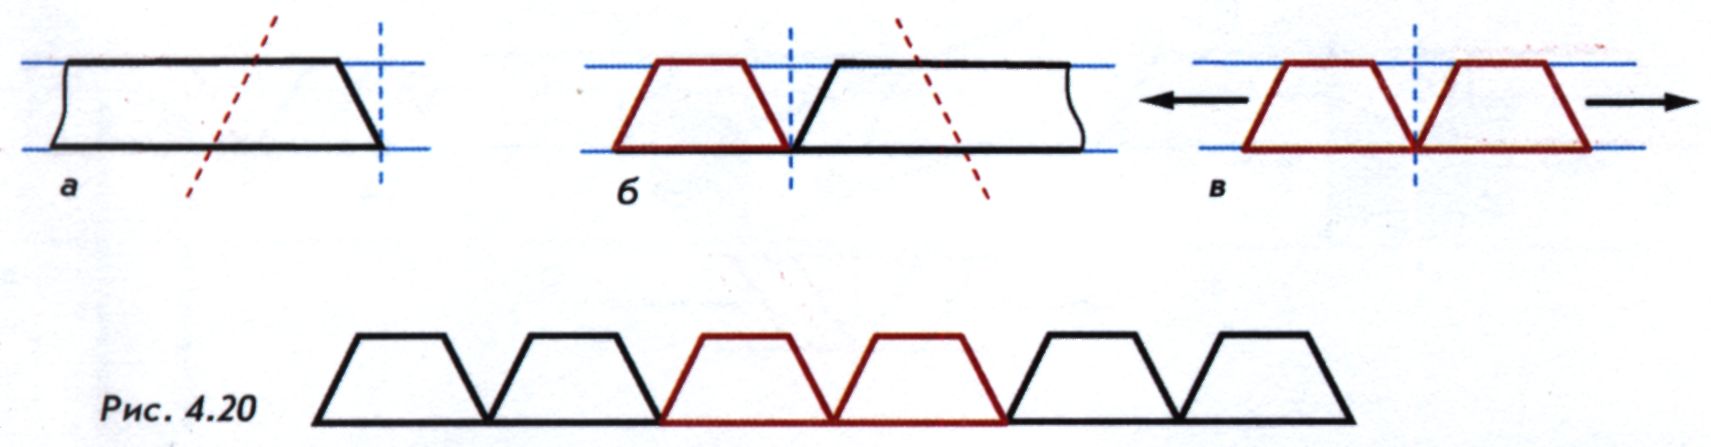
Materials:
2-3 straw ribbon of the same color width 6 mm, length 15— 18 cm.
processed and toned wooden base, lacquer, solvent, brush, pencil, ruler.
Execution of the work.
1. Follow the markings of boundary lines and the Central axis (figure 4.20 a).
2. Gluing the elements on the surface start from the Central axis (figure 4.20 a, b). The chain is simple in execution, some difficulties may cause the formation of trapezoids.
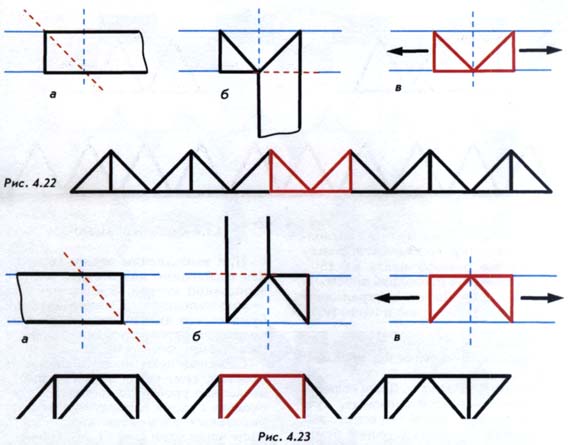
3. Follow this chain, alternately sticking the elements to the right and left of the Central axis (figure 4.20 b). There is no need to adjust the angle of the trapezoid, cutting area. Tape a straw is enough to turn 180° (figure 4.20 b). Chain on the basis of a right triangle (figure 4.21, 4.22, 4.23). From triangles we can obtain very different in composition chain. Three types of chains, which are shown in the figures, is made on the basis of one element is an isosceles right triangle. 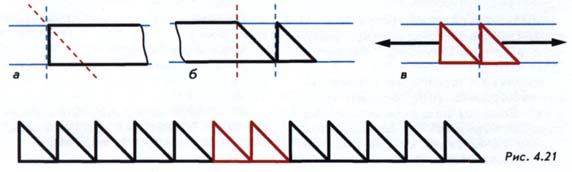
 Materials:
9-10 straw ribbons of the same color width 7 mm, length 15— 18 cm.
processed and toned wooden base, lacquer, solvent, brush, pencil, ruler.
Execution of the work.
1. Perform sequentially for each line marking the boundary lines and the Central axis (figure 4.21—4.23).
2. In figure 4.21 a, b, C shows the sequence of the chain at the same position of the elements on the plane.
3. In figure 4.22 a, b, C shows an example of the chain elements which are rotated relative to each other by 90°. When turning changes the direction of the fibers of the straw tape. As can be seen from the figure, such a chain can be made of isosceles triangles, made out of one piece. The same direction of the fibers will be deprived of a chain of black and white nuances. Chain, in which one triangle consists of two, gets a new decorative quality.
The chain in figure 4.23 a, b, C are also made of a parallelogram comprising the two right triangles. Elements that touch the sides of the fiber are rotated relative to each other by 90°.
The following examples of simple chains source element is an isosceles triangle (figure 4.24, 4.25). 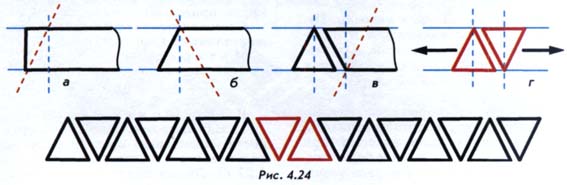
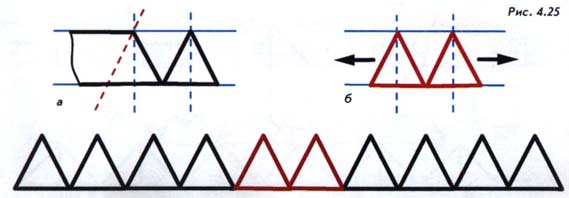
Figure 4.24 shows an example of the chain of inverted relative to each other triangles.
Cutter are cut on the same angle with alternating tilt right and left (figure 4.24 a, b). The position of the straw ribbon is not changed. When a new element leave a gap of 1— 2 mm (figure 4.24 C, d).
Figure 4.25 shows the chain, as well as the previous one, recruited from the isosceles triangles. Triangles dialed by the base in one direction. To complete the chain straw tape should be rotated 180°, the set of elements conduct alternately in both directions from the Central perpendicular right and to the left (figure 4.25 a, b).
We define the total required actions when performing ornaments:
The performance of the sketch. Even if you perform a simple ornament, it is better to have before him a sketch done on graph paper. It will help to create a composition, calculate the number of elements and motifs on the plane, choose the right size of straw ribbons.
Surface preparation. Begin work necessary with cleansing and toning the surface.
The marking surface. The road markings in the form of lines on the prepared surface with a pencil. The number of marking lines depends on the type of chain.
The beginning of the execution chain. Chains must begin and end with one element, this set of elements should begin to run from the Central axis.
Create black and white effects. In some types of chains of the straw tape it is necessary to rotate, changing the direction of the fibers, giving the impression of darker and lighter areas of the pattern.
Select your language