


")
Decoration any room in your house can serve as panels depicting flowers, landscape, still life or a utilitarian thing - for example, hours, - decorated in an unusual way. Panels can be flat, with little topography and poluobemnyh like supporting frame. The choice of technique depends on creative tasks. For example, long-range plan to better the landscape to be flat, and the front - both flat and slightly raised.
The topic of the picture and its composition is largely dependent on the available material. Made from fine leather in various shades of natural colors is easy to run the hills and forests, alternating the technique of "hide and seek" with a smooth gluing of the skin. In the foreground of this composition, place the main object, is made in technique of application. It can be rustic or fairytale hut, animal figures, etc.

The house can be covered with "tiles" (made of leather). If the cabin is rustic, it can be executed from the "logs" - rolls of the skin, and the roof to make a "straw" made of leather fringe. "Shingles" and "straw" glue rows from the bottom up so that the bottom layer protrudes from under the top.
Starting work on a landscape, think carefully about colour. First and foremost it depends on the available material and the interior of the room. The same landscape will look like gray, dark or warm, soft matter is dominated by it grey or brownish-beige shades. Important and the color of the Wallpaper serving as a background for your panel: bright Wallpaper mute the color, any Wallpaper come to him in some combination (and therefore the people, attentive to wall hangings, I prefer bright Wallpaper with a subtle pattern).
Landscape details adhesively bonded to the substrate, which is then inserted into the frame. Small pieces of skin can be stretch, moistened with water, and stick when wet.
The most simple in execution - landscape with a lake. First, let it completely: in the center of the panel across its width, the lake; on the left, on a promontory - a few birch trees (their trunks; the branches remain outside of the picture); on the right juts out into the lake one Cape; behind - the lonely forest with a single path.
Primarily on the basis of paste "sky" and "lake". It is desirable that the leather for the details of the lake was the same color as the sky, and even better, a close shade but a bit darker. This will give the landscape a greater significance, as in nature the reflection is always a bit darker than the original. Pasting "lake", the skin should be in several places "comunity" fine longitudinal folds; the farther from the bottom edge of the picture, the folds are smaller.
Further, from the thin skin matching colors paste parts of the far forest and the two headlands, on opposite ends protruding into the lake. The long-range plan can not be communivate or collect small diverging folds, resembling branches of trees. For details of the far Cape folds position longitudinally or in the direction from top right and down left. Middle Cape will shimurim folds, putting them in places where no birch trunks. If the folds are on the whole surface of the part, at the locations of their trunks should be cut.
Birch trunks can be accomplished in two ways - from a thin skin and medium thickness. In the first case of white or light skin perform cords, rolls of the desired thickness and glued them in place. The upper and lower ends of the cord pre-cut diagonally 1 cm and glued to the surface of the mural slices. This technique allows the "tree" smoothly and quietly grow, go beyond the edge of the picture. When working with skin of medium thickness cut parts of the stems 1-2 mm larger than intended. The strips treated on a hot surface, achieving easy bending along the entire length. The characteristic spots on the trunks is applied to a device for burning or gel pen, acrylic paint. In the foreground, at the base of the trunks, you can stick bunches of grass from finely cut strips of fringe. You can make "grass" from one narrow strip of leather, laying it on with glue smeared surface of small frequent loops. When working it is better to use tweezers.
The branches of the trees paint a cautery device, or make thin strips of the skin, which when wet can be moulded into any shape.
Landscape with a hut (figure 58) combines several techniques. Main details of "heaven" and "earth" - paste as in the previous work, just based. The front wall of the house, its additions, and the roof is made from three-dimensional parts. First harvest rolls-logs of different lengths: in the location window logs only go down to his sides, and top and bottom going the entire length of the wall.
Before you stick the sticks on the base, perform the side part of the wall. It is made from strips of leather shades. The width of the strips equal to the diameter of the logs. When glued the side and front of the house, start making the ends of the logs on the front wall. To do this, twist the coil a strip of leather with painted surface. This skin gives you a clear picture of the "annual rings" on the cut. The roll is cut crosswise into pieces with a length of 0.5 cm so that one slice was smooth, and the second formed of two oblique slices, directed toward the middle of the roll. The side finished piece resembles a house. Slanting slices smeared with glue and glued between the logs of the front wall on the right place.
To make "straw" roof, both parts are divided into several parts. For the side slope is the strips, repeating the main part shape, but more narrow. Strips for the front of the ramp will have the shape of a trapezoid, except the last, triangular. Cut small strips of fringe glued from the bottom edge of the roof. Subsequent fringe strips uncut, covers the edge of the previous.
Window parts made separately and then glued into place. To complete the sash, place on top of each other two pieces of leather and a rubber stamp with a pattern, fasten the edges with tape. Put down a piece of color glass, and top with a color cover. Drawing with a chisel through both layers of leather cut small squares - "glass". Then cut a detail around the edges. The dark squares are inserted in the corresponding holes of the cover and glued into place in the recess of the front wall of the house. If you find that the window is too deep in the wall, attach the details of the cover on a piece of skin of medium thickness, cut it to size and then glue into place.
Shutters on the figure depicted in the form of a trapezoid. You can make them and can stick to the sides of the window recess rectangular parts and bend them out. Then they will look open. If desired the shutters of any kind can be decorated with holes made with a punch of small diameter, or burn out the pattern cautery device.
Trees, shrubs, flowers made of fine leather, sagareva its radial folds. Tree trunks glued on top, insert the top edge into the slot of the part of the crown. Twigs draws gel pen or burn. Trees can be supplemented with apples - embossed punch circles; on bushes smaller circles to collect the grapes (currants).
For sunflowers, there are several ways. You can cut details scalloped scissors and bend the edges on fire. You can cut the petals from the edges to the center and sear afterwards. You can finally make two layers of petals - the upper one slightly smaller than the bottom. To center the circles dark skin of medium thickness densely cover the cuts in the opposite direction and handle on the hot surface. For flowers stick strips-stems.
The fence can be wooden, as shown, or fence. In the latter case, the basis is glued the lower ends of the strips (vertical pegs of the fence), twist a few strips of leather and the upper ends are also glued.
Based on the pictures it is easy to make your own choices. Hut instead of the front of the slope can have the window of the attic. the roof is natural to place a pipe or the stork nest. The cabin - the white hut or small cottage, with one window or more; around, except for trees and bushes, you can make a bed. The options are endless, allowing you to perform a truly unique author's work.
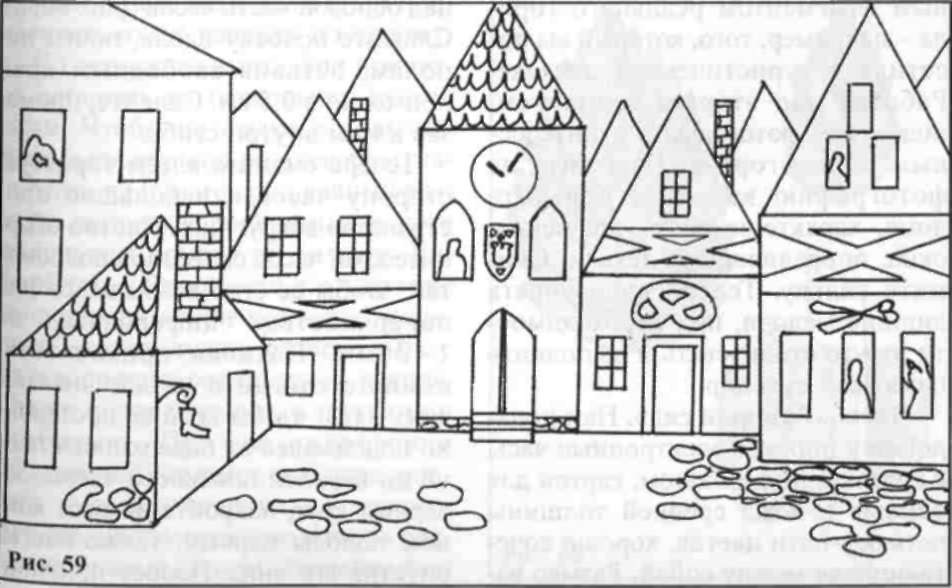
The urban landscape shown in figure 59, is created in technique of application of the skin is of medium thickness. Its peculiarity is that you can run two jobs simultaneously, according to the principle: positive-negative. For example, the house of gray and blue; two flap of skin overlap each other on top of the tracing paper with the pattern, and cut all layers of the skin (as produced window to house). One job will turn grey building with blue Windows, and the second blue house with grey Windows. This technique is useful for the manufacture of the same landscape with the image of the day and night. If only one picture is unnecessary until the second part do not throw away: perhaps replacing some of these parts a different color, you will create a second mural, which will require much less time.
The details of the houses are not glued to the background, and put it flush Windows. Additional work is sometimes decorated with drawings of symbols of different shops. This can be boots, scissors, pliers and hammer, bagel, horseshoes, etc. These emblems are traditionally hung by chains to metal brackets. Night city good light antique lantern: "light", he pieces of yellow skin. The bright Windows you can draw silhouettes of people.
Depending on the used color of the skin of the city can be fabulous or, on the contrary, the specific fragment of the real city - for example, the fact that you visited as a tourist. Working on the second option, choose a photo with interesting view of the city. Apply on the photo and tracing paper and draw a circle around the house, typical of their decoration, Windows, any part. Remove the tracing paper. Now it is necessary to remove superfluous detail, when you need to stylize and execute a memorable souvenir.