


")
Of thin skin based on the old large icon, you can make an elegant brooch. If there is no suitable icon, a basis will have to make yourself, but having the advantage: the basis is the desired shape.
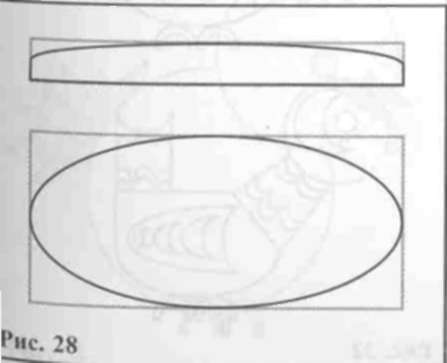
From a piece of hardboard is cut round, oval or square, depending on design. A square is not a lot scroogled office knife angles and sharp edges. The circular and oval shapes of the ribs are cut much more gently, keeping maximum thickness only in the Central part of the base (figure 28). With sandpaper, smooth the surface. If you have a finished clasp for a brooch, just glue it from the inside. For greater accuracy it is possible "drown" it in the surface of the hardboard, cut out the recess for its size. If you use the simple safety pin, penetrate the basis of a narrow groove, and where to put the pin. Additionally, the fastener will be fixed when pasting skin the reverse side of the product.
Of thin leather cut out detail of the same shape as, but larger. Lubricate the base with the front side with glue and beautiful "sugarite" the skin. The edge of the flap projecting beyond base trim. Fold the allowances on the wrong side and glue. High shear folds. The wrong side of the seal flap of skin 1 - 3 mm smaller than the bases.
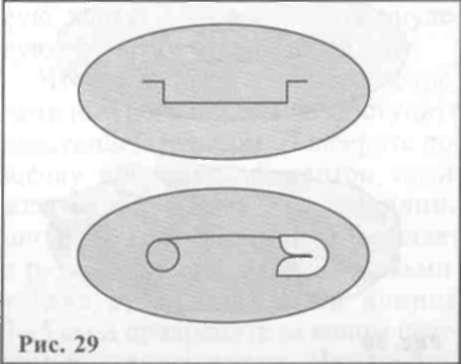
To secure the closure, cut out details to the slot as in figure 29. The resulting valve bend, pass under the lever of the clasp and glue. Ready-made brooch can be decorated by putting gold on top termoperevodnoy film and pogladil. Or sprinkle the surface aerosol automotive dye, directing the jet a bit to the side. That is another way of emphasizing the relief of the folds and will make the product unique. Gilded brooch can be supplemented with small crystals.
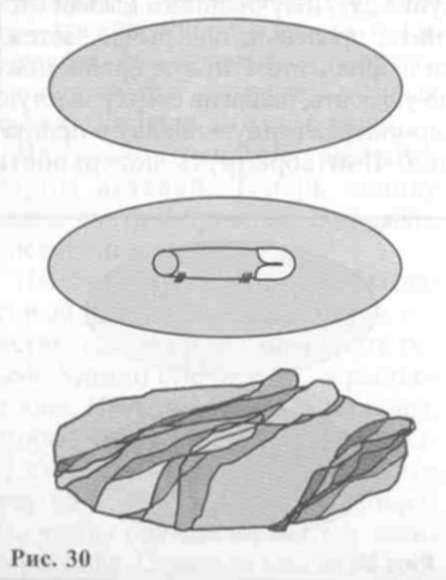
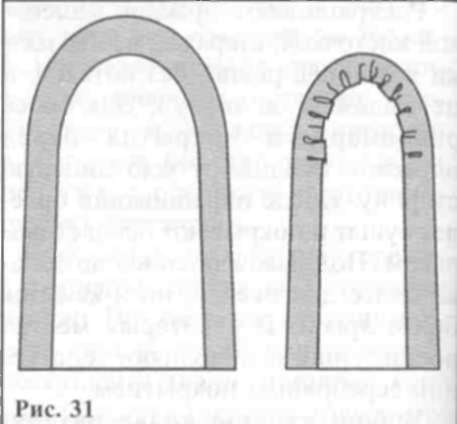
If the brooch is designed to hang straight, without folds, its surface is glued a thin layer of foam. A piece of soft leather glued basis, collecting allowances on the wrong side of the small assemblies. Assemblies are grouped in the areas of maximum bending shape (figure 30). Also hang plastic base of the headband (figure 31). The Hoop is then decorated with "segmentname" accents, crisscross bands, and flowers.
You can make a brooch and leather-based. It is easier to make a complex shape - a bird, animal. This brooch will decorate children's clothing or backpack.
Outline the sequence of operations on the example of the brooch "Bird" (figure 32). From the skin of medium thickness cut out two bases. One of them is the front and should have the color of birds; the second, made in the mirror, will be assigned to clasp. To the underside of the base attach pin, note its length from the head to the loops, cut slits. Open the pin, thread through both slits it part of the head and fasten. Glue both bases, front and back. Glue on the front side the details of the wings, head, tail. In place of eyes, you can insert a bead.
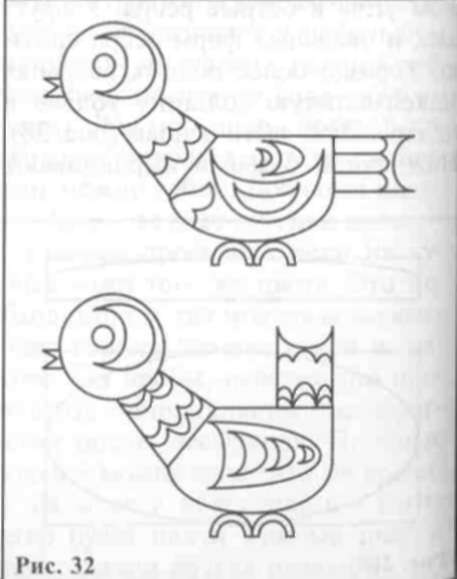
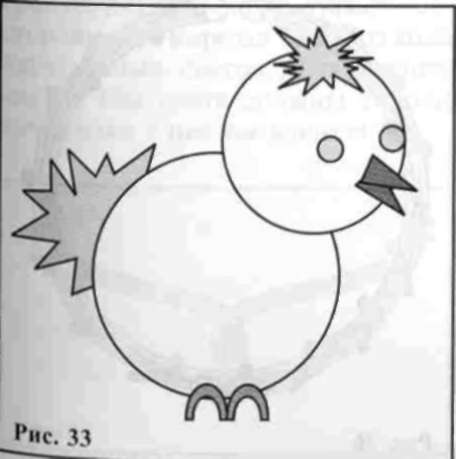
Brooch in the shape of a chicken (figure 33) differs from the previous one that the details of the head of the bullock, and of the wings are complemented with fringe on the edge. For this they are cut a little more. Fringe can lightly sear over the candle, creating and fixing the curls.
Consult your child what kind of jewelry he would like to have. Perhaps this brooch badge in the form of a soccer ball or guitar?..
Excellent material for many different DIY - leather cords. They can serve for its intended purpose - cord for the pendant, and can become material for fashionable jewelry. As pendants you can use pieces of thick leather done in their holes, wooden beads of different sizes and styles, beads and leather pendants.
Spectacular youth product - necklace leather cords. Except the cords with a width of 0.3 cm, will need the following materials: metal rings, wooden beads of different shapes and sizes, metal cups used in the fixing of the bead cords, clasps for jewelry (beaded), wire, glue "Moment".
Decide what length necklace would look like. It should not tightly fit the neck or hanging too low. The easiest way to install it long, hanging around the neck of the measuring tape and placing the "zero" mark at the rear, in the middle.
Just secure the cords to the cups, we proceed as follows. Pick up a Board or thick cardboard the same length as the selected length of cord (perhaps the size coincide with the size of the back of a chair). Take two pieces of wire with a length of 3-5 cm and attach the ends with tape to the ends of the Board. Wrap, pressing pieces of wire, as many turns of cord as you need for your plan. The beginning of the cord should be about one of the wires, because the connection is hidden under a metal Cup. In the last round move the cord end to the beginning and glue the ends.
Now with one hand free the wire from the tape. Twist the ends so that one of them was longer than the other. Twisting, you clip the straps in a wire loop. Same do with the other wire. The long end of the thread in a Cup from inside to outside, put on his lock, and bend the wire in the ring with pliers. A second ring of a padlock put on the wire second end is also threaded through a Cup, and bend the ring.
To the base of the necklace you can add charms, intercept cords with rings of leather and other materials, the part of cords to braid scythe, or other type of weaving, Pereval this scythe other cords, etc. (figure 34-36).

When you add in a bunch of cords braids or multiple braids this must be done before the cords are secured to the cups, and fasten them up all the loose ends. Various rings on the bunch also put on to the dock.
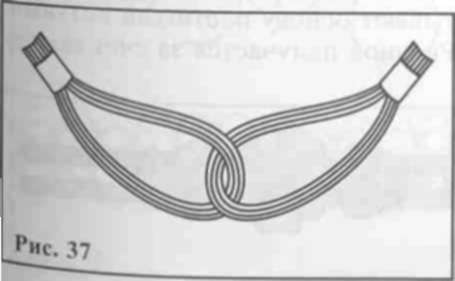
An interesting variant is obtained by not using a beam cords, and two half length. The beams bend in the middle relative to each other and reinforce the point of bending of each ring of leather, wood or metal. From the form of a ring, its width, the material from which it is made, depends on the product (for example see figure 37).
On the basis of cords are sets of necklace and bracelet decorated with leather circles. Mugs are made of leather of medium thickness with a punch (figure 38). Used other geometric shapes, such as square, triangle. In this case, they cut with a utility knife.

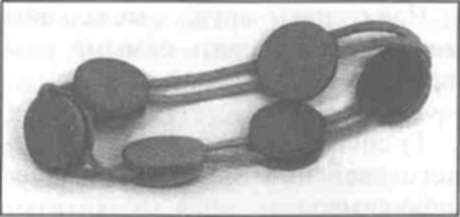
If provided to perform the charm bracelet six circles, prepare twelve parts. You can arrange the front six of them, and you can make a bracelet of bilateral, decorating both sides, or cut out circles from the skin of two different colors. In the latter case, both colors should go well with the color of the cords.
On a sheet of paper mark the location of the circles of the bracelet. If it should be six, then five circles of the front of the bracelet lay on the marked places with the wrong side up and apply glue. Cut a piece of cord of the desired length (the volume of the brush at its widest part plus 1 cm). Place the lace face down on the mug so that it was at a distance approximately 1/3 a diameter of the circle from the top edge. Press the lace in places of its contact with circles, so it stuck. Also glue the second cord, but at a distance from the lower edge of circles. Glue circles on top of the first layer, second layer, face up.
To connect the bracelet to the ring, the ends of the cord on one side to glue to the wrong side of the sixth circle. On the same side glue the opposite ends, closing the bracelet into a ring. Seal the junction of the second circle.
Received mugs-medallions can be decorated in various ways, for example:
1) a simple method or color embossing to portray any character;
2) heat a piece of metal mesh and pressed to mugs;
3) put knife on mugs, cross-cuts, and singe them over the flame of a candle to the cuts revealed;
4) in the center of the circles to stick on the circles of a convex processed on the hot surface of the skin or rhinestones; both to turn over;
5) burn or stick (cut from a thin piece of skin) the signs of the Zodiac;
6) on the Central circle to burn or run in technology applications figure dial with hands;
7) burn or any other symmetric pattern.
On bracelets cord sometimes stick medallions is not circular, but any other form of right triangles, the squares of one or several of the dimensions. You can decorate the medallions with the flowers of a simple form or make themselves lockets in the shape of flowers, leaves (figure 39).

Cords and decorated with the usual "hair machine" for hair.
To do this, always take off the spring plate and twist around the base. After braiding the spring insert back.
One of the simplest options - the basics of wrapping a braid of leather cord. Pigtail can be made of three, four or more cords. The end is glued to the reverse side of the buckle close to one end. Carefully, without twisting the braid; wrap it on the basis of hairpin turn after turn. If the opposite direction to lubricate, the coil will stay tight. On the opposite end of the coils are placed close to the edge, after which the remaining end is shortened and glued to the underside of the clasp. Sometimes the clip additionally painted with Golden hot stamping film. If the color of the cords does not match the design, you can paint them with stain or paint for the skin.
The second option pins can be used in set with bracelet, as described above. Two segments dark cord, a little longer than most pins, glued to its front side with one of the edges next to each other. The end of the light cord is glued on the reverse side at the edge and wrap the base tight turns. The pattern obtained by alternately lifting the ends of the dark cord over another round light. In the end, on the longitudinal median line there is a pattern "checkered". When using pins, standard width is impractical to take more than two dark cords, as the pattern then will not go with strip and cover the entire plane of the product. The ends of the dark cord hidden under the last two turns of light cord (the front side).
The bracelet can be performed in the negative form: for decoration to take cords, bright colors, and winding dark. Another option is to change the positive and negative pins in the middle. One edge is bright, with dark pattern, and the second - on the contrary.
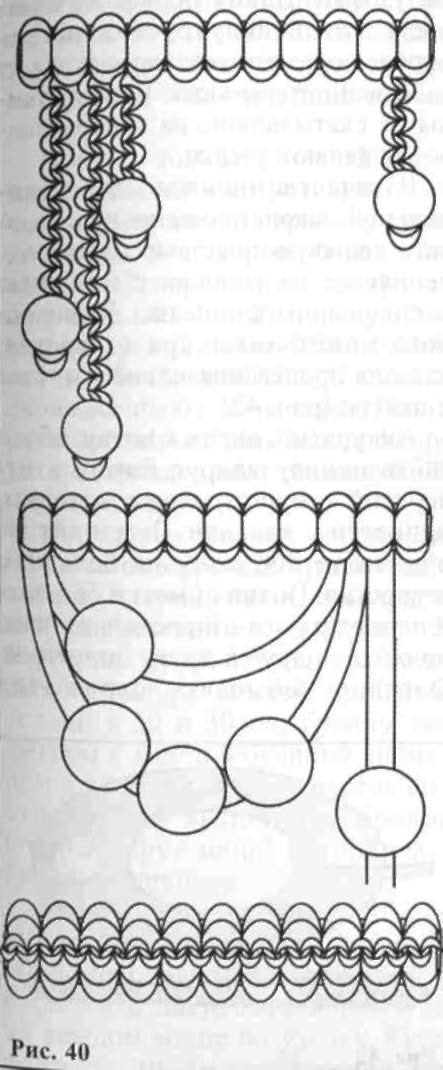
Three clips, shown in figure 40, braided macramé and decorated with charms with beads. Different clips amount and type of suspensions and the number of beads on them. One additionally decorated with braid on top braid at the median longitudinal line.
Of the leather straps, playing the role of the working thread around the base of the weave a chain of flat nodes (figure 41) as a basis you can use the cut flat rope). Straps length equal to the length of the pins plus 2. For this purpose, special pillow, cushion, sofa or other appropriate surface with a pin fasten the cord of the base and two long strap for braiding. The basis of, for convenience, needs to be longer than the size of the finished chain.
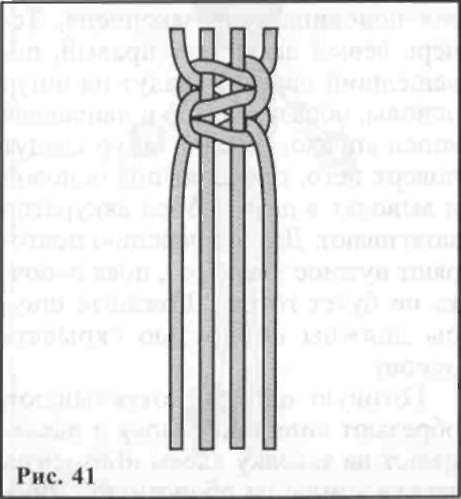
Weave in the following sequence. The right cord, forming a loop, put over the cord of the warp end to the left. The left cord is applied to the end, then hold them under the base and threaded from the bottom up through the loop between the base and the right cord. The first half of the knot completed. Now the left cord (i.e., the right passed to the left) put on a cord basis, form a loop and directing the end to the right. Put the right cord on top of it, is carried out under the Foundation and out in a loop. Gently tighten the knot. Further, the operation is repeated as often as necessary, until the chain is ready. Leather cords, which should completely hide the base.
Ready chain of the chip, trim the excess base and glued to the barrette with glue "Moment", turning down the ends on the reverse side of the product. You can optionally attach a chain to a leather cord from the inside of the clips. This leather lace is carried out through the side loop-locks from one side of the pins, then the other and forThibaut.
Laces for pendants attached to the laces of a chain of simple knots. The length of the suspensions, the number and semicircular loops is determined arbitrarily on the basis of his own ideas. Below beads are not pushed at the ends of pendants make the knots.
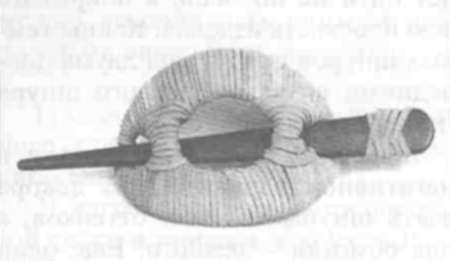
As the basis for the original clips you can use cheap plastic, securing her hair with a special wedge. Such a framework may have three holes: two for threading of the wedge and the third in the centre (figure 42).
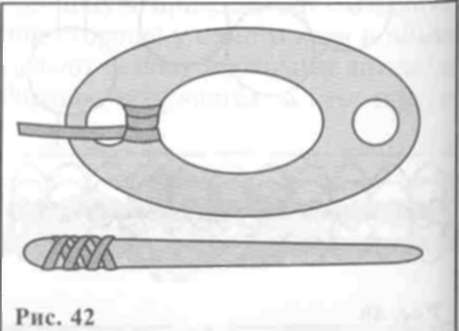
Carefully, turn to turn, wrap the base around the side openings in the cord, the end of which is glued from the inside. Then just wrap both sides of the large hole. The windings side and the center holes must fit each other closely. Left to wrap jumper between the holes. The first coil cord (taped from the inside) needs to cover the place where the series winding side and the center holes are spaced maximally from each other. Wrapped in a jumper, tightly stacking the coils in a direction perpendicular to the direction of the windings of the holes. On the other side of the jumper cord is wound on the same distance from its centre, on which were laid the first round.
So in the same style to make fixing the wedge to the wide glue the middle segment of the cord. This side will be the reverse. Now the ends of the cord alternately bring to the front side cross over so that the coils formed oblique cross, and again folded inside out. Repeat several times, ends trimmed and glued from the inside. Barrette is ready.
Using cords, you can perform an interesting pendant, "little Man" - a decoration for the youth or children's clothing (figure 43). Take two pieces of colored leather cord with a length of approximately 50 and 30 cm, bead diameter 1 cm and 4 beads with a diameter of 5 mm. If you are replacing the pendant to carry a keychain, cord take wider and longer, and the bead is larger.
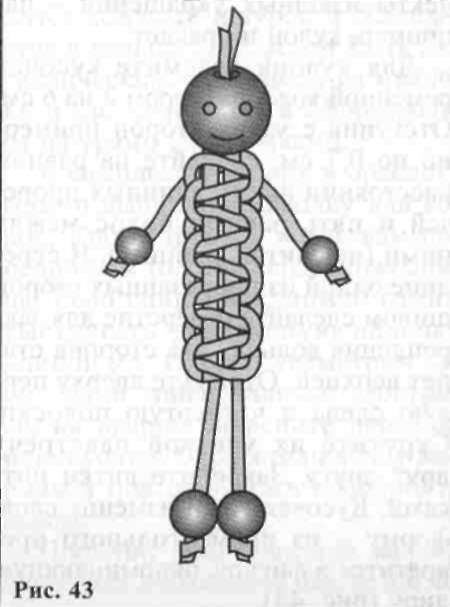
Take the cord length of 50 cm and fold it in half. On the ends put two small beads and secure them, tying each end for the knot. Piece length of 30 cm is placed under the cord with the beads above them by about 5-7 cm Distance from the beads to this place would be the foot man. Proplatit in the direction from the ends of the cord to the place of adding multiple nodes, called macramé "flat". The ends of the long cord will be used as the basis, and the ends of the cord in a different color - as worker threads.
The number of flat nodes depends on how long the torso is your man. The remaining free ends of the cord put on the bead and tie the knot: it will handle.
But the little man has no head. This requires a bead with a diameter of 1 cm is put on a folded end of a long cord, positioned closely to the torso and fix the site. This busine drawing a smiling face, decorated with the crown cut out of leather fringe-bangs or ponytails strips of fringe, rolled into the tassel (the tails are glued on the sides of the head). You can also cut from leather ring, an inner diameter equal to or slightly less than the diameter of the large beads. Pulling a circle on a bead and having glued, get the man in the hat. And you can add the skirt from a piece of leather, cut-fringed or festooned. The seam tips should be closed behind the back. If desired, add a very very small details - a belt, beaded beads, tiny purse, etc.
Preparing for such a pendant as a gift, you can give it easily recognizable features of the future owner.
Of a thick skin doing sets of fine jewelry, for example necklace and bracelet.
For the pendant, take a piece of belt leather size 2 to 6 cm Departing from the narrow sides approximately 0.7 cm, make equal distance six long slots, and five equal stripes between them (not counting the extreme). In the middle of one of the slotted sides with an awl make a hole to attach the ring. This side becomes the top. Cut at the top left of the first and fourth strips. Twist them a snail towards each other. Secure the turns of the thread. A piece of skin will change its shape from rectangular will turn into a shape resembling a lyre (figure 44).
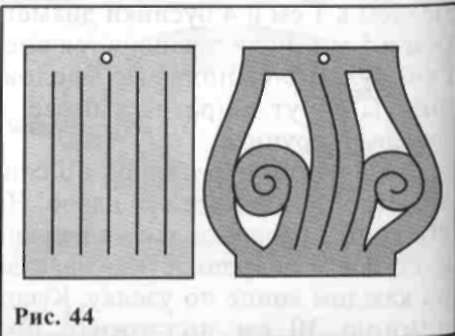
Put the product inside on a hot surface; the swirls and curves of the rest of the bands are fixed. If desired, the pendant can be painted with wood stain or aniline dyes to cover any varnish (product will look like carved wood). In the upper part of the hole thread a metal ring, insert the cord and the pendant is ready.
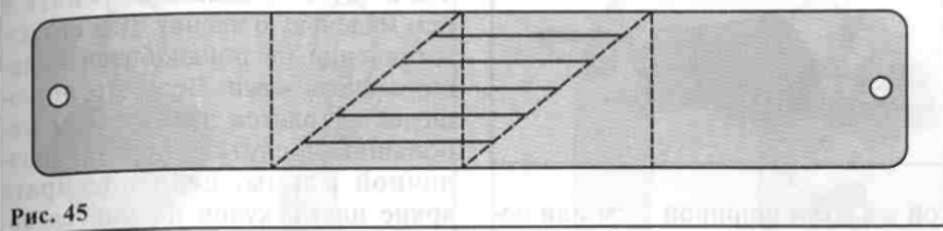
In the same style, you can make a bracelet. From belt leather, cut the piece of 12 by 2.5 cm of the Edges of the rectangle a little round. On both ends of the workpiece, at a distance of 0.5 cm from the edge, make the punch one hole with a diameter of 2-3 mm. At one end punch another hole with a diameter of 0.5 cm, retreating 0.5 cm from the first hole towards the middle of the bracelet. Both holes, big and small, connect a slot of width 1 mm.
On the reverse side, draw the location of future cuts. Place the workpiece horizontally in front of you, draw two vertical lines at a distance of 3 cm from the ends of the bracelet. To the left of a line drawn along the upper edge of the workpiece, measure 2.5-3 cm and place the point. The same distance aside from the right line on the bottom edge. Connect the point on the upper side with the lower end of the left vertical line. Point on the lower side connect with the upper end of the right line. Within the boundaries of the resulting oblique parallelepiped guide at a distance of 0.5 cm from the other four lines, as shown in figure 45. These lines penetrate the skin.
Slotted insert any small objects, not afraid of heat. It can be metal or wooden beads, beads (without lacquer coating), and finally dry peas. These items insert into the slots, pulling them apart. Bracelet will expand in the middle part, the holes take the form of long narrow leaves. Thus prepared product is put on a hot surface so that the position of the slots was fixed.
To reveal the slots you could also take the workpiece with both hands at the ends and move the hands. Revealing cuts, spend a few times the middle part of the bracelet over a candle flame. Further, the bracelet is treated the same as the pendant.
Clasp will serve as a cord length of 5 cm with knots on the ends. Single knot tie off immediately, the second after we pass the free end of the cord into the single hole on the end product. Bracelet worn on the hand and, hooking, lace up, first introduced in a bigger hole on the other side, then through the slit in the least.
Of several of these bracelets can be made belt. To do this, they flexibly interconnected. Through the holes at the ends (the second hole to do) is leather lace and glued into the ring. It can be metal, braided, chain, etc. the ends of the belt are drawn by cords with tassels.
Included with the pendant and bracelet, you can perform a hair pin. In addition to thick skin, you will need a thick wooden spoke. If the spokes there, you can whittle a stick of wood long 9 - 12 cm and a diameter of 0.5 cm. One end of the wand to focus on the second, fasten a wooden bead. Paint the wand with wood stain in the color of the skin and coat with varnish.

Braiding bands barrettes clips connecting strip of the same leather with a width of 3 cm or wooden stick of the same length. The strip can be notched in the middle and finished weaving, paste the cut bead.
Cut from thick leather strip with a length of about 10 cm and 3 cm wide Round the corners. Start from the edge of the narrow sides 1 cm and make the punch holes of the same diameter as the knitting needle. Start from the edge of the hole by a few millimeters and mark from the inside the location of future incisions. All five of them, at a distance of 0.5 cm from one another. The basis of the clips will be divided this way into six lanes. Twist strips, as described for bracelets by using hemstitch. Below the skin is more pliable, it can be wet, but not all, and only six strips. Prepare the connecting strip. Slit it open and insert a bead, beads or rhinestones. Glue.
The finished clip can be painted. Put it on top of the gum that binds the hair, threading the needle through both holes.
Small patches of thin skin you can make a pendant having the shape of the bag. Inside will fit a small key a stone-talisman, rare coin. You can use the bag as a little bag to store it in a small icon. Its production does not need a piece of leather. It's not a purse! Will fit even very large pieces, trimming a variety of forms. If you pick a bright color, the pendant will be fun, elegant.
Collect the leather scraps from the canvas. To do this, glue them with rubber glue on the basis, for example on cotton fabric. Better if the fabric is thin, so not too thicken the skin, or the skin forms a beautiful small folds. Prostrochite on a typewriter at the junction of the flaps seam "zigzag". If the patches are very small or complex shape, mount them on the basis of overlap (so that they slightly overlap each other). Prostrochite the cloth in different directions, for example vertically, and then horizontally, positioning the seams at a distance of 0.5 cm At the top and bottom punch holes for the drawstring. Fold the cloth on floors and attrocity side seam. Thread the laces. Lace the bottom edge of tighten and tie a bow. You can decorate the ends with tassels and beads.
If the bottom of the bag to punch holes in two rows, there are new design options. In the lowest row of holes thread the strap and pull tight. The edge of the cloth and lace tuck inside of bag and glue. Put the bottom bead or just a tight ball of cotton wool or tissue. Pull the pendant cord through the holes in the middle row. The bottom edge can make wider and not tuck inside, but on the contrary, spread in the form of ruffles.
From the skin of medium thickness easy to make earrings in different shapes. The easiest way is to trace the notched slot in the line-patterns (figure 46).
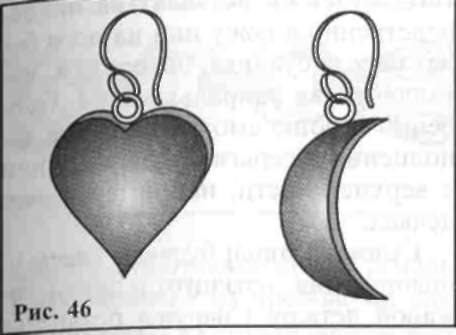
Template or self-made cardboard stencil is applied to the reverse side of the leather piece and get it. Then turn over the stencil or pattern so that the drawing was "mirror". But if the form is symmetric (e.g., the heart), the stencil can not turn over.
Cut-out detail is put on the hot pan or on the burner electric stove - earrings acquire a convex or curved shape. You must make sure that details out the same.
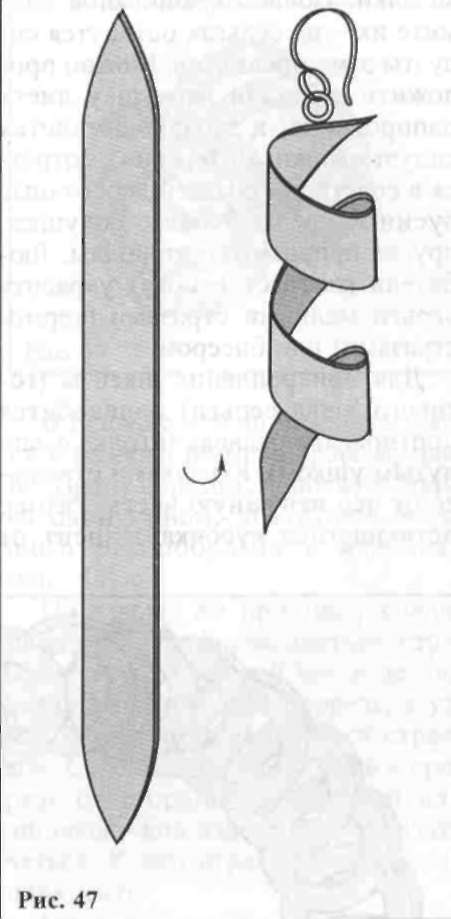
For making long spiral earrings cut out detail, similar to leaf of willow. Wound it on unnecessary pencil or wooden stick. The coils are fixed with wire. The second part is fixed similar to the first, only in mirror image. Several times hold the stick with a fixed item through the flame of the gas stove burners or candles. Remove the wire and became a spiral detail (figure 47).
Finished parts can be painted in different colors, varnish. When using dyes, sprays put on leather items any small items - straws, rope,
rings. After staining remove them - on earrings will remain the silhouettes of these items. Can be applied to the workpiece the tip of the fern leaf, and it remains the silhouette of the tree. Interesting look, combined with leather, wooden beads, wood slices, shells, and other natural materials. Lovers of contrasts can decorate earrings small rhinestones (thermostream) or beads.
To attach earrings (ready abalone earrings) will need dressmaker pin (a needle with a curved ear). With wire cutters, cut the unwanted part. The size of the remaining piece depends on it will be inserted directly into the skin or it will wear a bead, beads, metal spiral, etc. they are Especially good such additions to the earrings with a recess in the upper part, for example in hearts.
Lubricate the end of the pins with glue and rotating the stick in the end leather details. There are just a ring that attaches shvenzy. This method of installation is used in parts such as the heart.
Alternatively, in place of fastening split detail on two layers and put a pin between them. However, instead of pins you can use a ring of wire, folded it in half and twisting the ends. The tips spread them apart and glue between the layers of the skin.
To make the original chain, belt or bracelet, you can use the technique of creating Christmas garlands. Parts of garland are cut from a piece of thin leather, folded in half. Maintaining the position of the fold intact, and cut a ring or trapezoid, square, rectangle. The shape of the link depends on the appearance of the product. In detail trapezoidal shape bend can be positioned and small, and the larger base of the trapezoid. If a bend will have a larger base, the item better to carry soft leather, as at the final stage it will sobrepasa. It should take into account the purpose of the product. For the chain on the neck of the part should be less for belt - large.
Link details are as follows: first fold in half, place the bend; the second unwrap, put in the hole first and again fold in half. Spread. Now take a third part, put the second and so on, closing the circuit or pridelava fasteners (figure 48).
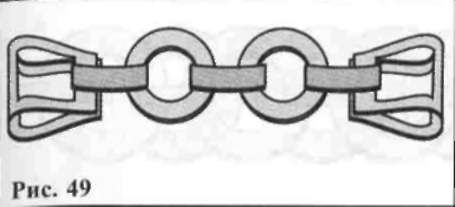
In the chain you can rotate the pieces of different size, shape, color. Thus, using only one reception reach a large diversity in products (figure 49).
On the same principle of connecting parts in the form of leaves, arrows, etc. In the wide side of the part is a T-shaped slot and a narrow end ends with an arrow. The arrow can be pushed through the notch on the reverse or the face of the product will vary. The end of the arrow must be attached.
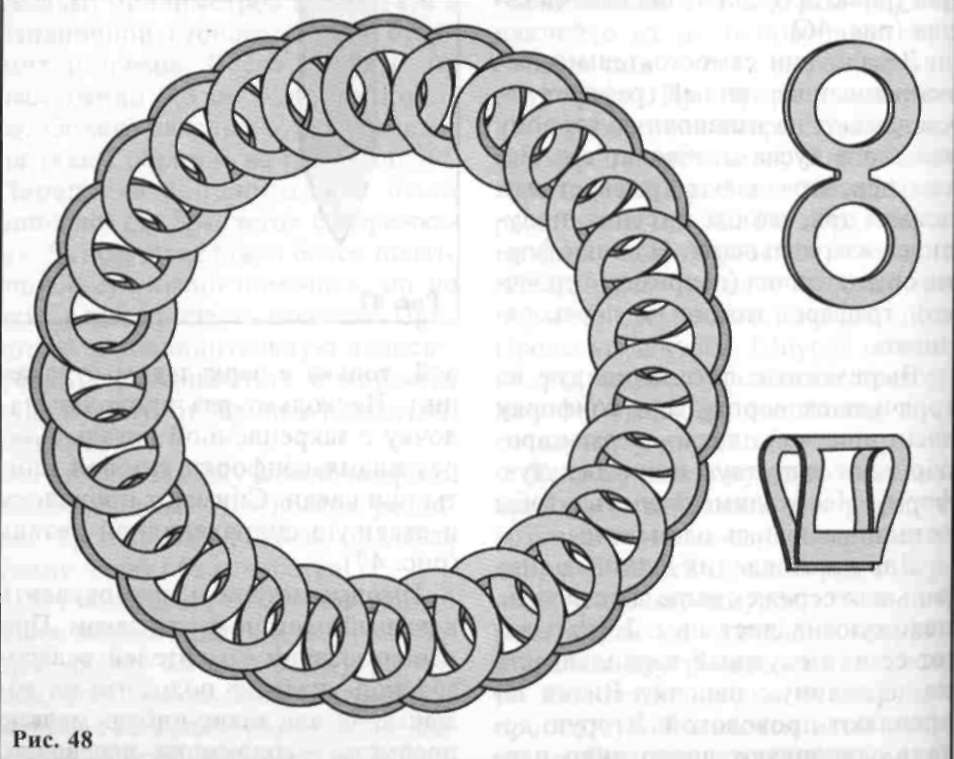
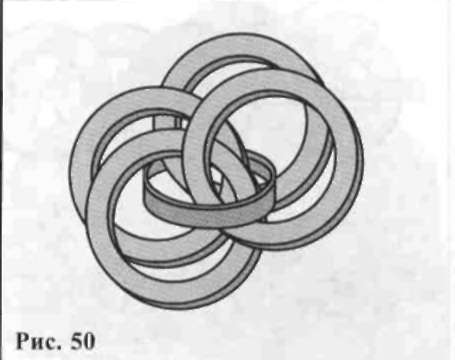
Special features are the products of interwoven leather rings. The ring is made from the skin of medium thickness, using punches in two sizes. First cut out the main circle, then it punched a round hole.
Connect the ring in different ways. Apply alternately one on another four rings so that their pairs were shifted relative to each other, and connect the fifth (figure 50); attach the next pair bond with a second - and so on.
Put the rings of the first row butt smoothly with others. On top of them put the ring in the second row; they should close up on the center rings first (figure 51, a). Cord, passing over the adjacent sides of the rings of the upper row and below the adjacent sides of the rings of the bottom row and bind together the product into a single unit (figure 51, b).
Rings come in a straight line, superimposing them one on another. Lace proletayut, prostoyat the whole series, bringing it to the top side of the ring, then under the next (figure 51, b).
