


")
We will need very small pieces of soft leather for flowers and leaves (you can use scraps of leather from other products) and skin of medium thickness for the base and the stems. Still need ready zip for brooches (sold in the same departments as the accessories for beads) or a simple pin. From the pin with pliers to separate the head at the end of the bent hook. In this form the pin attached to the brooch. You will also need automotive enamel sprays. The color of enamel depends on selected range of products, but often enough to acquire enamel gold color.
From the skin of medium thickness cut three strips with a width of 3-5 mm and a length of 11, 12 and 13 see If you only have thin leather strips for the stems can be prepared as follows. On the ruler, align the edge of the flap with a utility knife. From the inside, lubricate the edge with glue on Sheree well, 6-8 mm; bend it so that it happened twice, and glue. Not much not to tear the skin, tap with a hammer the resulting thickened edge and cut from it strips of the required length for the stems.
In the same way you can run thin and durable strap for pendant.
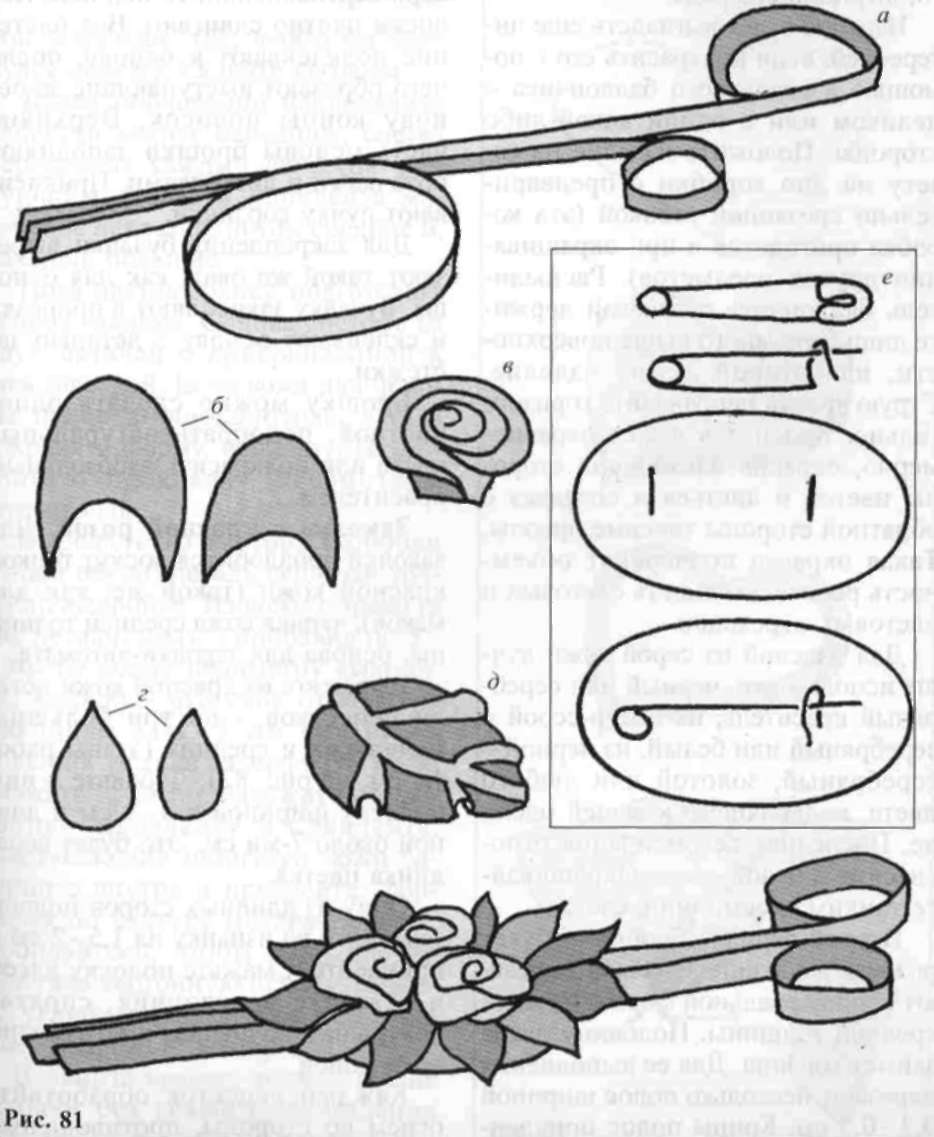
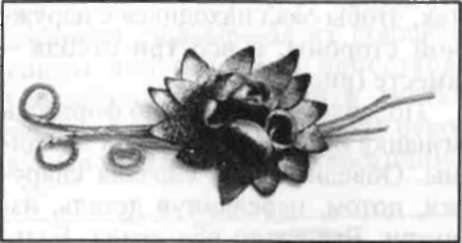
The ends of the strips with a length of 11 and 13 cm screw in ring about an inch in diameter. The third glue strip to the oval, leaving a free end about three inches. Glue the strips between them in the middle. Swirls of stems point in opposite directions. Band with oval glue to one of the stems so that the oval was outside, and all three stalks together (figure 81).
Put the resulting shape on the underside of a piece of skin of medium thickness. Draw the oval on the outside first, then moving the item inside. Cut both of the oval. More will serve as the basis for flowers and leaves, less for the fastening of the clasp. Glue the large oval to the base of the stems. While the glue dries, make the flowers and leaves.
Cut parts of colors (figure 81, b). Grease glue their concave edge on the front side. Roll each part in a roll, making sure that the oiled region was formed by one plane. If done correctly, the item will resemble a truncated cone, put the top down.
Pry out the socket of the petals of each flower (figure 81, b). To fix the shape, take each rose with tweezers and guide her underside several times over a candle flame. Will not overdo the item over the fire, otherwise the rosette will strongly decrease. If it still happens, make a new (but defective also use the product).
Cut out the pattern 12-15 leaves (figure 81, g). They can be left without streaks, only give them natural curves, holding the tweezers over the flame. Experiment burning some leaves on the front side, part on the reverse; some hold the sharp end, the others blunt.
If you do decide to make the veins, then they should penetrate 1/3 of the thickness of the skin. Fold the leaves in half along the veins so that they are opened. Keeping the leaves with tweezers, slide streaked across the side of a candle flame. Fire will lock the form.
Working with very thin and soft skin, you can try to arrange the leaves in the technique of "hide and seek". Increase the detail sizes 1 to 2 mm around the perimeter. Brush the leaves with the back glue, tweezers form the Central veins, then the distributor side (figure 81, d).
Before fastening the clasp through, decide for yourself how it will be the brooch on clothing: up curved ends of the stems down at an angle? In line with this, place a pin on a smaller oval. A ballpoint pen mark the locations of future cuts - about ringlet and hook. Penetrate the skin with a knife or chisel. Undo the safety pin and thread it with the hook forward through both slit. Fasten the pin. The clasp should be on the front side of the skin (figure 81, e).
Ready fasteners are glued a little different: enough to pass through the slit projecting parts of the clasp (actually, the very clasp), and the Foundation to glue it from the inside.
Leather detail with clasp glued to the inside of the oval formed by the stem on the reverse side.
If the jewelry is assumed to take the form of a pendant, on a stalk, which serves to support the base of the bouquet, make a small slit. It is inserted into a leather loop. The ends thereof are displayed on the underside and glued. Is passed through the eyelet lace.
Collect the product. On a large oval beautiful place rosettes and glue them. Glue the leaves around, slipping their wide ends under the lapels of the petals. Try to position the leaves so that completely hides the Foundation. Sometimes it is necessary to make a second series of leaves, podkladyvaya their base under the curved ends of the leaves of the first row.
If you use the technique of "hide and seek", first place the leaves on the edges of the bases, closing their widest part the leaves of the second, inner row.
The product will look more interesting if you embellish it with a spray can in whole or to any one particular side. Put the product on the newspaper on the bottom of the box with pre-cut wall (this box will be useful when painting other subjects). Spray paint can keep only slightly above the surface on which lies the product. The spray paint point horizontally. The dye will fall unevenly, having painted the next side of the flowers and leaves and creating on the back side of the shadow ghosting. This color will accentuate the ambiance of roses, subtlety of light and color transitions.
For products from grey leather it is better to use black or silver coloring from dark gray or silver white, black - silver, Golden or any color which matches to your clothes. The last recommendation applies equally to white skin. Paint a thin layer, only slightly.
The second option is the brooch - a bouquet of roses in the basket. First cut out the base oval from the leather of medium thickness. The half oval is basket. To accomplish cut a few wide strips of 0.3-0.5 cm. the ends of the strips are glued just above the middle line of the part. Between the strips leave a small gap (approximately equal to their thickness). Further proletayut other strips in the horizontal direction, alternately flowing horizontal strip over the vertical, then under it. Strips tightly to move. All netting is glued to the base, then cut the speakers based on the ends of the strips. The upper part of the base of the brooch is filled with small roses and leaves. Stick the handle of the basket.
To secure the pins are cut the same oval-like basis. A pin secured in the slots and glued the base with a detail of the clasp.
Pin you can make one color, to choose natural color or tint spray dye.