


")
Will talk about simple and sophisticated, classic and avant-garde, but always beautiful wares - jewelry, belts, bracelets. These products you will be happy to wear ourselves and will always be able to please your girlfriend an original gift.
Bracelets. Perhaps the most traditional and common is now the decoration of leather - a bracelet. A huge variety of these bracelets, from basic baubles to highly bulk products - can satisfy a variety of tastes.
Simple to manufacture wristbands with buckles. They need only a strip of skin is thin or medium thickness and cut a metal tube of oval cross section. Skin can be any color and texture, you can use suede. The strip should cover the brush at its widest part plus 2 inches for sticking into the buckle. Band width equal to twice the width of the bracelet. For a tight fit in the bracelet of fine leather, you can insert an elastic band for strength staple it to the ring.
As the buckles used a variety of materials. The only condition is that the buckle should be hollow inside. It can be cut any "pipe" oval cross section (best to do oblique cut), a few slightly tapered cheap children's rings, beautiful buckle from an old belt, a ring of wood or nut, just a strip of gold-plated or silver-plated skin. It is from the buckle depends on the appearance of the product.
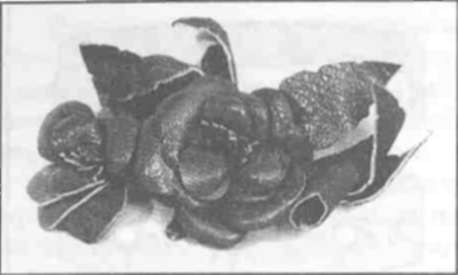
A strip of leather glued together, aligning the long edges of the rectangle, and stick their butt to the other side, which is adjacent to the arm and therefore will not be visible. The ends of the strip smeared with glue and forming uniform pleats, inserted in the buckle. Keep the front side is leather and the buckle is the same. Figure 5 shows several examples of these bracelets.

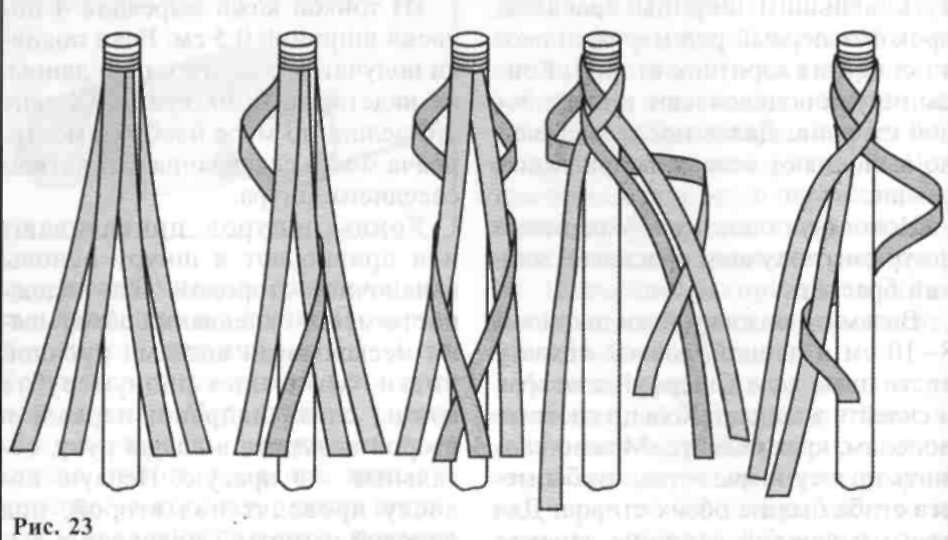
Using different types of woven leather strips, you can perform many variants of the original product. For example, different twisting a different number of straps. Simple weave three strands - braid - it is common knowledge; using it enough every few inches to attach the netting turned 90 degrees so the bracelet became a zigzag. What that means is: weaving hair, keep a right angle between the straps; if all three of the band consistently turn right, turn right turn, left - left. Alternating turns, you will get a zigzag.
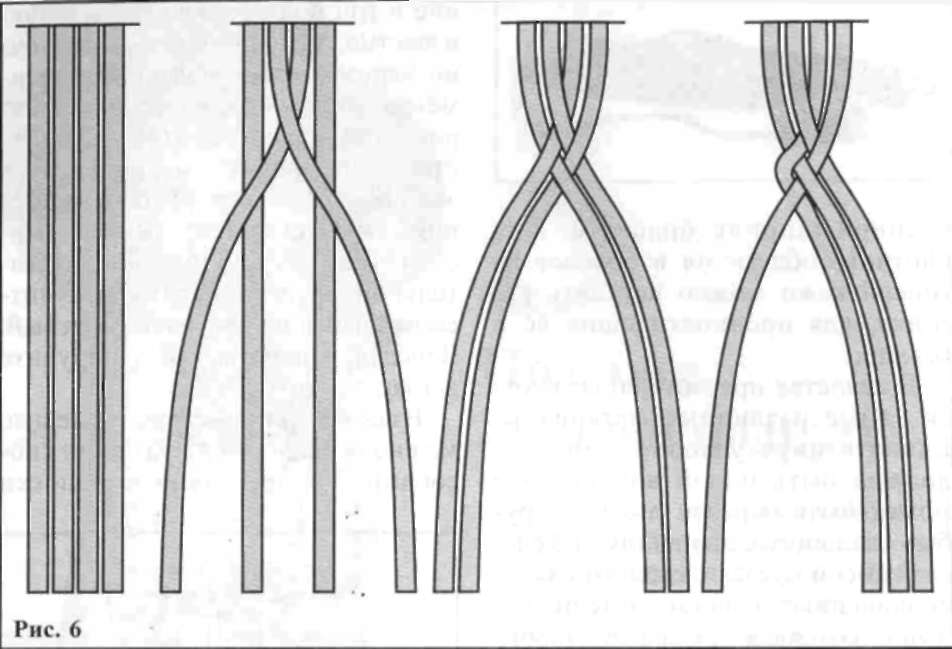
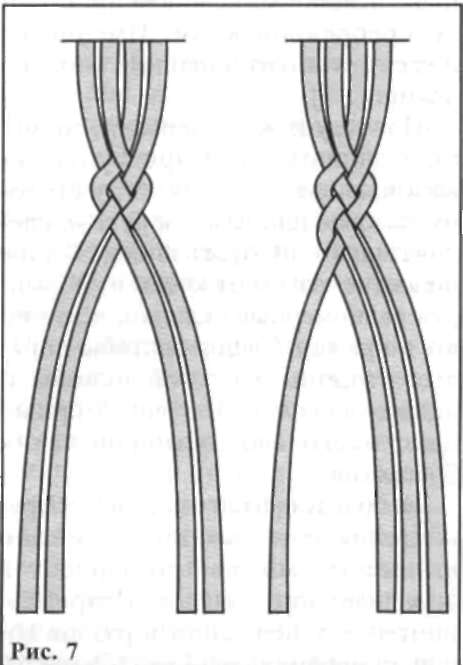
Taking not three, but four of the strap, twisting them in different ways. Four leather strips with a width of about 0.5 cm are laid out in a row, aligning the ends and clamped ends of the stationery clamp or clothespin. Mentally number the ends of the first through the fourth. Further, the second end of the overlay on the third. The first is passed by the third and second. The fourth strap is put over, hold under the first and again put on top of the third (figure 6). The first cycle is completed. Again we number the strips. Again, the second end placed over the top of the third, and so on. The netting looks to be to present a series of cord to bottom left upwards to the right, with a short jumper in the transverse direction (figure 7).
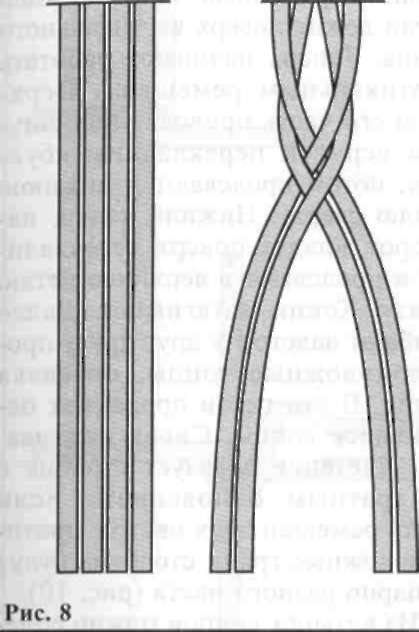
The second netting also start with fixing straps. Spread the straps are a fan. Alternately take the most extreme straps and place them in the center, overlaying one another. Get a pigtail that looks like trekhprudnyy, but wider. This way you can bind not only four, but any number of strands (figure 8).
The third method of weaving four strands as follows: the first strap is applied to second, fourth, carried out under the third and put on first. The straps tighten. The netting cycle is repeated.
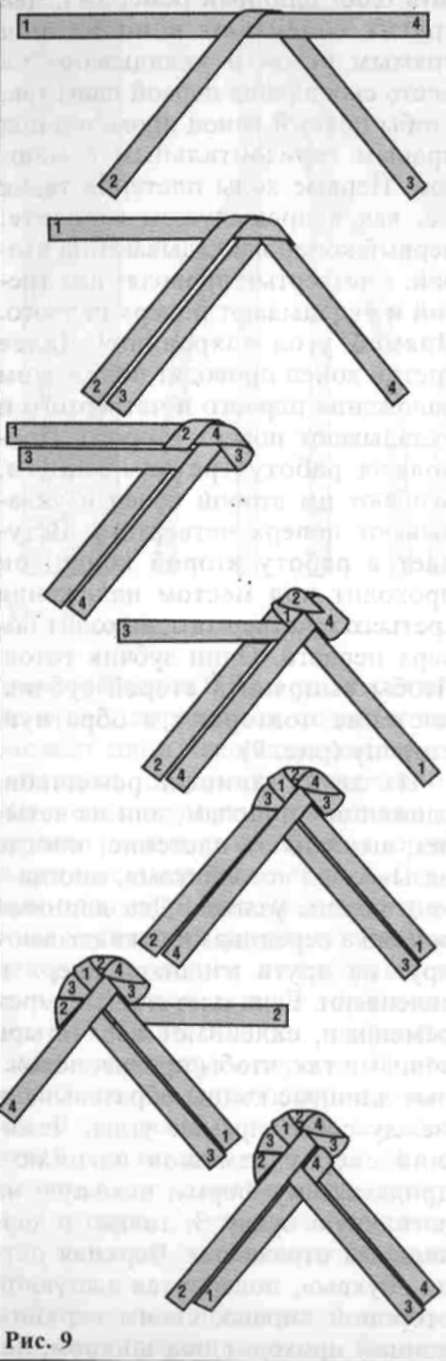
Slightly modifying the previous weave, to Supplement it with cloves. The straps are laid out as follows: two glued ends and placed horizontally (you can use one long strap); the other two ends are glued at right angles and laid on the binding of the first pairs so that the right end passed under the right horizontal strap. The first moves of weaving are the same as in the previous embodiment: the first end is applied to the second and the fourth are under the third and laid on top of the first. Square corner save! Further, the third end is carried out under the application of the first and fourth and is placed over the second. Continuing the work of the third end, they encircle the second end and is placed over the fourth. Comes in the other end: it passes on the application of the third and fourth goes at the top of the first. A clove is ready. To perform the second tooth, and the weave repeat in the opposite direction (figure 9).
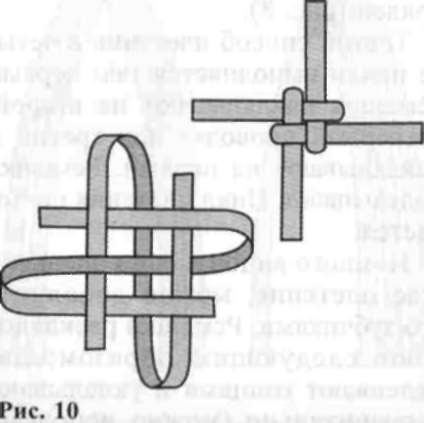
Two long straps, folded in half, or from four perform netting, sometimes called "column," and sometimes as "Chinese knot". Two long strap means applied to each other with the wrong side up and glued. If the weave of the four straps, glue all four ends so that the opposite long ends form between them angles. Lying on top of the Flex strap, giving it a shape similar to the letter S, only in mirror image. The top loop of the "letters", with the convex side turned to the right, its upper end passes under the cord, lying vertically. The lower end of the loop rests on top of the vertical end. Now start working the vertical strap. The upper part is carried out under the cord from the top rail of the "letters", then put in the bottom loop from the top. The lower end, on the contrary, put on top of the bar and threaded in the upper hinge from below. The ends are tightened. Then bend toward each other the opposite ends, leaving a loop. In these loops pass through the remaining ends. Again tighten. Netting forms a column with a square base. If you take the straps in two colors, opposite faces of the column are pairwise different colors (figure 10).
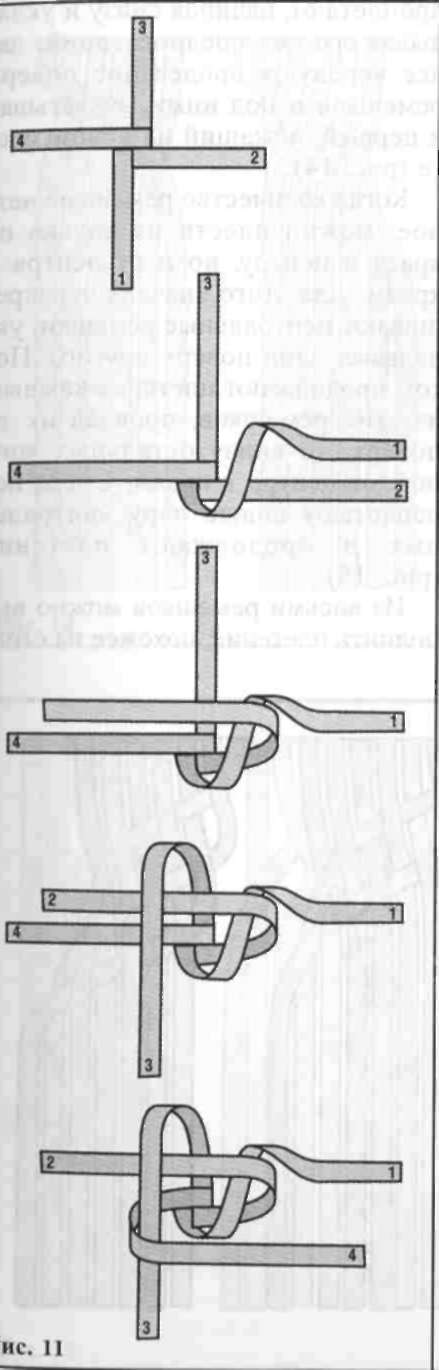
Of the four ends can be woven round cord. Straps spread from the center crosswise, gluing them at the base. Mentally number, for example, the left counterclockwise. The first strap is applied to the second a little obliquely, the second applied to the third, simultaneously cutting off the top first. The netting continue around the circle. You can weave as clockwise, and against it (figure 11).
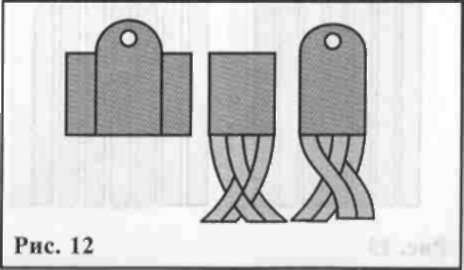
Having weaved the strap in the desired length by any method, sealed edge closure. The simplest option is to wrap the end of the bracelet strip of leather to the glueing was located on the wrong side of the netting. In the strip punch a hole through all layers of the skin and fastened the clasp. You can perform sophisticated variant of this sealing of the ends: in the middle part of the leather strips designed to seal, draw a semicircle; hole punch in this semicircle. And third, the most elegant version of clasp - metal Cup for sealing the ends of glass bead (figure 12).
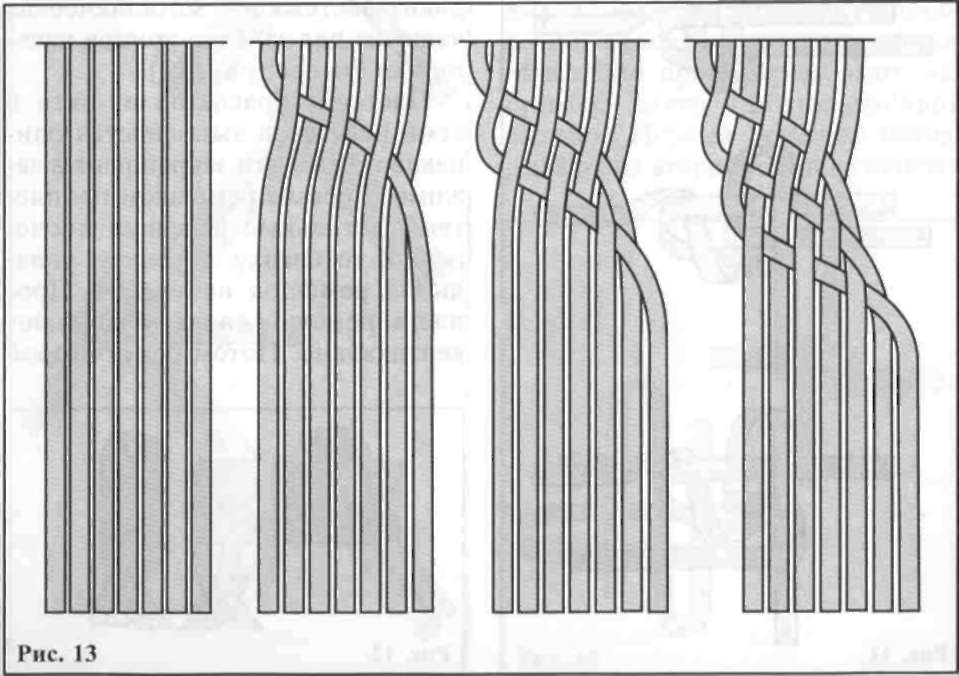
Weave bracelets out of five and seven straps running the same. The straps are fixed in time. The first strap proletayut the other straps one by one, the top, the bottom, laying the strap across. Proplete strap again laid vertically. Then take the second strap and also proletayut them the rest of the straps, including the first, lying at the new location. Continue braiding to the desired length, pulling and aligning the straps. Similarly, simulating the weaving process, you can run the product from a larger odd number of straps (figure 13).
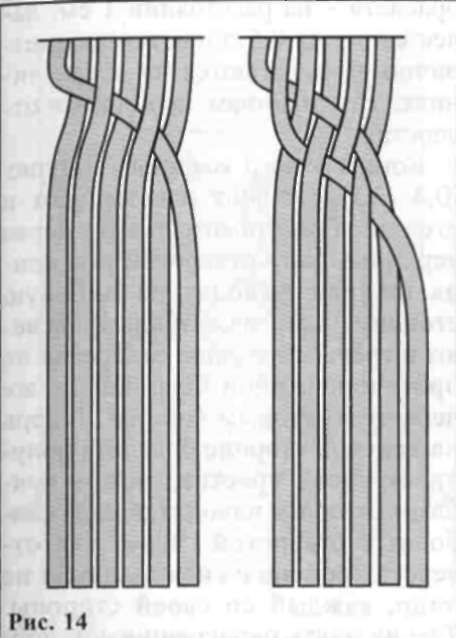
Weaving an even number, for example six or eight, is performed a little differently. Straps fixed, laid out a small fan and divided by sex. The first is placed over the second, under the third. If straps eight, then the first stack on top of the fourth. Proplacheny attached to the straps of the second half. Last proletayut, starting from the bottom and putting it under the penultimate; continue alternating threading the straps over and under them, seizing first one, lying at the new location (figure 14).
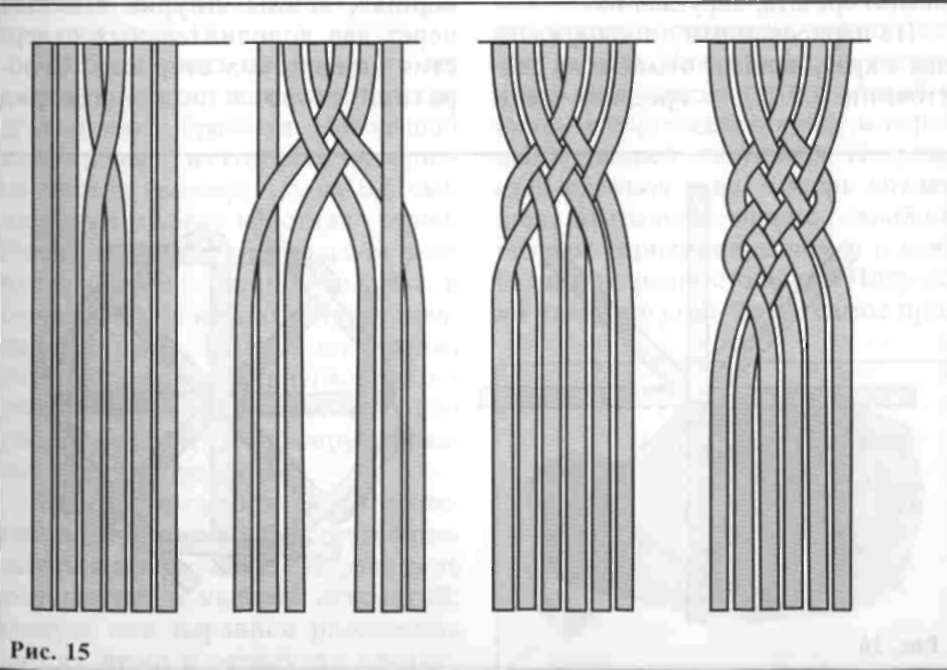
When an even number of straps, can be woven not only from the edges to the center and from the center to the edges. To do this, first the Central cross over straps, stacking one on top of another. Then continue weaving each of these straps passing them over, the bottom of the remaining ends, from the center to the edges. Rebind a new pair of Central and continue weaving (figure 15).
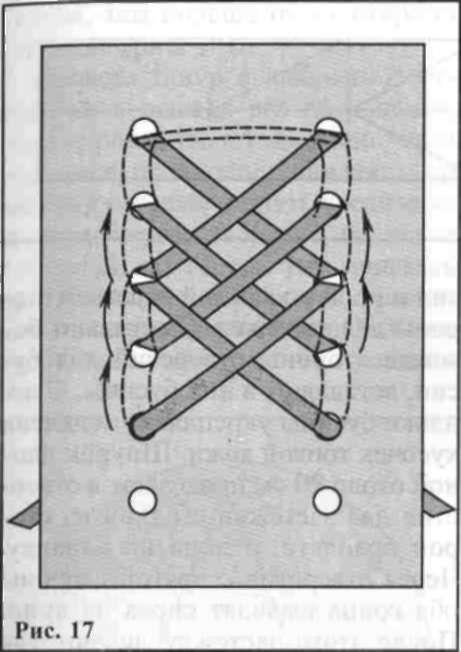
Of the eight straps, you can perform a netting that is similar to the column of the four, only now the column is circular in cross section. Sometimes this weaving is called "the wreath" or "crown knot". You can use eight straps, bonded ends, and four fixed means.
The straps are laid on the surface so that they are separated from each other at 45 degrees. You can weave and clockwise and counterclockwise. In the first case, mentally number the straps from left to right, starting with 12 o'clock. The first strap is placed over the second, the second around the first and rests on top of the third, the third surrounds the second, and goes over the top of the fourth, and so on; is formed in the shape similar to a wreath. The last cord stitch, similar to the engine line (figure 17).
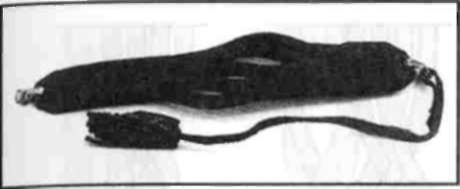
To make the clasp, the same ends are threaded through the holes on the other side of the bracelet. A small piece of skin from which the basis (size: 1.5 to 0.5 cm), Kerfoot on both short sides. After that it is wrapped around the free ends of the lace together. At the ends of the cord tie a knot. Cylinder clamp, moving along the laces, it weakens them, allowing you to shoot or to wear a bracelet that captures the bracelet in a tightened form.
Using the same weave, you can make bracelets with different design. Plays the role of the number and frequency of openings of equal or unequal distance between them and between their ranks.
Between the rows of holes you can glue a strip of leather of a different color, which will be visible through the weave. If the skin is shiny, looks nice matte suede cord; if matte lace made of lacquered or simply polished leather. In the latter case, when weaving it is necessary to ensure that the lace does not turn. Finally, you can use not one, but two different lace colors. Then the weave will look completely new.
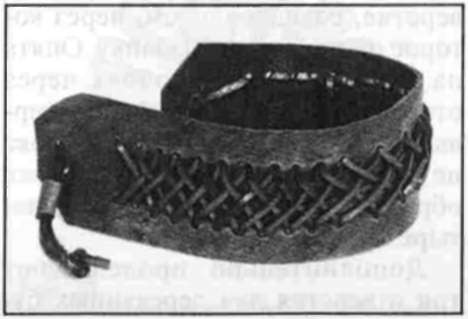
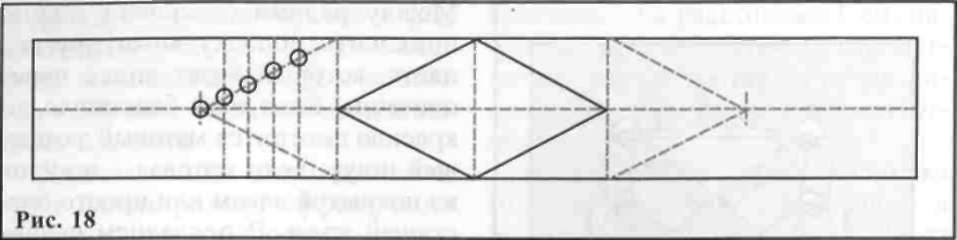
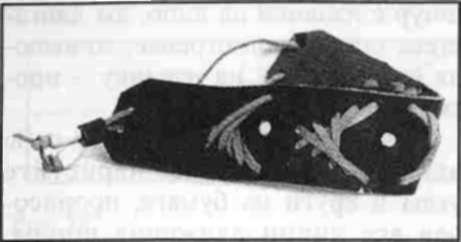
Brown bracelet with beads decorate the cord, using a strip 17x2,5 cm From the middle of the strip on the reverse side lay segments of 3 cm, two on each side. Through the obtained points carried out perpendicular to the side of the bracelet line. In the middle of the bracelet, parallel to its long sides, draw a center line. Starting from the left, connect the intersection of the axis with the first perpendicular at the top and bottom. The image obtained of the angle. Now connect the point of intersection with the second axis and perpendicular to the ends of the transverse axis. Get the same angle. The same is done on the right side. So now on the wrong side, drawn four corner pairs of directed vertices to the ends of the bracelet (figure 18).
To mark the holes, draw the perpendiculars to the long sides at a distance of 0.5 cm, starting from the top leftmost corner to the top rightmost corner. Intersections of these lines with the sides of the corners and there are places future openings. Do them with a punch, not punching the vertices of the angles. Now through these holes vyplatit cord pattern in the following sequence. Print on the front side of the cord end through one of the most distant from the apex of the corner holes. Thread this end into the hole closest to the top, on the opposite side of the corner. Again, print the end on the front side through the opening adjacent to those through which he passed on the wrong side. Again, on the wrong side the cord will pass through hole adjacent to the first. Continue weaving until you braid the entire corner. In the same way carry out the decoration in all four corners.
Additionally, make three holes for wooden beads and two on each short side for clasps. Grease the sides of the holes for the beads, insert them beads. Inside out beads strengthen, having glued a piece of thin leather. The lace length of about 20 cm threaded holes of the clasp with one side of the bracelet, from the face inside out. Through the holes on the other side of the both end output again on the face. Then the clasp is made just like the previous bracelet, adding just the bead on the ends of the cord.
Way of decorating the second bracelet known as "isanity". This way you can create patterns from a variety of angles and circles. Stitch depends on the angle, length of sides, number of holes. You can use the cords of two or more colors.
When knitting circle (a circle divided into an even number of parts) its appearance will depend in the first place, which hole held the cord after the withdrawal in the face. If the cord is held close to the middle of the circle (through the middle of it to hold it!), the Central opening between the crossing straps will be small. The farther you go from the lace centre, the more open the middle (figure 19).

Having a cord in the selected hole and withdrawing it inside out, again pull it to the face through the hole, moving clockwise, and again get on the wrong side through the hole adjacent to the first, but is now moving counterclockwise. The direction does not matter, if only it was different: if threading the cord from the inside to the face, you are moving clockwise, then bringing the cord from the face on the wrong side - against her. And Vice versa.
So to imagine the appearance of your decor and draw angles and circles on the paper, drawing over all the lines of movement of the cord. Cut out the resulting shapes, try to make the com position. Larger compositions can be used for decorating bags, clothes, covers of books, even for panels.
From narrow strips of soft leather, you can perform a flower in the art, similar to ISONET. For strip you need to choose the skin with a beautiful as the front and reverse, because in the end will be visible both sides (figure 20).
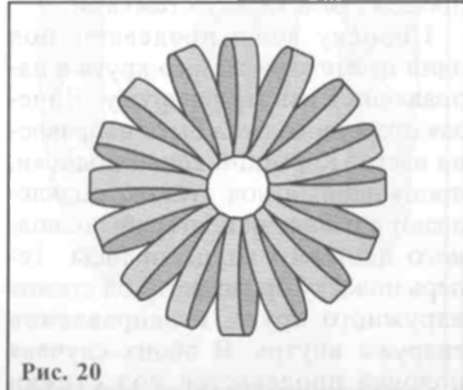
On the reverse side for detail drawing two circles - a small one in the center of a large. A large circle divided into equal parts, the size of which is equal to the width of strip for decoration, and the distance between them (between the petals of the "flower"). From one of the edges of each received segment of the circle lay the width of the strip. In these places with an awl to pierce holes. Through holes, seam "forward needle" sturdy thread sew all the way around, bringing the front of the stitches equal to the width of the strip. As a result of the circle formed by the dotted line, where stitches indicate where the future of the "petals", and the distance between them is the distance between the petals.
Inner circumference divide it into as many parts as stitches turned out on the edge of the large circle. Punch holes in any seam in which the stitches will remain on the front side, such as "back needle". The seam should look just like a seam "forward a needle", only without gaps between the stitches.
The strip of skin is put under one of the stitches small circle in the direction from the inside out. Front side should be facing up. Short end of the strip, held under a stitch, glued on the reverse side of the main long end of the strip. Now the strip pass under the stitch of the outermost circle, in the direction from outside to inside. In both cases, the strip is threaded under the stitches so that it covers the stitch completely.
After fixing the end of the process will be like this: cutting off the top, first stitch a large circle, the strip will come to the next stitch a small circle and held under it from the bottom; rounding it, she will lay on top of the neighboring stitch a large circle, pass under him and again at the bottom under the stitch a small circle.
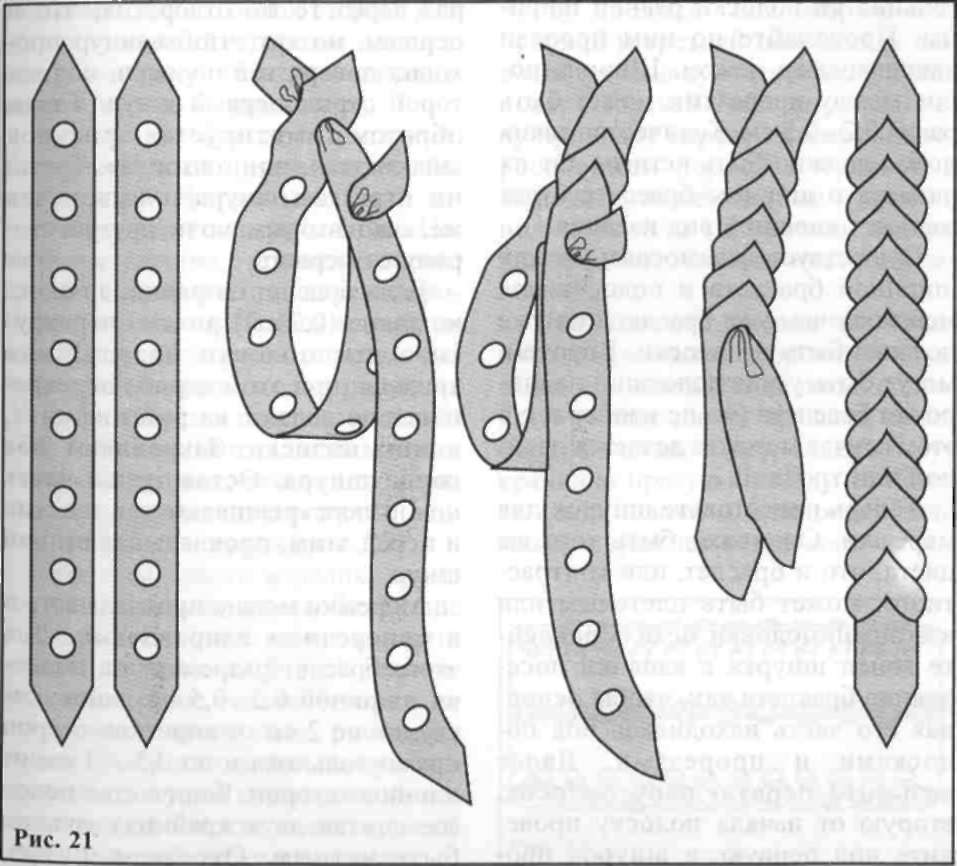
Of two colorful strips of skin, you can perform a netting that is similar to the pigtail, but with alternating colors. To do this in two identical strips, make holes in the same places. To the location of the holes was identical, you can glue both strips wrong side with rubber-based adhesive, and after applying the holes to be separated.
The appearance of the netting will depend on the shape of the holes and their frequencies. Holes can be longitudinal, transverse, round mi. The weave is the same, regardless of the type of holes.
The ends of the strips cut angle, the top of which is located in the middle of the short side of the strip. Such a cut will ease the process of weaving.
Put strips on top of each other, face to underside of one another. Suppose the upper band is yellow, and bottom red. So, holding the beginning of both strips, pull the opposite end of the red, the bottom strip through the first hole of the upper, yellow. The red strip everything but the beginning, will be on top.
Now the end of the yellow band pull up from the bottom through the first hole to red. Then the process will repeat until the end of the lanes (figure 21). Weaving can be done on the entire length of the strip, and you can make the holes only on the ends of the strips. Then the weave will be placed in the middle of the bracelet, its ends are smooth, with different colors.
These "pigtails" are used as a bracelet, bag handles, jewelry, clothes, headband etc. to make the bracelet, trim the ends of the braids and glue them between the two layers of the skin. Punch one or two holes. Castle do the same as the previous bracelets. The ends of the laces adorn the tassels of different colors.
To decorate bracelets, you can use the basic stitches used in embroidery, for example goat, blanket stitch, stalk, etc. Beautiful and unusual look of heirloom.
Cutting off strip of leather for the bracelet, step to 0.5-0.8 cm from the edge of the long sides of the rectangle and draw a line. From the short sides back off on 1,5-2 see and Get the picture a smaller rectangle. Parallel to the short sides inside it, draw lines, dividing the rectangle into strips of equal width. Follow them slots with a utility knife. The width of the strips between the slits may be equal to 0.2-0.5 cm Number of strips must be even. The size and width of the bracelet will depend on the appearance of the product.
There is a relationship between the width of the bracelet and straps for frayed: the narrower bracelet, the narrower should be the bands. However, there may be a narrow strip and a wide band (but not Vice versa); in this case, the openwork is done double or triple.
Now prepare the lace for heirloom. It can be the same color as the bracelet, or contrast; may be braided or thin strips of fur. Glue the end of lace with the wrong side in the middle of the bracelet so that the main part was under the strips and slots. Next, take the first couple of strips, the second from the beginning of the strip under the first swipe, and the lace slide between them so that it passed under the second strip (in its new position), but on top of the first, also in her new position. That is, the strip foundations as if twisted together. Then take another pair of strips and repeat the same operation. And so to complete the process. Netting straighten and glue the other end of the cord is the same as in the beginning.
You can give the product a completely different look, "prostop" finished hemstitch. For this new segment of the cord pass second time through same holes as the first, but so that the cord passes over the strips, under which is hidden the first cord. Thus, the simulated pattern "checkerboard", or "darning". The third segment of the cord are the same as the second, but on the other side from the first.
If the bracelet is wide, and the strips are narrow (0.2 cm), it is possible to twist these strips two or three times; the first crossing make at a distance of 1/3 the length of the strip. Fix both ends of the cord. The remaining part of the strips cross over in the same way as before, making the second cord.
The heirloom can be constructed and in the transverse direction. For the bracelet cut into strips with a width of 0.2-0.5 in length, departing at 2 cm from the short sides of the rectangle and 0.5 - 1 cm from the long sides. The number of lanes (not counting the last two) must be even. Cut the cord, slightly less of the width of the bracelet, pass the first row of frayed around one of the short sides. The ends of the cord glued to the reverse side. Next, sequentially perform the remaining rows of heirloom.
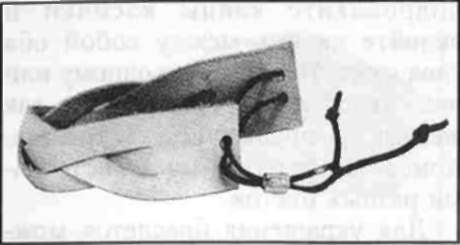
Using the braiding and decoration cords, get a nice, soft strap.
Take a strip of skin the width of 8-10 cm and a length equal to the circumference of the brush plus 1 see Servuice the edges and glue in the ring. Ring, fold in half, glue edges. You can fold the strip otherwise so that place was bending on both sides. To do this, on each side fold the skin on one quarter of the width inside the ring and glue.
Decorate the bracelet with a braid. To position it better so that in the process of registration was braided open cuts of the skin. Mark the holes using a special ruler and punch them with a punch or breakout tongs. Follow the ranks of braid, one of the figures on the ways. The ends of the cords connected from the inside. The center band of the bracelet can be decorated openwork holes or weaving of the cords (figure 22).
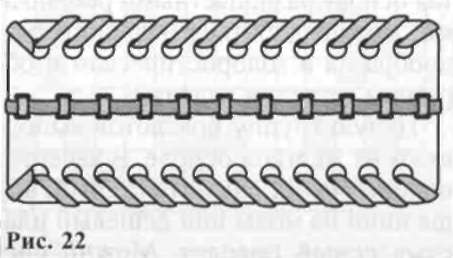
For the following products, in addition to the cords of the netting, and need the basis. The Foundation can serve as twine, cord, etc. this technique is not only a bracelet, but the torque with pendants, handle for bags. If as the basis to use a piece of springy metal strips, you can make an original headband.
Of thin leather cut out 4 wide strips of 0.5 cm If the strips get too short, not nastavljate them at once - better to do it as needed, hiding the join under the neighbouring coil cord.
The ends of the cords are glued or sewn to the cord basics wrong side. For reliability the join wrapped with several turns of strong thread. Mentally number the ends from left to right; the first and second take in the left hand, the other to the right. The first stripe is performed under one base and the third stripe, and output to the front side, stacked on top of the third. The fourth strip is carried out from right to left under the intersection of the first and third output and also on face, placing under the first and third. The coils tighten. The basis of netting laid.
Continue braiding. The leftmost strip is carried behind the cord, and on the output face, having it between the two right lanes tip to the left. Now take the rightmost strip, trace it back to the base and output on the face between the left two lanes tip to the right. Continue to weave until the product reaches the desired length (figure 23).
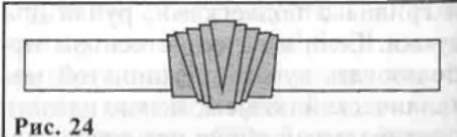
If the netting is designed to handle bags, just glue the ends and fasten with thread, as the joints will be hidden later by the fastening of the handle to the bag. If you make the bracelet, you can connect the ends of the butt joints and hold them together, gluing the wide side of the triangular detail: it is wrapped around, like a bagel (figure 24). The ends of the hryvnia or necklace it is better to seal the metal cups for the bubbly beads and cords. Criss-crossing the base of colorful straps, you can achieve great diversity in color and shape solution products.
The whole group of the bangles perform on a rigid Foundation. As basis can serve as old, out of fashion or cheap plastic bracelet. You can make a basis on their own. To do this, pick up the bottle, a circle approximates the circumference of the wrist or hand at the widest part. A sheet of thick paper or thin cardboard to make one revolution around the bottle, then liberally coat the paper with white glue and, holding tightly, wrap the rest of the coils to the desired thickness. Allow the base to dry, take it off the bottle (if the bottle is plastic, you can just cut it on the sides of the paper strip) and cut into several strips of equal width for future bracelets.
Simple in execution, but spectacular bracelets, you can make winding a basis of leather cord. Cord should be equal in width and thickness, rather dense. As with a long cord to work inconvenient, it is better to use segments of no more than a meter.
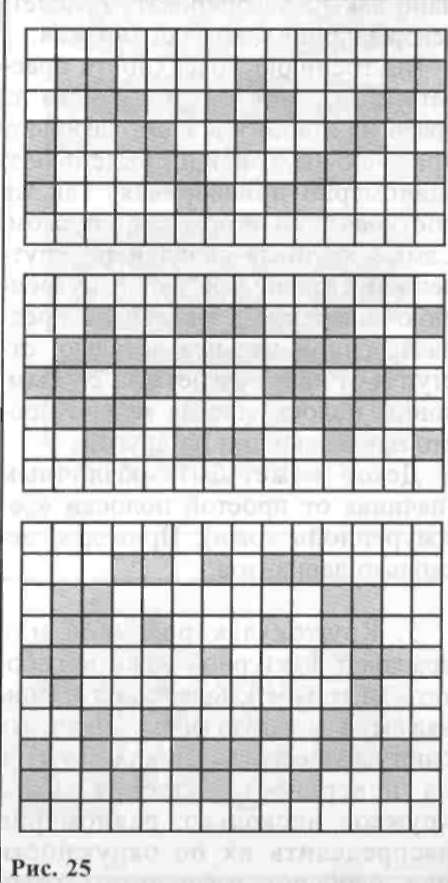
First of all, on graph paper, draw a pattern. Measure how many times will fit the width of the cord is the width of the bracelet. This will give the number of cells in a vertical column of the pattern. Draw a strip of such width. Separate the top and bottom of the strip width of one cell. The remaining field will be the field pattern. As a pattern use pictures weaving stitches or come up with it independently (figure 25). The only requirement is that the number of shaded cells horizontally shall not exceed four. The repetition of the pattern (rapport) must fit around the circumference of the bracelet is integer times.
Select a cord of a contrasting color for the background and for the pattern (for the pattern should be approximately three times longer than the circumference of the bracelet). They and others attach to the base of the bracelet, leaving the top and bottom as much free space as empty cells at the top and bottom of the pattern. Servuice the end of the cord background inside out and stick it on the inside of the bracelet so that the circulation to the face closed the bond patterned cords. Now start weaving the pattern of a tightly winding the cord background. Where it shaded cells, take up the cords of the pattern. With every turn of background cord they will change their position according to the drawing. After braiding, the ends of the cords connected to the underside of the bracelet.
Bracelet will become soft rounded shape, if the outer side on a rigid base to stick a strip of thin foam. Soft leather of the desired color cut out a strip equal to the width of the bracelet plus 2 cm, and a length equal to the circumference of the bracelet plus a 1 see the Second strip to the inner side of the bracelet should already be on his 5-6 mm.
Detail for the outside of the bracelet is smeared with glue and applied to the base with foam so that the allowances of 1 cm from each side remained free.
Connect the short sides of the rectangular part of the bracelet on the face in various ways. The connection will be almost invisible, if both end parts to surfovat and stick to each other. You can just tuck one edge and paste it to another. This method is simpler and is especially good in that case, if intended to decorate the bracelet: the decor will close the connection.
The inner surface of the bracelet smeared with glue one of the edges at a width of 1 cm, stock folded inward and glued, evenly proburivaja. They do the same with the second mating. The large folds on the inner side are cut. The inner surface of the stick intended for her part, retreating from the edge of the bracelet is 2-3 mm; the ends of the strip sometimes you can just stick one to another.
The decor may be different (ranging from simple strips "cormorano" skin). Give a few options.
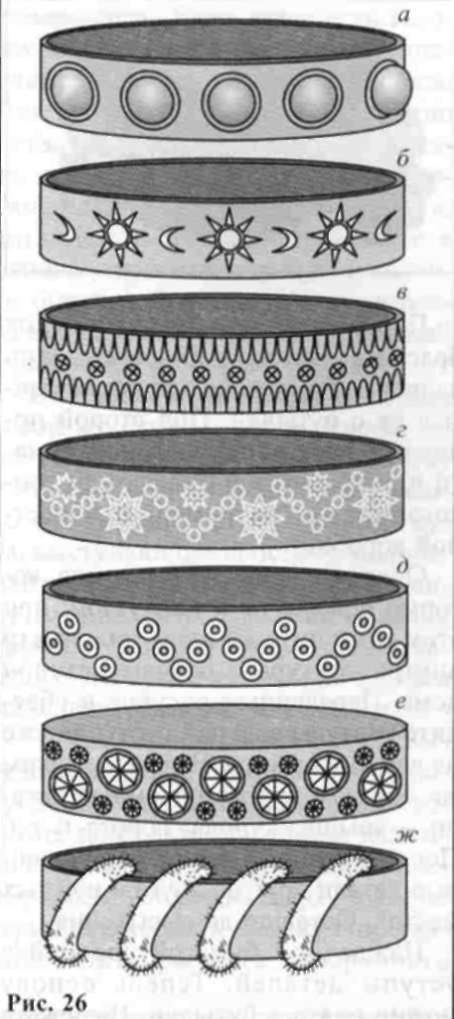
1. A circle of lacquered or beautiful textured leather handle on a hot surface, giving it a convex shape. To paste one or more of these circles on the surface of the product. If several circles, evenly distributed circumferentially or on the contrary, to have group, for example, two small on the sides large. From fine leather to make an edge, turning the skin rolls. Paste over edge convex shapes around the circumference. The original colors - as one color, and contrast - allow you to make a variety of bracelets, from elegant to avant-garde, youth (one of the samples in figure 26, a).
2. Take a strip of leather of two colors or shades of one paste over the base, the second with a punch or scissors cut out openwork pattern (this strip should be slightly narrower than the bracelet). Someone is using finished drawings of patterns for embroidery, some of their own. Strip pattern glued on top of the first.
Making the bracelet this way, it is necessary to take the base a little larger than usual because the two layers of leather wrapped inside, greatly reduce the internal circumference of the bracelet. There is another way to save interior space: first on the strip with a pattern glued a strip of lining, the width of which is equal to the width of the bracelet then finished with a detail of the paste over the base (figure 26, b).
3. On the outside put a pattern unit for burning (figure 26).
4. Decorate the bracelet by stamping using stamps. Embossing can be single color or multi color (figure 26, g).
5. Draw detail to the outer side of the metal studs (figure 26, d).
6. To stick leather mugs, crystals or stones, turn over them on a circle (figure 26, e).
7. To do one or more of rows of holes and threading them into thin fur strips (figure 26,).
As you can see, the options are endless. Their choice depends on your taste and availability of material.
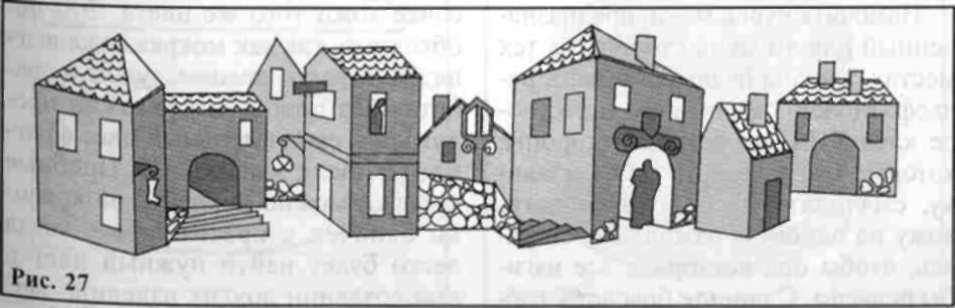
Quite complex in execution, but certainly is a beautiful and original bracelet. The silhouette of the figure can represent any city - modern, fairy-tale or medieval on your taste. You can use a picture from our website (No. 27), from children's "coloring" of any other book. For the manufacture of embossed bracelet, you will need a piece of thin leather gray color and is specially made rigid base.
On the bottle or other base of suitable diameter, wrap, proKLIMA each round of glue, a few layers of paper. Band width should be such that the pattern of the bracelet fit into it completely. The bracelet dry.
Turn on the tracing pattern of the bracelet twice. Glue one of them on a paper basis, without removing it from the bottle. Under the second put a sheet of carbon paper and a sheet of thick paper or thin cardboard (like from a candy box).
Draw the contours of the houses that we turned to an angle; this will yield one millimeter inside the outline on the sides of the house. Move the figure and trace over the contours again, already stepping back two millimeters. Cut in the same way other three-dimensional parts - roofs, domes, gates, etc. Consistently apply the items received on each other in the right places. Leave to dry.
Sandpaper sravnite ledges details. Now the Foundation can be removed from the bottle. Cut the bracelet along the contour.
Wet a piece of leather designed for the front side, in those places where it will cover the terrain. You can soak it in a solution of PVA glue, but the sides that will be wrapped inside out, being wet is not necessary. Apply the skin to the base and smooth out, trying to repeat all the curves of the terrain. Slide the bracelet to the neck of the bottle so that part of it acted on the "shoulders" of the bottle. Pulling the skin at the edges, fold it on the wrong side of the bracelet, straighten the folds and glue. Remove the bracelet from the bottle and similarly make the other side.
When the product dries, cut the inside out with a strongly protruding folds. The inner side of the seal with a thin skin or strip asakusas fabric, repeating the contours of the bracelet (you only have to retreat from the edge by a few millimeters, so that the lining was not visible). Front surface complete your burning. Lines precise drawing, drawing frame, tiles, symbols of crafts on the brackets, the stones of the parapet and the pavement. It is not forbidden to complete a drawing silhouettes of people.
If the bracelet is swathed in light leather, after the burning paint it with aniline dyes. They are bred in small numbers, in accordance with the recipe indicated on the package (for dyeing cloth). To obtain a rich palette of shades of dyes are mixed together. By adding water, get the lighter shades of color.
First try the paint on the piece of leather of the same color. This is necessary because wet skin is much darker than dry and, working without a sample, it is impossible to predict the final color of the fragment after drying. Test pieces can be pasted on the lids of the jars with dye - then it will be easy to find the right color and to create other products.
Paint the bracelet with a small brush, trying to keep the strokes went smoothly, no streaks, and did not get out for the circuit. For a more uniform coating before painting, moisten the entire front side. After staining the bracelet dry and cover with varnish. Lacquer painting is not only more durable, but also seems more vivid. In some places the painting sometimes complement the gold or silver plating.