")
Leather you can perform the interesting and unusual table decorations. Well, if the same style is made of jewelry of several types. For example, napkins for paper napkins and rings for the linen napkins.
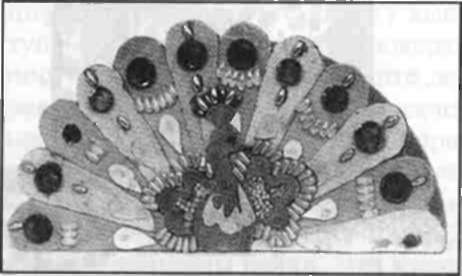
Consider the process of manufacture of the kit "Peacock". As the basis used plastic napkin holder with round sides and a thick leather ring. The peacock is made from a piece of skin of medium thickness. Carving out his semicircle whose radius is 1 cm larger than the radius of napkin holders. The same semi-circle cut out of paper or cardboard for patterns. Paper semi-circle divided into 12 parts (sectors). Each sector is completed by a small semicircle. One such sector with semi circular end - feather peacock's tail (figure 64).

Bright leather two colors cut out six feathers. In our set of alternate feathers of yellow and beige. Parts glued to the semicircle lining, wrong sides together. At work I try to combine the thin tips of feathers in the middle of the straight side of the lining." All items are gently connect back to back.
The finished tail put a part of the body of a peacock and the two parts of the wings. The breast of a bird decorated with a piece of yellow skin, and the tail feathers are glued teardrop "small feathers", alternating colors depending on the color of the feathers. The yellow feathers glued a light, beige - yellow. The same peacock performed for the second side of the napkin.
Now glued to every big pen for rhinestone beads "rice" spread around the perimeter of the wings and crest complement the decoration of large feathers. Small beads fall asleep smeared with glue grooves in the wings.
Of course, we only offer one option. Each is decorated with a product to your liking. The finished parts are glued to the napkin holder with glue "Moment".
Napkin rings are cut from thick leather belt, independently choosing their width and diameter. Cut a rectangle for the future ring, Scherbaum it short side for 2-3 cm on one end side face, and the other from the flesh side. Ring glue, lining up the slices, so the inside was smooth face.
The pattern cut out peacock feather. It is easy to adjust the pattern to the size of my ring, as a matter of fact it is a cut diagonally across the rectangle, one end of which is enlarged and scroogle. The pen is cut from a thin light skin and paste it on the leather ring. At the same time trying to ring under the pen could not be seen. The edges of the convex part of the pen can be cut short fringe and slightly securabit it over the fire. Next, from the large to the small parts glued jewelry feather - "eyes". Lower part is decorated with rhinestones.
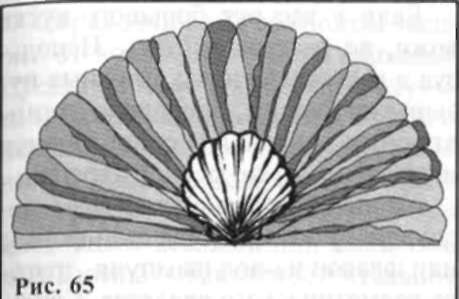
Of the same items you can create a set with a nautical theme. He performed mainly in the technique of hide and seek. On the lateral side of the napkin holders attach a piece of soft leather, collecting its folds arranged like the grooves round bivalve shells. In the lower part of the product glued real shells. The second side of the napkin holders is made similarly (figure 65).
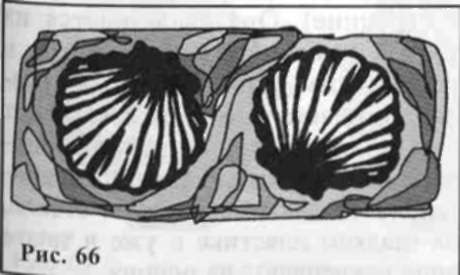
For rings use a rigid base made of papier-mache or wood. Perform ring sagareva the skin of groups of folds, and wrapping the edges somereni strips inside of the ring. In the spaces between the pleats glued little shells (figure 66). Additionally, you can decorate the set of pearl beads.
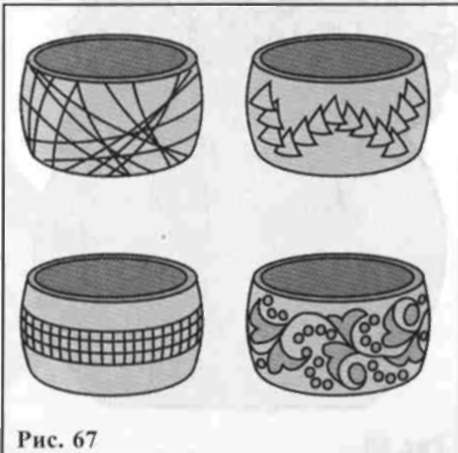
Strict and stylish look of napkin rings, just covered thin dyed leather. As the basis is better to take a wooden ring, as they have a beautiful shape - thicker in the middle and thinner towards the edges. So tight was smooth, without folds, of the skin rectangle, whose length is slightly less than the length of the circumference of the ring in its widest part, moisten along the longitudinal axis and stretch. Prepared detail glued to the ring with glue "Moment". Decorating these simple ring patterns (even just straight or random lines) using gold or silver termoperevodnoy film, you will make a set is not just elegant, but a solemn (figure 67).
Original table decoration - vases for flowers. As a basis you can use the spherical part of the bottle. Bottle cut the neck and cut along the lower edge of the spherical shape. The big hole in the base is closed by a bottom, the small will be the base of the neck of the vase. A large piece of soft leather moistened with arbitrary shape. In the middle of it, put the base of the vase. Skin edges raised to form folds and tie around the neck. While skin is damp, its ends are placed around the neck folds, like the leaves. The product is dried. Remove the cord holding the folds. Leather needs to retain the shape given to it. For greater strength some folds are glued (figure 68).
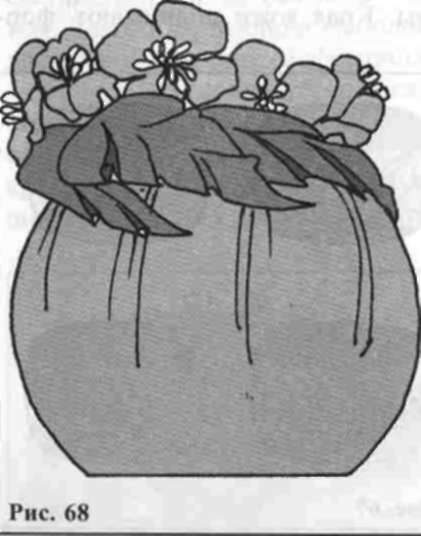
If you just tie the lace billet cut from leather of the same color, the lace can not be removed. If desired, decorate the vase with several smaller leather flowers of the same color. In this case, the vase serves as an independent decoration or capacity for leather corsage.
Of course, in such a vase will not put fresh flowers, but it is very harmonious look bessmertnyi, spruce and pine twigs, leather flowers, effectively curved koreski.
If you have a big piece of skin, do not worry. Using as the basis of feel, doing a few miniature vases for a single flower and put them next to each plate.
A good basis for the vase serve a bottle of unusual shape or a bottle of shampoo, other cosmetics. Creating such a vase arrangement of dried or artificial flowers, utilite her bottom, sprinkle sand, small stones, shells... you Can use and plasticine.
Often form bases itself dictates the image of the product, its style, but sometimes, on the contrary, choose the Foundation according to its purpose. In any case, it is necessary to consider the purpose of the product. If it will stand the flowers, its decoration should be more modest so as not to distract attention from the bouquet, but only highlight its beauty. A product designed just for interior decoration, can be decorated richer.
The figures under the number 69 shows the options for the design of the bottle of shampoo. Let's call these options "Spring", "Wind" and "Stone flower". The most simple in execution - vase "Wind" (the one in the middle). It is made of fine leather multiple colors in the technique of "hide and seek". Pieces of leather of different color and size drape oblique folds is directly based on, brushing it with glue. Or pre-create the folds on glass, smooth plastic and in this way glued to the base.

The image of this vases is largely dependent on color decision. Imagine it in shades of blue and blue or beige and brown, or white and black, red and yellow. If the colors are close together, the vase is better to use for flower arrangements, if they are contrasting - as a standalone decoration.
Vase "Spring" is also quite simple to manufacture. The basis of glued pieces of light or white skin, the joints are disguised by the folds. Folds directed from the bottom up, simulating the branches of a tree. On large planes, you can lightly sketch in tempera or oil paints spring landscape: forest in the distance and birch trees in the foreground. If you can't draw, enough to stick in a few places small pieces "cormorano" skin - and the vase will be similar to the trunk of a birch.
The branch with leaves is made separately. From the skin of medium thickness cut sheets. As a template, you can use this birch leaves. On the front side of the product with a knife, mark the veins, the edges finely incised to a depth of 1-2 mm, the distance between slits in 1 mm. the workpiece is machined over a candle flame; the veins are fixed, spending over the fire face, and the edges are wrong. Notched edges will be curved, forming a scalloped edge. For each sheet on the reverse side glue the wire handle with a length of about 10 cm.
Birch catkins are made, the wire is wound on a roll of leather with a diameter of 0.5 cm and a length of 3-4 cm On the roll, make a small transverse and longitudinal sections - like a fine mesh. In this form, they are treated with fire. The cuts are revealed, and it turns out a textured surface.
Of finished parts collect branch: consistently, one after another, fasten the leaves and catkins, trying to branch was more similar to the present. You can take a real branch for a sample. Ready branch wire mask, brushing it with PVA glue and wrapped with thread of suitable colors. As a rule, the darker the leaves and branch earrings. Attach it by tying the end around the neck of the vase. The mounting location can be masked by a strip of leather. You can also lock the position of the branches, primatv it with a strip of the skin color framework in several places.
Fulfilling vase "Stone flower", the first to be pasted on the basis of the pieces of skin the main color. The Foundation then decorate the petals of a flower. The petals have an oval shape with pointed ends. Their size depends on bottle bases. The number of petals must be even, so it is easy to calculate their width depending on the quantity. Take into account that the edges of the petals a bit come one after another.
To give the petals a stable form, the parts are soaked in a solution of PVA glue. While the skin is moist, it is given the desired shape. After drying, the form is fixed. The finished parts are adhesively bonded to the substrate with glue "Moment". This method is especially good if you are using thin skin. If decor items are made of skin of medium thickness, to give the bend and fix it by using fire. The petals lower and the upper tier of the hold above the flames reverse, and the petals at the base of neck - facial.
Complement the product is different stamens. They are made on a wire base, wrapped with thread or leather cord. Anthers may be of any shape, even in the form of hearts. Well, if the anthers are made of leather of a different texture than the petals, for example suede.
Another flower vase - Oriental jug, i.e. with a long narrow neck and geometric or stylized floral pattern. The bottom of the main profile is modified using a large piece of leather. His raise and adhesively bonded to the substrate to form the bottom not stand out (used a bottle of the same shape as in the previous vases). Adhered are formed four large Darts. They can be cut off: first, cut one side, then fit the skin close to the cutoff, on the other. Leather plastic, so the joints are almost invisible.
The entire background of the vase is made of leather shades. Closing the triangular ends of the first piece glued strip for ornament. The lower edge of the strip is slightly stretched, the upper pribivayut, so the detail goes smoothly, without folds. Ends connect back to back. As well stick the second strip - for ornamentation of medallions. Here, the form is bent more steeply, so make a few tucks, trying to place them evenly around the circumference. Tuck removed the same as in the lower part. The neck almost the entire height of the paste over one piece of skin, pulling it at the bottom.
Last piece glued at the top of the skin color of the ornament. This may be a problem, as in the upper part of the outer diameter of the neck less. The width must be aligned under a bottleneck with leather and gluing it. The upper section of a cover ring leather medium or large thickness. Inner ring diameter equal to the diameter of the hole in the neck, the outer may be slightly larger than the outer diameter of the neck.
You can increase the similarity of our products with Oriental jug with fantastic for him leather two handles (both sides). To choose a different style, take a strip of skin of medium thickness; one end of a rubber band fastened at the neck, and the second puts to the side of the framework at different heights. Once a handle is selected, measure the length of the auxiliary leather strips and start making the handles. Depending on the type of change the image of the product.
Handles can be woven from the straps of a width of 0.5 cm in three or four strands, or made from whole strips of skin. In the first case, spin according to the scheme, at the same time criss-crossing wire. Creating detail required length, carefully sealed both ends of the braided strap, so that they were flat. Flex wire, giving details of the required shape and glued to the base. The place of gluing decorative trim mask. In the second method of the skin is of medium thickness cut a strip of the desired length; in width it should be twice the planned width of the handle. The inner side of the strip is divided lengthwise into four parts. The extreme end of the bend to the centre line, putting in a bend in the wire, one segment on each side. The wire is about 1 cm shorter than the handle, so that the edges of the obtained strip Scherbaum 0.5 cm from each end. The upper end of the handle is cut from the front side, the lower on the reverse.

Before you begin decorating, prepare all the details. For curls cut strips of dark, supple leather of medium thickness, with a width of 0.3-0.4 mm and a length of 8 see half the length of the strip is smeared with glue and rolled into a roll. Ready strips evenly around the entire circumference bonded alternately, up and down "head". The obtained ornamental belt limit two strips of dark leather, glued to the base at the edges of the lower band.
For the second strip and masking of the fastening of handles are made medallions in the technique of "hide and seek". From a thin cardboard cut out is the number of ovals to be placed evenly in the second zone (plus four oval for pens). Small pieces of red thin skin collected pleats with glue smeared cardboard ovals, trying to keep the edges of the folds were not very high. Cut the skin exposed beyond the edges of the ovals. Thin dark leather cut out long strips with a width of 1,5-2 see Them smeared with glue on the reverse side and rolled into long rolls-cords. Ready ovals glued in place cut tuck the second strip foundations. Each oval on the edge of the dark circle made by the cord joining the ends butt. The upper edge of the ornamental belt limit dark stripe - the same as in the first edging strip. Four of the medallion glued to the attachment of the handles.
Original looks like a set of woven coasters and napkin rings. They are made as braided bracelets of different number of straps: for example, ring - 6, cupholders - of 12. However, the number of straps depends on their width and your plan.
The joints of the netting are made differently. So skip the last ends of the straps through the already woven and glue, the join is almost imperceptible. However, this work requires special care. Second method: on the rings of the ends of the netting hidden in the buckle or in detail, as the replacement. It can be a simple leather strip, the ends of which are glued on the reverse side of the product. But you can do on this strip, embossing, burn drawing, lettering, to decorate it with a sticker in arms, to come up with some kind of private option. Importantly, the decor in one set were identical and in the Cup holders, and rings.
Coasters can be braid for example bark products. The soft leather is cut into strips 1-2 cm wide. The length of the strips should be such that, covering the bottom of the glass, she on both sides it was 3 to 4 cm longer than the height of the Cup holder. The narrower the strip, the more they will need to weave and, therefore, the more bands will be bent, intertwined. So, what is the bandwidth, the greater must be its length (the seam allowance).
From the prepared strips to weave the bottom of the future product. The rest of the strip up, fixed to the glass with a rubber band, spread. Start propitate the bottom row, near the bottom. Weave strap in a circle, alternately passing under, then over vertically straps. Finish the row, hiding the end of the strap under the vertical strap that first. In the same way proletayut all series at the height of the Cup holder.
To secure the top edge of the product, surround it with a piece of wire in place top edge. The ends of the wire are twisted and bent. Apart the ends of the strips located at the edges. Those that cover the last row of horizontal netting, output and in turn close up the ends. Those that are under the wire, trace it up (add a drop of glue) under the second from the top horizontal row. When all these ends are fixed, the glass is removed. Bred out over the wire ends folded inside the unit and secured with glue netting under the top horizontal row.
To seal the edge of the product can also teeth. For this purpose the ends of the strips are bent in pairs - one inward, the other outwards (forming a clove) and hide under the straps of the netting.
Plasticity of the skin allows, slightly squeezing and stretching the strips to achieve a smooth transition from a square weave bottom round shape of the bottom of a glass. If the skin is too thin and slightly hold its shape, the product without removing from the substrate, is impregnated with a solution of PVA glue. In this case, not to spoil the glass, as a temporary basis, you can use a bottle of suitable diameter.
In addition to the kit in the same technique, you can perform cases for salt shakers, pepper shakers, glasses, napkin, etc.
Coffee table well decorated openwork leather cloth. If you have a large piece of skin with a thin or medium thickness, the question is only to choose the pattern that you can perform by using punches of different size and profile. The pattern you find among the schemes for embroidery techniques Richelieu, etc. the more frequently spaced holes, the sleeker looks of the product.
If a large piece of skin there, think of the napkin symmetric and divide it into sectors, within each of them by placing the pattern.
As a variant it is possible to perform two identical napkins in the technique of positive-negative. To do this, the print pattern transferred twice on tracing paper. One of the drawings tape bond with two different color pieces of skin are glued together with tape the entire stack at the edges. The second picture is placed nearby. Punching a hole in the stack, get two colorful details. That would not get lost in the abundance of fragments, they immediately placed the second figure on it the same place from which they were taken. So all punched holes and display all received small parts.
A stack disconnect. Each piece of leather glued to leather or woven (asakusas of the tissue) lining. Sticking, carefully ensure that the plastic skin is not stretched, otherwise it will be difficult to insert the pattern pieces.
Stick both the background to the Foundation, in holes glued parts a different color than the base. For example, if you used red and blue skin, then into the holes of the red basis paste the blue details, and Vice versa.
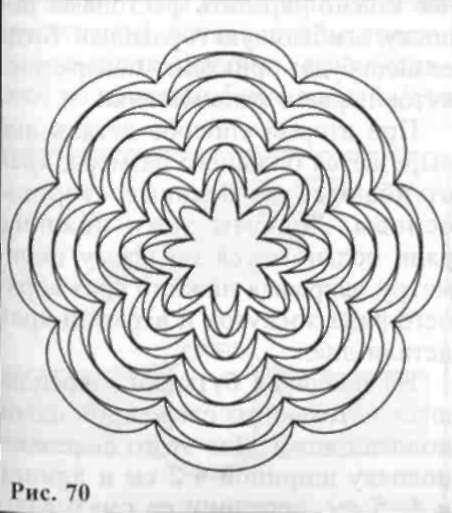
Another embodiment of openwork napkins - selection and fastening some leather motifs. It is easier to use symmetric motifs - hearts, leaves, fruit, etc. They fit in a circle or in the right of five-, six -, etc. gon. The motives can be different in size, decreasing toward the center (figure 70). Fasten them with strips of thin leather, glued from the inside. In order not to disrupt the composition, motives are laid out on the pattern wrong side up and connect the details. The spaces between the motifs to fill in the small inserts in the form of wings, antennae, etc.
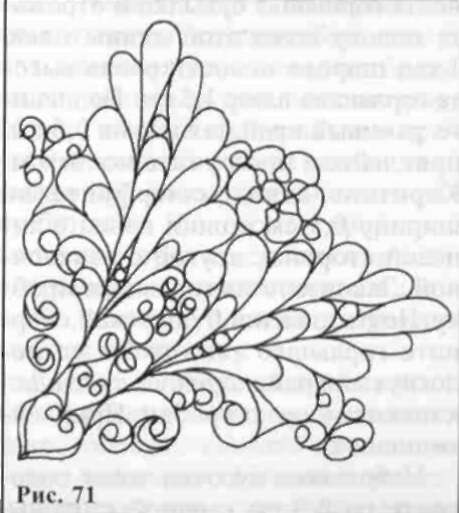
Most of the proposed variants of openwork napkins - jewelry. He will need to learn the patterns of filigree, filigree, consisting of a variety of curls. The napkin is made of lace, cut from the skin of medium thickness or belt. It is desirable that the cord had a square in cross section. Having made a drawing, prepare a separate team details-swirls, which are then glued together in pattern. In the joints or a smooth transition from one form into another cord end cut at an angle so that it is smoothly refined. Naturally, the length of the slice, all parts should be the same (figure 71).
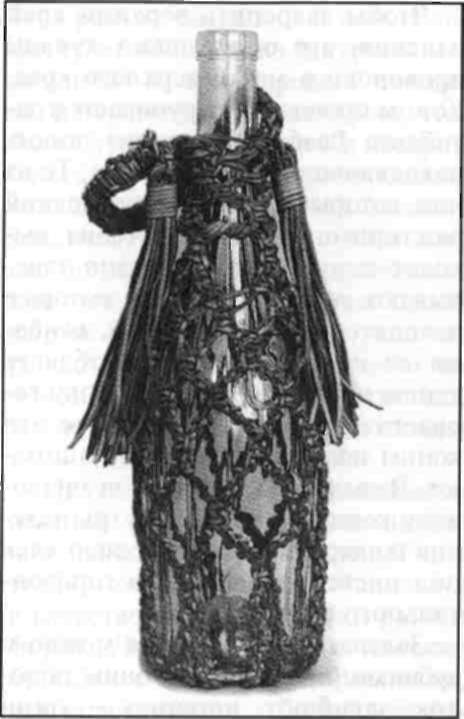
An entire functional group of products (vases, jars, candlesticks) or decorations for the table can be performed, using as a basis the bottles of different shapes. Jars are suitable for flat bottles with screw neck, candlesticks, bottles of beer, soda, perfume, Cologne, for the original vessels with pictures, damasks.
You'll want to do the most simple product - the jar. Pick up the shreds of the thin skin of one or more colors, different size. You can use old gloves. Measure the circumference of the neck of the bottle and cut a strip of leather to this length plus 1 cm; the width of the strips equal to the height of the neck plus 1.5 cm fold the long edge stripe 0.5 cm, glue and tap with a hammer. Short ends servuice width 0.5 cm - one end on the front side, the other on the reverse. Screw on the neck of the tube. Prepared by the strip wrap the neck so that its bent edge close to the lower edge of the tube. Glue strip.
Small pieces of the skin fold at 0.5 cm from one side, and attach the lapel and prostuchite a hammer. If the skin flap of complex shape, the bends form folds and excessive thickness can be cut after the glue dries. Affix these pieces, moving down from the neck. The bent side should be on top, overlapping the bottom edge of the previous piece of skin. Can edge flaps leave without bending. Each method has its advantages and disadvantages. When the bottom of the bottle will be several centimeters, decide which of the two ways it will be processed.
In the first case, the mosaic of patches is lowered until then, until he turns on the plane of the bottom. Then on the bottom is glued to the item, repeating it in the form. You can cut this part slightly larger to make the edge scalloped using a punch, bend them to the sides of the bottle and sticking. In the latter case can be decorated with festoons at the gloss, the envelope of the neck. Then it will need to glue on top flaps of the first row of the puzzle.
In the second method the detail of the bottom is cut larger, the edges are folded to the sides of the base. The flaps of skin of the lower row bent around the perimeter, closing the lower section of the top row of the flaps and the top edge parts of the bottom.
On the shoulders of the bottle are fixed loops of the double-folded strips of leather. To do this, cut a strip width of 2 cm and a length of 4-5 cm, the middle of it smeared with glue, the edges folded to the middle and glue. Striped fold loop, insert a metal ring threaded it and glued the strap to the shoulder of the bottle in the place where it goes into the wall. The bond closed with flaps of skin in the process. This method is more decorative than functional.
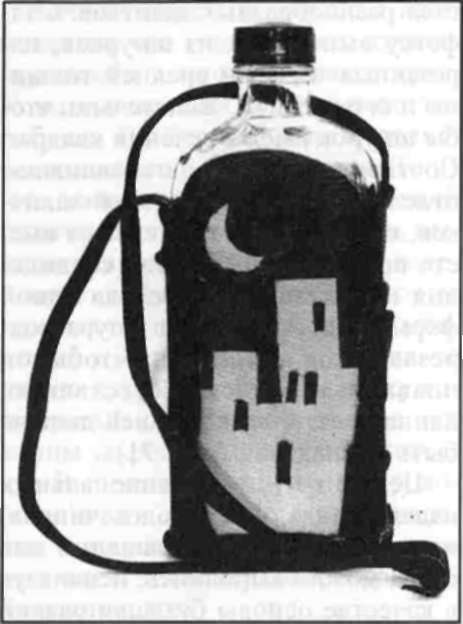
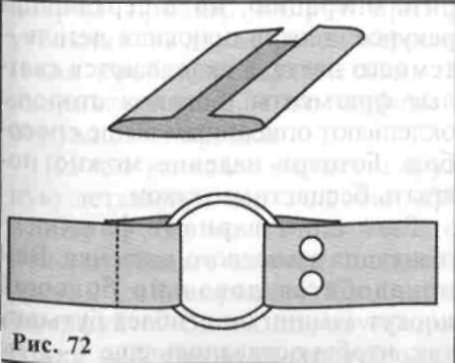
To the flask could be worn on the shoulder without fear of surprises, strap with eyelets, it is necessary to make such length that it around the bottle along its narrow sides along the entire length from the shoulder to the shoulder. Loops on the ends of the strap are not only glued but also sewn or fasten a rivet (figure 72).
The strap, which will be thrown over the shoulder, doing the same. A strip of leather the right length glue, podrachivaya the edge to the middle. And defer the bends on the machine or stitch by hand. If not strip the skin of sufficient length to make the band as a whole, it consists of two or more parts. To do this, cut a rectangle of width slightly less than the width of the finished strap and a length of 3-5 cm Glued one half part to the middle of one end of the band of the future, the second half - to the middle of the other. Wrap the side parts to the middle line and glue. Rectangular auxiliary item is affixed between the parts of the strap. The junction of the mask with a triangular detail, little side of which is glued on the connection to the midline from the inside. The item itself is smeared with glue and wrapped around the strap.
The ends of the strap pass through the metal ring on the shoulders of the bottle and fastened by a rivet.
If you plan to attach the flask to his belt, not to wear on the shoulder, then with one of the flat sides of the bottles fastened with a wide belt loop of such length that it passes freely his belt. The strap for the loop is done the same way as for carrying on the shoulder, but wider, about three inches. You can paste the ends of the loop into the slot on the main leather panels covering the flat back side of the bottle. To do this, in the slots on the front side are inserted the ends of the strap and glued from the inside, and then the whole piece is pasted on the bottle.
If you intend to use the flask in field conditions, it is expedient to make the mounting more reliable. Measure the dimensions of the bottle through the middle of the flat sides, the bottom and the base of the neck. Add a few inches to the diffraction Trouser belt (belt width plus 2-3 cm). Vykroyte of paper the item is received the length and width of the future of the band. In the same place on both sides at a distance of about 10 cm make the extension to the width of the part doubled. Measure the diameter of the base of the neck and draw a circle of this diameter plus 1 cm on the widest part part. Cut out the circle and put it over the neck of the bottle. Think about how the part is to round it, where to do a loop, at what point to connect the ends of the strap of the future. After fitting make a leather strap, put on the neck of the bottle pass through the slits detail the back side of the bottle and glue the bottle over the entire length, except loop for threading a belt. Glue and detail in the design of the back side.
In the process of pasting, you can arrange the flat side of the bottle or both sides, various figurines, appliqué. Take two pieces of leather of different colors with a size that's slightly larger than the size of the side. Put darker flap facedown; he is also face down, light the flap. Seal them around the perimeter with tape. Put the bottle on the skin with the flat side and draw a circle around it. Now for the skin, you can apply a pattern on tracing paper translated and rotated in the mirror. Under the picture put carbon paper and attach with tape to the skin along with a picture. Encircle it with a pen.
Drawing can be very simple (say, five stars), and plot and landscape, but always in silhouette, with minimum development of internal surfaces of the spots. For example, the tops of trees, town houses, pipes, guns. The shape of the objects should be simple, clear, with a small number of curves.
For both flat sides of the bottle figure is made simultaneously. Slotting it in the translated lines, try to keep sharpened a chisel or screwdriver to build vertically. Penetrate the skin all the drawn lines. If in the process you find that some areas are shifting, secure them with tape.
Cutting through all the lines, remove the tape and separate the layers of the skin. Attach detail of light color on the flat side of the bottle; into the resulting gaps insert the relevant details in the dark colors. On the second flat side repeat the operation, but in mirror view: now the main part-of dark and bright fragments are pasted. The sides hang as described above. The finished product can be covered with a colourless varnish.
Another option is flask - imitation suede pouch. You will need quite a large flap suede: it wraps around the bottle, leaving a 1 - 2 cm overlap for gluing; the height of the flap should almost reach the tube. The second piece of suede (or leather) is larger than the bottom of the bottle at 1 - 2 cm around the perimeter. Two small pieces will go on wrapping the bottle and cork and one, very small, round sealing surface of the tube. For strap and its attachment will fit a long thin flap of leather or suede and two metal brackets, or rings.
Trace the outline of the bottom of the bottle for its intended flap. Add around the perimeter of 1-2 cm and cut. Glue the detail on the bottom. Grease glue the sides of the bottle and bend them allowances of the skin. In this case, the angles formed of four folds, and cut them with a sharp hobby knife.
Fine suede or leather (to glue the flesh side out) cut out two rectangles. The length of the first is equal to the circumference of the neck plus 1 cm, and the width and height of the openings of the shoulders of the bottle to the bottom of the tube; attach it to the neck against the edge of the tube. A second rectangle equal in length to the first (if the tube is metal, screw-down), and width of the circumference of the tube.
From the same skin cut out the round part for the top of the tube. Draw a circle around the tube on the wrong side, add the whole perimeter of 1 cm and cut out. The edges of the circle servuice. Centimeter increase cut into triangular or trapezoidal valves. Glue detail on the upper plane of the cover, and the valves on the side. Glue the lateral surface of the prepared rectangle.
Take the main part and one of its vertical edges cut with scissors "zigzag" (if the suede is thin) or to make scallops. On the upper edge punch holes at a distance of 1 cm one from the other and then the whole row, stepping back 1 cm from the edge of the flap. Mark on the wrong side of the narrow sides of the bottle so that the place of gluing it fell to the middle of one of the flat sides. Mark on the sides of the bottles at the same distance the place of exit on the front side straps, to which is attached the strap-handle. The lower section of a detail of the bend on the wrong side by 1 cm and glue.
Follow the above-mentioned way straps length of 10 cm, the ends servuice. Thread each metal ring and glue so that the shorter end was glued to a long. The metal part insert into the holes on the front side, release the strap the same length and glue to the main part. If you make the strap, covering the bottom of the bottle, glue it to the bottle before I glued the bottom (leaving free both ends, 3-5 cm).
From the wrong side brush detail glue up to the height of the shoulders of the bottle. Wrap it on the bottle so that the bent edge is flush with the bottom, and treated with a zigzag or scalloped, lay on top of the raw edges. Glue.
Thread holes in the leather lace and tighten it. Pull both ends in a metal or leather ring. It must move to the ends of the cord with little effort, in order not to slide on them when they hang down. Moving ring, it is possible to fix the ends of the cord in different length, thereby changing the tension of the neck of the bag. To the ring was slipped on the ends of tie knots. Additionally, the product is sometimes decorated with tassels, a small applique, for example on the lid.
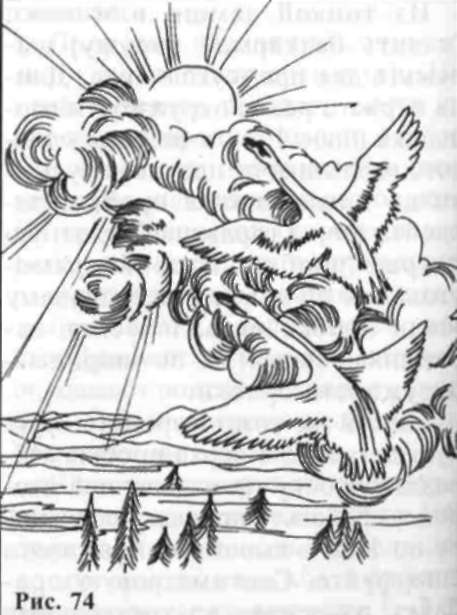
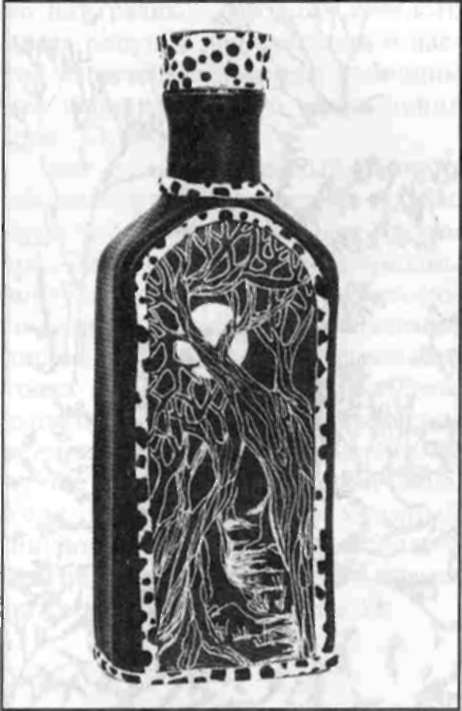
Complex and interesting picture can be applied on the flat face of the bottle, covered with dark skin, white or silver gel pen. The drawing is transferred from paper in the following way. Main line tracing tracing a white gel pen or tailor's chalk or enclose yellow copy paper. The choice of method depends on the type and color used by the skin. Tracing paper overlay on the leather underside and tracing all the lines. The pattern may be identical on both sides flat bottle or different. On the skin light in color pattern make a dark paste. As example, we give two variants of this design (figure 73, 74).