")
You will need:
8 thick bars with a length of 300 mm for the frame;
32 rod with a length of 425 mm for racks bumpers;
2 rod with a diameter of 28 mm for handles with a length of 300 mm;
4 rails for grips — short sections of the vine with a diameter of 28 mm, pointed at one end;
thin rods to weave the base and sidewalls of the tray;
4 small cloves; sliced ribbon for braiding handles.
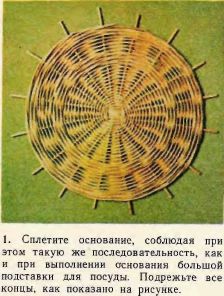
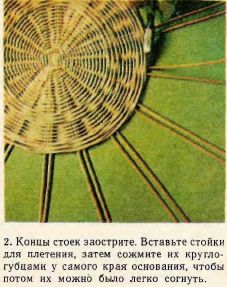
The frame for the base of the tray do the same as for a stand. Appetite frame method "torsion", while the base diameter of not greater than 150 mm. Three times appetite his way, "rope", then five times a way of "twisting" and three times "rope". Ensure that the base of the tray is not curved during weaving. Trim all the protruding ends of the rods. Insert in the base, previously spearheaded the bars for the uprights of the side of the tray (figure 2). To stand bent without breaking, squeeze them at the edge of the base of the tray with pliers. The ends of the curved racks assemble together on the base and tie tightly (figure 3).
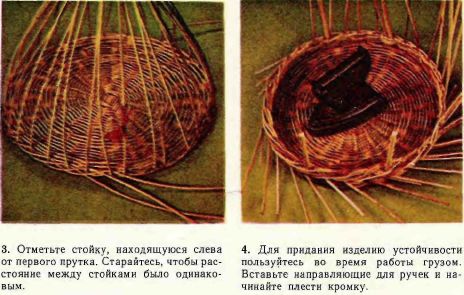
Landing
With this operation, change the direction of basket making in the transition from the base to the walls. The correct shape of the basket depends on how this operation is performed, so be very careful. Take three bars of medium thickness and sharpen them at one end. Although these bars have to go around the base at least once, should not take too long bars, because they have to work harder. Insert the rods into the base next to the three adjacent racks. Stand to the left of the first rod, mark the ribbon. In this place you will carry out a transition (figure 3). Appetite base once a way to "rope". Make "rope" tightly to the base, and the rod went down then up and rounded the Desk. All racks must be at the same distance from each other, so expand them in the process. Put the basket on the table.and inside it put for the stability of the load (figure 4). Make five more rows of a way to "rope". Untie the rack. Insert guides for future handles. The distance between the rails should be about 100 mm.
Edge
Squeeze it with pliers all stand at a distance of 7 mm from the woven edge of the rim so that they can be easily bent to one side. Bend three adjacent racks and begin weaving the edges of the three bars (see p. 13). Add a simple edge, "track", putting each foot in turn on the inside of the tray (figure 5). Trim all the ends.
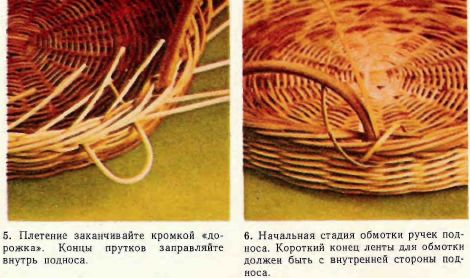
Handle
Well water blanks for pens, sharpen the ends and bend the arc. Remove the guide and insert in their place the handle. Insert the end of the ribbon (face down) to the ledge on the right from one end of the handle. The end of a braid inward facing tray equal to 150 mm. Around this end of the braid edge, with the same right — side handle and again pull it through the rim at the same level, but with the left side of the handle. Now miss the long end over the top edge to the left of the handle so that it was possible to begin winding the handle. Short end of the braid need to drag to the handle. On top of the handle will route the segment of the tape, inserting the ends into the edge near the ends of the handles. Three times tightly wrap the handle at the base, then thread the end of the braid under the cut that runs along the handle, tighten, and again wrap the handle over this segment. In the same sequence appetite the whole handle.. the Second end of the braid secure it is exactly the same as the first. For strength secure the braid with both ends of the handle studs.