")
Direct weaving
This type of netting is economical, simple and runs quickly. Weave from left to right. Take one rod and insert it anywhere between the two uprights of the basket. Miss the rod to around one rack in front, and behind her back, and so on until the circuit of the circle or until the end of the rod (figure 1).

While braiding, remember the form of a basket. Whenever the rod will bend around the front of the rack, hold the rack with thumb and forefinger of the left hand. If you want the basket is expanded upwards, each rack pull to him. All the rack pull is the same. If you want to get a basket of cylindrical shape, each rack hold vertically and Thus, the desired form will not work by itself — you have to give her the basket. It is much easier if inside the basket to put a load that will hold it.
To attach a new rod (figure 2), leave the end of the previous rear of the rack, and there place the beginning of the next bar. Allow the bars to dry and trim their ends diagonally so that they tightly, not speaking, close to each other.
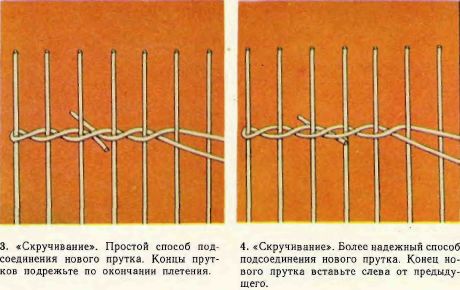
Torsion (simple rope)
This weave is used mainly for fabrication reasons or to decorate the walls of products. Is it the two bars. Take a rod, bend it in half, trace around one of the racks so as to get the two rods, the ends of which come to you. Then the left rod skip before the first bar over another bar and behind the second rack. Do the same with another rod and lay it before the second and third stands behind.
Starting to weave the base , baskets, make sure that the weave was tight.
To attach the new rods use two methods. One of them is shown in figure 3. This method is use in the case where the desks are located close to each other, for example at the beginning of the weaving of the base. When the rod, which should continue, will be on the left side, pull it back with the thumb of the left hand and insert the new rod next to it (right side). The end of the previous bar, leave the front and the end of the new rod put on the back side. And then trim it. The second method of connecting bars shown in figure 4. This is a more durable connection. It is particularly suitable in cases where the rack is located at a great distance from each other. A new rod position is not the right and the left and bottom from the previous one.
Complex rope
This method is used always when it is necessary to give the product greater strength. The strings make the top and the bottom of the basket, and sometimes in the middle. It is weaving three or more bars.
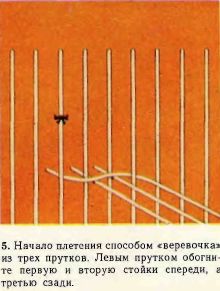
Rope of three bars
This method of weaving is used in the transition from the base to the walls of the basket (figure 5). Insert the three rod between the two adjacent racks. The left two bars go around the front and back again and the third output rod forward. Do the same with the next two bars. Mark the rack to the left of the first rod, attached to her ribbon. Continue stitching until you return to the marked stand. In this place it is necessary to make a smooth transition to avoid the stairs. Such a transition do every time in the same place.
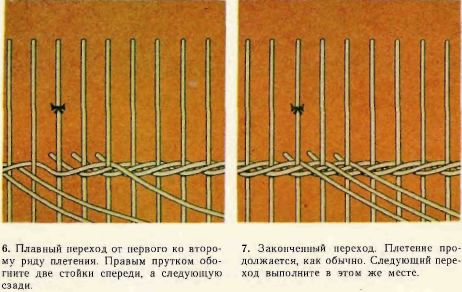
The transition
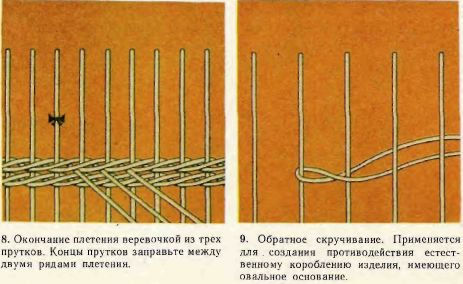
Now, instead of the left bar take a right and go around the two front and third rear (figure 6). Then do the same with middle and left rod (figure 7). Thus, repeating the transition each time in the same place, you will receive the required number of ropes. Trim the ends of the rods, and walking forward ends of all three rods (length about 75 mm) put them under a woven ropes (figure 8). Attach the new rod is exactly the same as it did when netting twisting (only the first method). Do this several departing from marked stands (i.e. not in the transition).
Rope of four bars
This durable rope is suitable for fixing the uprights of the basket, for example at the beginning of the weaving of the side walls.
Lay four bars of four adjacent racks and go around the left rod from the front of three stands (over other bars), and with the rear one. As in the previous case, check the first post. The same rod appetite all stand once (the rod should be marked around the rack). Cut this rod and continue to make a string of three rods as described above.
Reverse curl
Weaving way back twisting is used on the oval base in order to counteract the natural twisting of the material. This method can also be used on the side walls for decoration. Beautiful pattern in which one row of the twisting is alternated with one row of reverse twisting.
Start to perform a reverse curl as well as straight curl, but the ends of the guide rod (to the inner side of the basket). Then print the left bar forward over another bar and go around them with the following rack (figure 9). Join the other bars do the same, as in the weaving method of "twisting", but put bars on the reverse side.
Rope in fishnet weaving
This method is used in the weaving of the narrow strips on the walls of the baskets. The netting is two bars. Take one wire and go around them one of the uprights at the desired height (figure 10) (the height can be easily determined in the process). Put both bars in the right hand and once loop them as shown in the figure. Left or. the lower rod go around the next rack from the back side.

Continue weaving until the end of the bars. If necessary, you can attach the new rod on the bottom and left of the ending, but the need to conduct netting on top of the previous bar, then the connection will look like a regular node (figure 11). However, try to immediately pick up a rod of such length that it was enough for all the work.

EDGE
Edging is used to trim the rim of the basket. Stand bent down and twist together, getting a the curb. There are three main types of edges, and each of them can be performed in various ways. The amount of material going to the edge of the netting will depend on it and from distance between the uprights.
"Track"
This is the simplest method of braiding the edge of the basket. Each stand or pair of stands are bent down and woven into several other adjacent stands. More beautiful track, vyplacena double or triple racks.
The track" No. 1
Bend one of the posts down and to the right at a distance of 12 mm above the edge vipiteno wall basket weaving single stands and at a distance of 18 mm with braided double racks. Miss its end behind the next stand, and then ahead of the next two racks and tuck the end on the inner side of the basket (figure 12). Do the same with all the other posts. Last few stands are intermingled with the already curved uprights.
The track" No. 2
Miss folded stand (or several stands) behind a nearby rack, then the front the next two racks, one front, then behind, then in front of one rack and insert the end with the inner side of the product (figure 13).
Remember the order: one behind, two in front, one behind, one in front. Soon you will be able to create and use and your options of "track". The first bend on the rack a sufficient height, in order to weave the last stand. When running on a narrow path you can take height from 12 to 25 mm, and for the more complex types of "tracks" 50-75 mm. Installing the required height, stick to it as closely as possible. Tucked the ends of bars cut diagonally so that they fit snugly to the posts inside the basket.
Edge "rod"
It's a durable edge, it can be narrow and wide. When netting three bars, for example, will turn a narrow hem (it can be finished with a basket lid) and the use of four or five bars gives a wide "rod" (it is suited for decorating the edges of a large basket).
Edge of the three bars
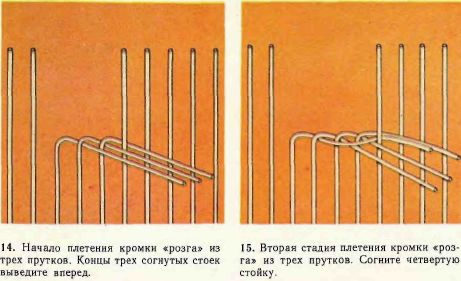
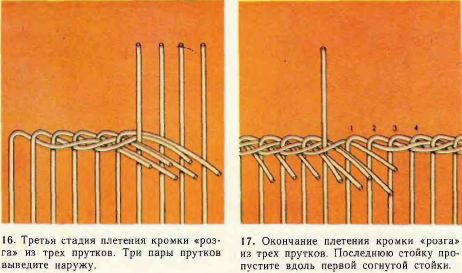
To accomplish this the edge of the upper free ends of the struts have a length of about 200 mm. All the poles of the basket squeeze it with pliers at a distance of 6 mm from the woven edges so that in this place they can be easily bent. Start with any stands that will be considered first. Bend stand No. 1 behind the bar № 2, stand № 2 — behind the stands № 3, stand number 3 — behind the reception counter No. 4. The ends of the curved racks bring to the fore (figure 14). Again, take the counter number 1, and curve it around the front rack No. 4 and at the rear of stand No. 5. Stand No. 4 Flex and slide to the rear and along the end of the bar No. 1. Repeat the same operations with a rack number 2, going around her stand № 5 (front) and strut number 6 (rear). Stand No. 3 go around the rack No. 6 (front) and stand No. 7 in (rear) (figure 16). You now have three pairs of bars, the ends of which face forward. Take the fifth, counting from the right, the rod and thread it in front of the nearest nesehnuti stand for the following nesehnuti stand. Bend the stand and perform the same operations as described above (it is important to have three pairs of bars, and the rest facing forward bars remained single until, until there is only one designata stand (figure 17). Take the end of the fifth, counting from the right, stand let him stand in front of nesehnuti and insert from the back side in a bend No. 1. Bend the bar and miss her just the same along the end of the fifth stand. You are all so "in" three pairs of bars. Looking carefully, you will see that the three stand, with which you started weaving, single, double and all the rest. Three rods of each pair that are to the right, it is necessary to pass through the edge. Take the fifth, counting from the right, the rod and thread it in front of the bar No. 1 fold No. 2. Then the third right rod miss the front of the counter No. 2 under the crease # 3 and then the last rod — front of the counter No. 3 under the crease, No. 4. (The ends of these latter bars have to come forward from the bottom edge.)
"Pigtail"
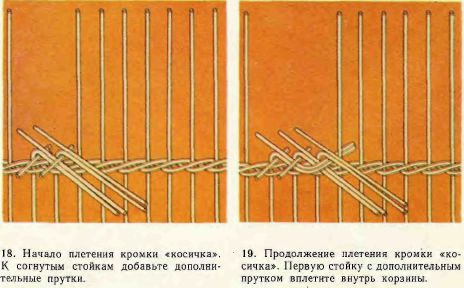
To accomplish this the edges of the free ends of the uprights must be a length of about 250 mm. Squeeze them with pliers at a distance of 6 mm from the edge of the woven basket. Prepare three additional rod with a length of 250 mm and two with a length of 75 mm. (All bars should be of equal thickness to the uprights.) Short rods will be needed during work for protection of the stands from excessive flexion, and the long — for replacement stands at the beginning of the weaving (in the end, in their place are inserted again real stand).
To start the weave at any place, except where when the walls were joined to individual bars.
One of the additional short bars in place to the right of the first stand and bend it so the end it passed in front of the other racks. Along it, place the extra long rod. Do the same with the second pillar, also using short and long rods (figure 18). Now take the first couple of bars and pass them over the second pair between the following two racks inside the basket (figure 19). (Do not tighten the resulting loop too much.) Bend the third rack and attach the third rod. The second pair of skip between the following two uprights. Now inside the basket facing two pairs of bars. Bend the fourth rack, and the left of the two pairs facing the inside of basket rods, output along the fourth rack (figure 20). Third pair of bars direct inside the basket, bend the fifth rack on top of this pair and the left pair of bars, facing the inside of the basket, output along fifth strut (figure 21). Now you have all the time to be two pairs of bars inside the basket and two groups of three rods on the outside (while the number of single rods in the process of weaving will increase).
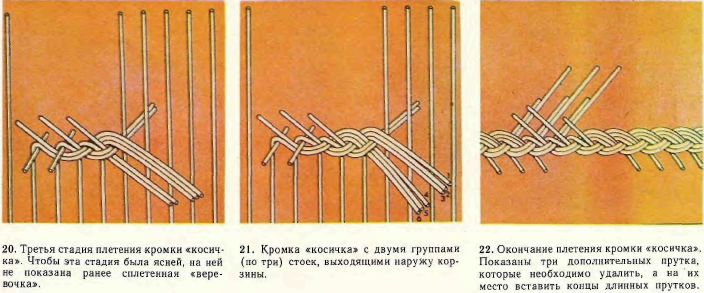
Count to the right of the fifth and sixth bars and thread them inside of the basket between the following two racks, fold on top of these bars in the next rack and take the left pair of bars on the outside. Further, the sequence of weaving such fifth and sixth wire miss inside the basket, stand, fold, and bring the left pair of bars.
Finishing the weaving of the rim of the basket, you may find that one of the bars too short — he doesn't even reaches the end "pigtails". It could be for the following reasons: you have a mistake in the account of rods or did you twist the rods in the process of weaving. Do not worry if you have to weave five or six baskets before you will master this technique and be able to perform this edge without the aid of drawings.
Now remove the first short (75 mm) rod and thread inside the fifth or sixth bars of the first rack through the crease. Then thread the last couple (#2 and # 3 on the right) on top of the first rack through the crease of the second post. Now inside the basket and you can see three pairs of bars, each with one long and one short rod (figure 22). Each of the three long rods will replace one of the extra bars. Remove left additional rod, gradually pulling him and inserting in its place the left long rod. Repeat the same with middle and right rods. Now inside the basket were three short rod. Tuck them inside "braids" in turn in the right direction. Carefully trim the ends of all bars.