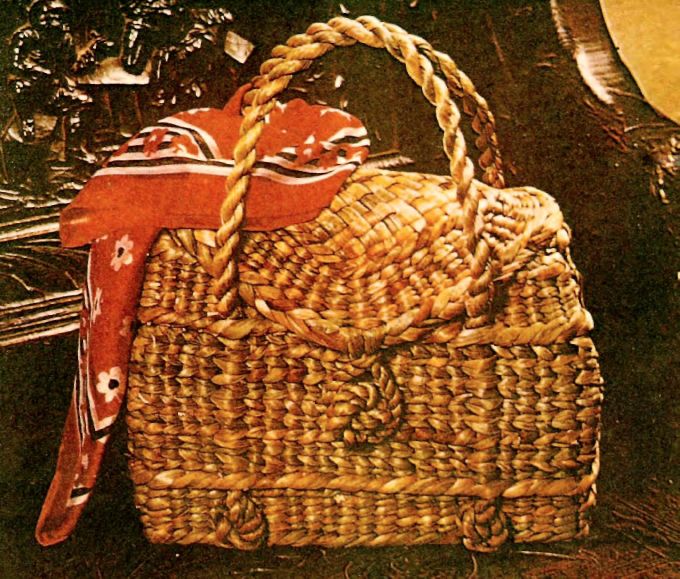
")
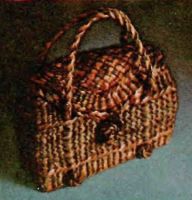
you will need:
stems of medium and small thickness;
1/2 m of fabric for the lining;
piece of sturdy cardboard the size of 75x225 mm for bottom of bag;
2 m of thin threads;
form for bags — a box, a piece of wood or a few sticks, fastened together, about the size of 275x80x185 mm;
the long and short struts.
To form the size you need 21 or 22 short (650 mm) long and stands 7-8 (875 mm), if the form is larger or smaller, adjust the number of racks themselves.
Select stands a good color and medium thickness, not more than 12 mm, otherwise the product will look uneven. Try to choose kamishini from the end of the same thickness.
Around the entire shape draw two horizontal lines, departing at 18 mm top and bottom. (At this point needs to be changed, the method of weaving.)
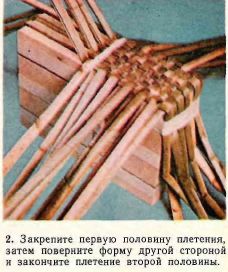
Place the mold on the table upside down. Along the base of the form, put seven or eight long racks. Firmly fasten them with adhesive tape at one end and in the middle (figure 1) Lift the stems through one loose ends and braid "in the box" by using short struts. Turn the form and tape the woven part of the bag (figure 2). Free the other half of the stems and doplatit the base to the end. Make sure the top side of the shape is fully closed, if necessary, add more struts.
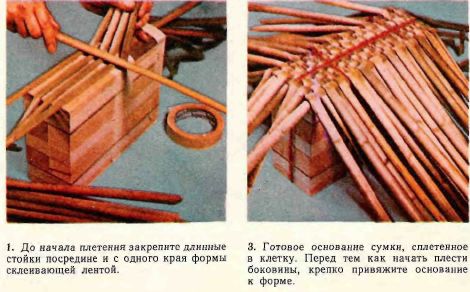
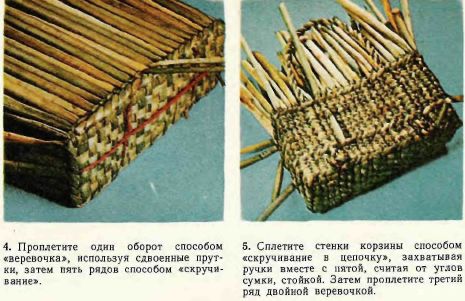
Firmly tie the finished base of the bag to form (figure 3). Then weave a way to "rope"using double stems, the lower rim. Connect the six thin stalks, and then separate them into three pairs. To ends was less bend the stems around racks. Begin to braid the rope from one corner, then the beginning and the end of the weave will be invisible. At the end of the first row rope tuck all the stems, except for two.
Using the remaining two stems, proplatit way "twisting" five series, adding as necessary new stems of medium thickness.
Handle
Handles, tie one end eight strong stems of medium size. Arrange them to make four thick and thin end on each side. Ask someone to hold the ends or hook them over the hook. Divide the stems into two beams of the same thickness and weave for (as in weaving baskets for a bouquet) at a length of about 1 m. Tie the other end of the harness, so it not dismissed, the pen is ready to connect with the wall.
Put harness so that its ends are passed along fifth stand as one, and the other edge of the side wall, and he formed a loop over the edge approximately 300 mm from the base. Leave the ends of the harness on the outside of the bag, and for convenience tie them to the posts. Make the same harness on the other lateral side of the bag.
Proplatit another row method "double rope"harness and a fifth from the edge of the counter appetite together alternately at the top and bottom.
Go to the weaving method of "twisting"using two rods, and make one number one and one row in the opposite direction (so-called "twisting the chain"). Proplatit so to a height of about 100 mm depending on what size bag you want to weave. Then make one row of double rope.
When you open the rack or its insufficient thickness, replace the new rack by threading through the weave threader. At the end of the bar to secure it tie a knot. Before you cut the old rack, do a few rows of weaving around both a-pillars. The end is not cut until the edge.
Proplatit five rows by way of "twisting", excluding the handle, then one range of double rope. Then do the ribbed edge. To do this, remove the bag from the mold. Each foot alternately bend to the right before two adjacent racks and tuck the end of the next stand. Neatly trim the ends.
Make handles finish until the bag is dry. (Make sure the ends of the handles wet and flexible; if not, water them.) Tie both ends of the harness a simple node so that the nodes were at the level of the bottom of the bag. The knot should be tight and tapered. If it is too large, untie it and cut a few stems. Broken stems will replace a new one, threading them into the weave.
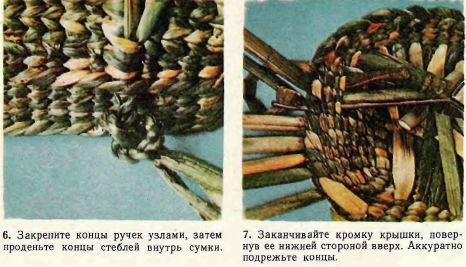
Thread the ends of the stems inside of the bag and weave them separately for fixation (figure 6)
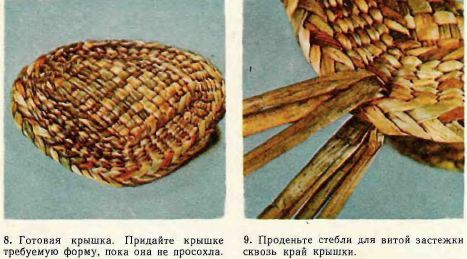
Try to give the bag a good shape while it dries. (It is possible again for several hours to insert it into the form.)
Cover
Select 22 medium stems of good colour and quality with a length of 500 mm. Weave the base (11 X 11 columns).
Double bars proplatit one number method "a string", single rod — way "twisting" five or six rows. Compare the diagonal size of the cap with the length of the top of the bag. Add 40 mm for one row of weaving rope and the edge. Stretch woven side of the lid (square) diagonally so that it is wider and closed the bag. If necessary, add one or two rows of netting to fit the cover to the size of the bag.
Proplatit one range of double rope. Edge do like the bag, but from the inside. Otherwise the cut ends of the stems will spoil the look of the cover. Flip the lid and in turn miss out each post to the left for two adjacent stands, then thread the end of each leg through the netting to the left of the next pillar (figure 7).
While the cap is not dried out, give it the necessary form, see how it is better suited to the bag and what angle to make the rear, and which front.
Clasp
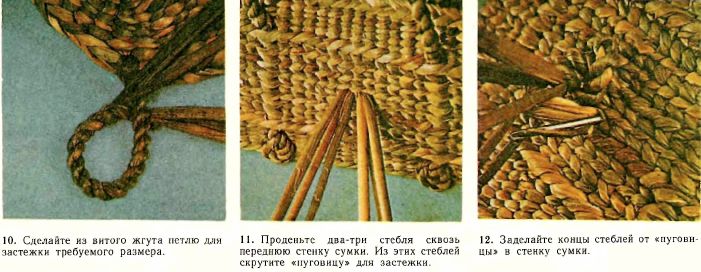
Thread the two stem from the front cover to the left of the left corner post. They go around the edge and a rope to go out four the end. Weave for wiring, the length of which is sufficient to cover stranded "button". Make a loop (figure 10). Twist the free ends two or three times, then tuck them as well as in weaving handles basket for a bouquet, threading the stems through the cover to the right of the right corner post. Thread the two ends from the inside out and the other two outside to the inside. Tighten and tuck the ends.
Lining
Cut out a cardboard rectangle the same size as the base form. Put it on the bottom so that the bag is not twisted.
You are right-with an allowance of 20 mm on podvorot tailor lining.
Sew bottom to the sides, then vsheyte the lining in place. Also cut a piece of fabric for the cover and firmly sew the bottom "rope". Tack the lining cover two or three times in the middle and on the edges, so it does not SAG. Try all the stitches to do wpoty.
After finishing the cover, but before sewing the lining into the bag sew the cover in place with three or four stitches closer to the edge. Do not close the thread too much, on the contrary, make the stitches loose so the lid is easily opened and closed