


")
The number of straws of which they are trailing, platezhki are divided into double-ended (two), trehantiria (triplets) chetyrehkantnye (four), etc. With a wide pletion has eleven ends. It is the largest manufacturer of articles of straw, so it is also called a suitcase
Before you begin weaving directly from straws, first be sure to work out make the most common types of peticov of colored paper strips.
That was easy to follow the process of weaving peticov, stripes in the images is specially painted in different colors. Only after will be able to fully understand the patterns of weaving paper peticov, proceed directly to work with strips.
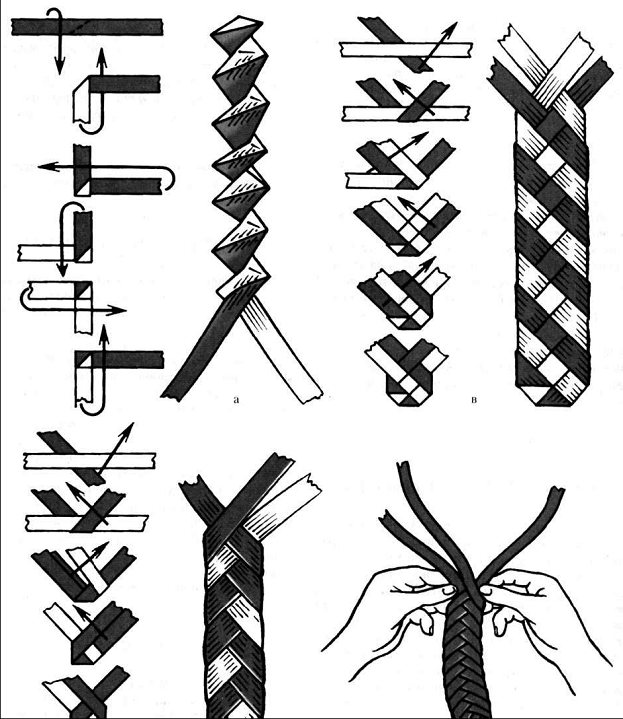
Figure 23
Pletion-dvuhtonnoy
Pletion-two, or duchcova, braided from one straw, and in this case, that is, when training weave one paper strip (figure 23). The strip is bent at an angle of 45 degrees, the ends thereof are at right angles to each other. Moreover, the fold line prudently shifted to one end so they were different lengths. Then increase each end will be not at the same time, and hence the strength platica in the joints will be more. These conditions must be observed when weaving peticov, and having a different number of ends. In the next stage, the left end of the strip is bent at a right angle. Then the end of the strip located on the right, also bend at right angles. The other end caught at the bottom, bend from top to bottom. And now another end of the strip is bent at a right angle from left to right. So do until then, until it receives pletion desired length. Build new Plethico carry out simple overlaying them on ending platezhki. When you are finished weaving, placebo stretch like an accordion, and get pletion in the form of a narrow wire mesh of the spiral (figure 23 a). Such platezhki used for the finishing of straw goods, jewelry boxes and straw sculptures.
Pletion-trehchasovye
Flat platici, vypletenii of three or more straw strips are mainly used for stitching of bags, hats, lampshades and many other similar products.
When netting trencansky master gush alternately arranged on the edges of the stripes medium stripes. In the process of weaving the role of each of the strips (straws) changing, as it periodically appears in the middle, then right, then left. For weaving trencansky use two of the straw, and for training exercises — two colored strips of paper, such as white and green (figure 23 b). White stripes placed horizontally, and the green at an angle of 45 degrees thereto. Then the ends of the green strips bent at right angles to each other. White striped bend in turn at a right angle to the green, located to the right of it. In the next stage, the green bar on the right is bent on a line running at an angle of 45 degrees. Then there is a green bar located to the right. It bent under an angle of 45 degrees and perechislyayut located in the middle of the other end of the green strip. From this stage, all operations of weaving braids again in the same order. As soon as one of the three strips over, it immediately increase, putting it under the end of the new strip.
For weaving all types of flat peticov of course observe the General rule: spin not on themselves, as in the weaving of ropes, and myself (figure 23 g).
Straw plucked thumb and forefinger, helping sometimes average. In the process of weaving the finished pletion gradually descends to the knees, where it is wound into a ball.
Pletion-chetyrehrazovoe
From the previous this pletion different widths and a more complex pattern platev with a chain of squares or diamonds in the middle (figure 23). Braid it the same way as Techconsult, but weaving involves all four risers. Strips at an angle of 60 degrees to each other. White stripes circle around the green. Then one end of the green bars bend to the left and the other to the right and slide under the adjacent white stripes. Following this, a white stripe, located to the right, bend to the left, and white stripes on the left bend to the right and slip it under the green. The first stage of the weaving ends. Then repeat the same operations in the same sequence.
Gear pletion-chetyrehrazovoe (herringbone)
He has a special chetyrehrazovoe not only decorative, but also higher strength.
Start to weave the herringbone (figure 24 a) in the same way as a simple chetyrehkantnomu. And on the fifth stage of weaving there is a difference, when first formed, and begins to form a second kink. The green bar pushes in placebo, circle around to the left of a green stripe and display on top of the white. In turn, the green bar on the left pushes in placebo and output on the right. As a result of these transactions formed the second clove. Getting to the formation of the third, which was developed right green tape around the white circle. And to finally formed the third tooth, and white stripes on the right, bend left and passed inside plateua. All further steps of forming teeth are no different from those that were considered. Despite the apparent complexity, scalloped chetyrehrazovoe lagging quite simple, even simpler than the usual four endings. But it is necessary to carefully study the techniques of weaving, then repeat them several times until you develop a certain automatism of movements of the fingers.
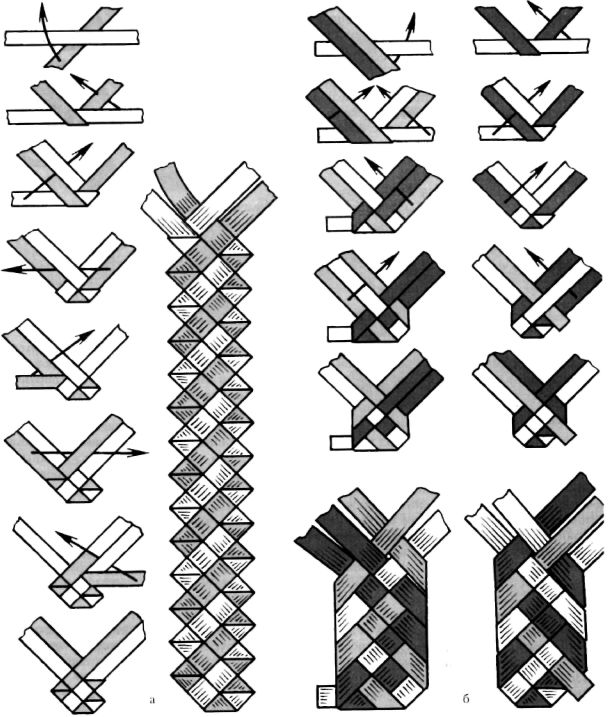
Figure 24
Pletion-pelikonsoli.
This pletion will be slightly wider than chetyrehrazovoe. From simple chetyrehrazovoe it differs in that instead of a single chain of diamonds in the middle are two such chains that complicate the picture plateua.
Braid patientuk, picking up three of the straw, and for training exercises three paper strips — grey, white and green. Gray and green stripes round at the same time around the white so that between their ends turned straight angle (figure 24 b). White stripes bend to the left and slip under the next grey bar. Then bend the gray bar to the right, positioning it over the green strip and slip under the white. The green bar on the right, twist with white and gray. In the end, on the one hand platev will be located two strips and on the other three. Further netting is carried out in the same manner.
Netting pelikonsoli you can start a little differently. In the first stage, as well as in the night of chetyrehrazovoe, use only two strips of green and white. They are placed at an angle to each other, and then twist, as if netting chetyrehrazovoe. The next stage in pletivo inserted the fifth (also gray) stripes. The rest of the process of weaving is no different from that which was discussed in the first embodiment, that is, alternately bend the extreme strips and twist them with others, who are in placewe.
Pletion-testicanzoni
Sectioncode is used for stitching all kinds of bags, mats, screens, etc.
Braid any pletion, however, is difficult. It is especially difficult to braid wide mnogokvantovye platezhki. Nothing related to each other scattered straw, slip from the hands. To facilitate the work it is convenient to use a special pin, which is bent from steel wire. Paper strips, and later the straw is clamped by the pin at a certain angle (figure 25 a) and a bend in its anchoring (figure 25 b). Then begin to twist the strips without worrying that they will fall apart. Located in the middle of the gray bar to twist with white and green (figure 25). Have them twist also to the right the gray bar (figure 25 g), then the leftmost green striped with white and two gray (figure 25 d). In this same sequence continues to weave on. When all the strips are twisted repeatedly and the netting goes on as usual, the pin can be removed from plateua without fear that it will collapse (figure 25 e).
Sectioncode, like all other flat platici, when dry twisted but helix.
And I noticed that platezhki consisting of an even number of straws, twist is much stronger than those that are made of an odd number of straws.
Regardless of the degree of zakruchivaetsya all platezhki moisturize again and smooth with a hot iron, then rolled into rolls and tie in several places with twine. The rolls were stored in a dry place.
Stitching Plethico
Various products sewn from Plethico manually with a needle or sewing machine. The most common two ways of stitching - butt and the ledge. When knitting butt needle alternately engage the edges of the two peticov and pull them together as tightly as possible with thread. Stitched thus platezhki represent a smooth surface, as they are all on one level. This technique of stitching used for making mats and screens. Making, for example, a Mat of rectangular shape, each pletion bend the edge at an angle of 45 degrees 2 times (figure 25 W, z). This forms a triangular projection (figure 25). In the same way they curve and at the other edge of the Mat. In the end, the two sides of the Mat will have a scalloped edge (figure 25). But if necessary they can hide, sew top pletion with smooth edges. One side of the Mat, where are still visible the stitches will be deemed wrong, and the opposite face.
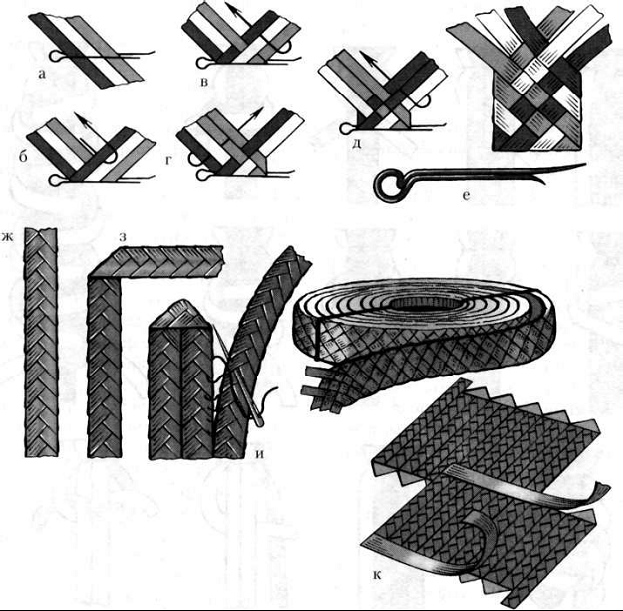 Figure 25
On the front of the Mat, you can draw with a pencil the pattern and sew along the contours of the various platezhki.
Way of binding ledge is used in the manufacture of various hats, bags, lampshades, etc. (figure 26). The products sewn in this way, high durability. Each new pletion is superimposed on the previous one, overlapping it by about one third, then they are stapled. Before sewing platezhki be sure to lightly moisturize. The hat of the sombrero type, jockey and children's hats, sun visors are sewn in a spiral. The hat consists of a bottom, a crown and fields. Sew starting from the bottom — at first the needle, then the sewing machine. You can, of course, and all the work to perform only one needle. Immediately get a flat spiral pretty hard in the middle of the bottom formed a small cone. Gradually platezhki stitch detail for detail. Once the bottom is ready, the edges of Plethico bend along and go on to the stitching of the crown with a surface that is close to cylindrical. After graduating with a crown, the edges of Plethico again bent along a right angle only in the opposite direction, and proceed to sshivaniya. To the edge of the hat more wear and tear and not break, their sheathe narrow cloth tape.
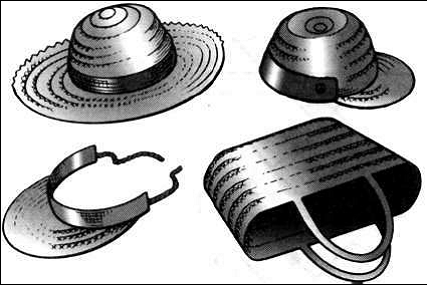 Figure 26
The finished hat is moistened and ironed to the Ironing Board and the crown with the bottom on a wooden disc. Conical protrusion, protruding above the bottom, turn so that he was inside the crown.
Hat with cuff and visor sewn in the same way as the crown of the hat. In the crown make the cut, sheathe with cloth tape, turn the edges and sew the visor.
Of straw peticov, in addition to hats, you can sew lightweight and durable bags, various trays for small items, decorative figurines and lampshades. Simple Plethico it is easy to weave a rectangle and then folded it an envelope, get the original pocket for wooden spoons and other kitchen utensils.
Weaving finishing Plethico
Finishing platezhki used for the decoration is sewn from strips of straw products and wooden and cardboard boxes, cylindrical boxes, and more. Finishing platezhki are of two types — flat (figure 27) and screw (figure 27, II). One another weave of at least four straws.
For training exercises you can use electrical wires that have the colored PVC insulation.
Placing the green cord on the left, two grey in the middle, and white on the right, bind them firmly, the ends of the thin wire (figure 27 a). Two middle of the cord will serve as the Foundation, constantly staying close, and the other two located at the edges will be to braid them. To start you can weave with any cord, such as white. Under the grey cords give birth to the first white (figure 27 b), then green (figure 27). The white cord, which in turn is laid on top of gray and pull on the top green hole (figure 27 d), bending in the opposite direction (figure 27 d) on top of the grey. On the other side again attracted to green (figure 27 e). In this same sequence is carried out and all the rest of the weave (figure 27 W, z). Width of flat finishing platica depends on the number of cords in the middle. So, instead of two, you can take three, four and even five cords.
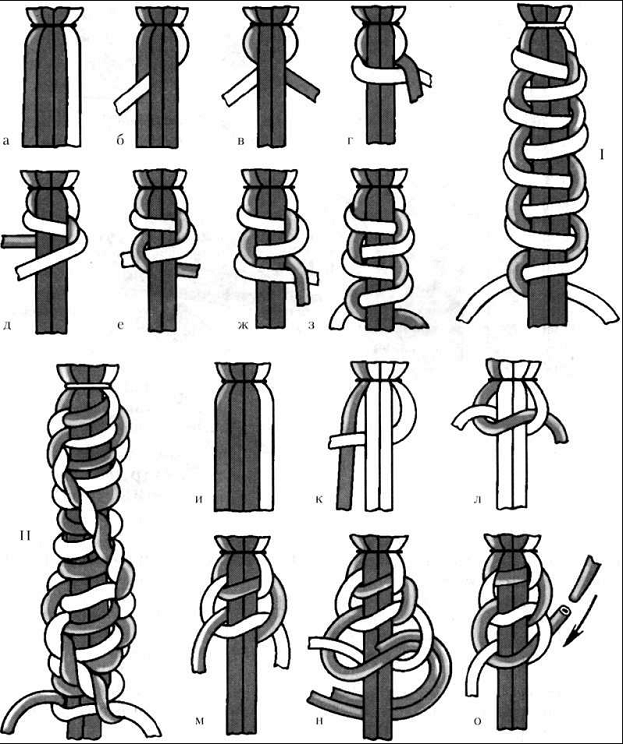
Figure 27
If the netting is flat finishing platica functions involved in the weaving of the left and right cords are different from each other, the screw they are exactly the same. Four cord link together and begin braiding (figure 27). Located to the right white cord slips between the green and two gray in the middle (figure 27). In turn, the green wrap around the end of the white, put it on top of the grey and put in the loop formed by the right green cord (figure 27 l). The resulting knot is tightened as tightly as possible and continue braiding. At this stage, white and green cords the roles are reversed: now the green cord slips between white and gray, and white round the end of the green and stick into the loop formed by the right green cord (figure 27). The resulting node is also delayed as tightly as possible. All other nodes are knitted in the same sequence. In the process of weaving pletion will evenly twist along a helical path in a counterclockwise direction. If the weave started off on the right (white) and left (green) cord, pletion would twist clockwise.
As already mentioned, the length of the cords in the middle and serve as the Foundation always remains constant, while the lateral cords will be periodically pletetsya. Ends of the lateral cord are increasing, sticking another loop in the end of the new cord (figure 27 h). The loop delay as much as possible and continue to weave in the usual manner. The connection was more durable, you need some time with a new twist to an old end (the remaining coccyx cut with scissors). If screw pletion weave as much as Solomin, when building the socket the old straw insert the thinner end of the bark and tighten the connection hub (figure 27).
For screw and flat Plethico it is desirable to use long straw, harvested from the top of the stem. On fine netting have to go narrow strips of split straws, harvested from the middle part of the trunk.
The straw, located in the middle of platica may not be very flexible, while the side must have very high ductility. So just before netting soaked or steamed carefully. Suitable for use are those of the straw, which can easily tie up in knots. From the party soaked Solomin take one or two and tie them in a simple knot. Tightening the knot as tight as you can, carefully inspect it. If the node turned round, and Samedov no chips and straw around it is not cracked, the cooked material is quite suitable for weaving.
Netting squares, and polygons
Squares and polygons, woven from straw, are used by folk craftsmen most often for finishing of all kinds of caskets and boxes. At the same time of them you can make original Christmas decorations.
The principle of weaving all the pieces are the same, so it is enough to master the techniques of weaving the most simple shapes — the square. Begin weaving with the manufacture of the frame (figure 28 a). Two features of the straw at a right angle to each other and linked. At the same time to the cross tie a band of straw. Then, starting the formation of a square, a strip successively encircle the pillar crosses (figure 28 b) finally received the first spiral of the square (figure 28). The same sequence continues to stand around the cross, receiving the second, third and all the other turns. Do until nor until it has obtained the square of a given size.
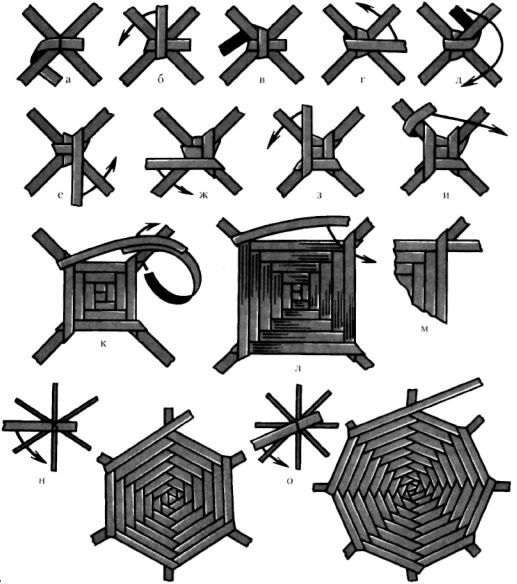 Figure 28
As another straw or a strip of it is to end, it build a new one. Insert a new straw top (thin part) in COMELEC running out of straws in a time when have to make another turn around the strut (figure 28 l). A new strip is placed under the end of the old and make a revolution around the rack. The end of the old straw is firmly clamped and protruding from Platea figure 28 the end after some time, clipped with scissors.
The end of the braid close up under a straw on the opposite side of the square (figure 28 m). It is easy to see that the shape of each polygon is determined by the crossbar. To weave a hexagon, a cross made from three intersecting Solomin (figure 28 h). Cross to the octagon is made of four intersecting struts (figure 28). As cross closes completely entangling it sticks, it can be made from soft wire or narrow strips of sheet metal. That is the d-pad is convenient to use in cases where squares and polygons it is necessary to fix on the walls of the cartons and boxes. Intentionally left the ends of the wire are bent at the corners of a square or polygon and inserted into pre-drilled holes in the cardboard or wood. Threaded into the hole the wire is bent to the inside.
Square or any other geometric shape that is woven from straw, acquires a special significance if used for weaving the straw for two tones.
Rows of straw to a darker color, arranged in a specific order, highlight the natural beauty of natural materials, create a special rhythm.
Polygons for the production of Christmas toys spin as well as for other purposes. But the crosses are made of long straws. Some of them bend the arc, getting decorative flower with rounded petals, others tie the ends in pairs, receiving the star.
Criss-crossing strips associated together three stands, made triangles, which can serve as the basis of a variety of toys.
If a little dream, of straw you can make a lot of bright and distinctive Christmas decorations. One disadvantage of straw is that she is afraid of fire. But this disadvantage can be eliminated if the toy down for a few minutes in a 10% solution of boric acid, borax or silicate glue.