


")
Straw was beneficial in the economy, but for artists it is a long time, is of no value. May first tried to applied to the wall from pieces of straw a simple pattern, Cabinet makers, skilled mosaic wood — marquetry and intarsia. The essence of the first technique is that the parts representing the elements, cut from thin wood shavings, and the later veneer, glued to the surface of a wooden product. In this sense, the technique of inlay strips (applique) closer to marquetry than intarsia (inlays).
The idea to use a straw for such works is likely to come to the masters who are familiar with marquetry. It is possible that in the early stages of straw was used in combination with the chips. However, this can only be guessed, because of the fragility of the material, such products could not reach our days.
The earliest samples of inlaid strips belong to the XVIII century. They can be found occasionally in museums.
Modern inlay strips is different from true inlay or intarsia, the fact that its elements do not cut into the wooden base, and glued on its surface. And from an application or marquetry it is distinguished by the fact that only in certain cases its elements are tightly frigonautica to each other, the greater part of the base remains open and serves as a background. Each item is cut from the straw rises above the background. In marquetry the background fully closes tightly fitting to each other elements.
If you understand the word inlay in the literal sense (incrusting -- cut), for each straw element of the pattern would need to cut a special slot in which it is then glued. Since the straw elements of the pattern are glued on top, such a technique should have been called applique. But it so happened that this inlay technique is very time consuming, so accessible and a simple technique of application strips having external similarity with her, and was called the same.
Except for Shine and Golden color, straw has another remarkable property: it is laminated of the image, depending on the change of the angle of view shimmers like mother of pearl. The same effect is present in straw braids. It is due to the structural heterogeneity of the tissue straws. Transparent glossy film on top, translucent striated fibers running along the trunk and reflecting light rays, depending on what angle they are to the light source. If straw is turned so that the light glides along the grain, it seems dark, as if invited. But if light falls perpendicular to the fibers — straw as if lit due to reflected light rays. This phenomenon is easy to simulate. Two identical pieces of paper can be folded accordions and put on the table so that the light from the lamp or a window fell on one of them along the corrugations, and the other — across (figure 38 a). The first corrugated strip will seem bright and the other dark. If each strip to rotate 45 degrees, then everything will be Vice versa. The star shaped diamonds of straw, fibers are also directed at different angles to the light source (figure 38 b). Lighter will seem to those on the fiber where the light will fall under the direct or close to it angle. But it is necessary to move the light source or to turn inlaid product as light diamonds are out, and the dark, on the contrary, will Shine (figure 38).
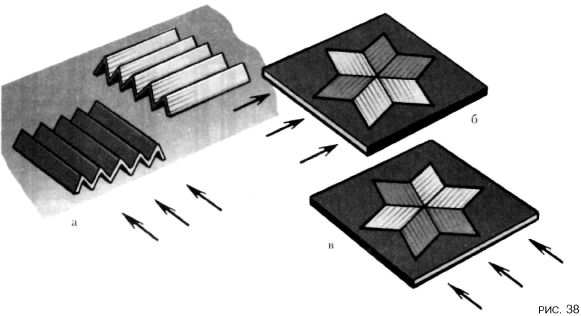
Even a small product is decorated with inlay, paste many tens, or even hundreds of cut straw elements having the different direction of the fibers. Enough so at least a bit of a turn-encrusted object to inlay began to flicker and sparkle.
Although straw and like to compare with gold, the noble metal having a homogeneous structure, yet there is such a unique property that has the usual straw. Thus, in order to achieve flicker of gold and silver surfaces, jewelers put on their tiny grooves, essentially simulating straw fiber.
TOOLS
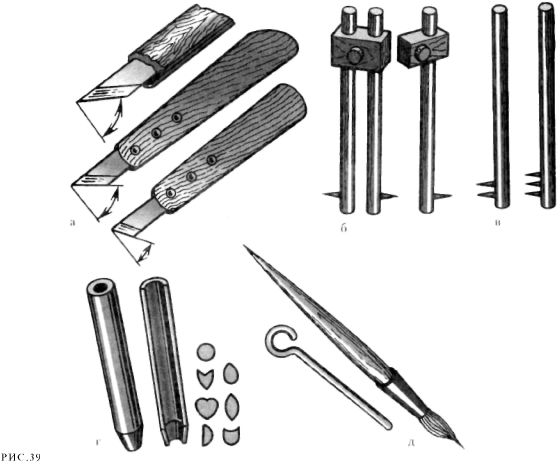
The main tool used in the inlay strips, a knife-jamb. By the master should be a few knives with different angles of inclination of the blade (figure 39 a). They are made from old knives or cloths metal hacksaw. The handle is made from durable and smooth hardwood — birch, beech, pear, Apple. Glued the handle is made from two plates with a thickness of about 7 mm. Wide edge (of the plate) of each plank is sanded so that they fit tightly to each other. Then on the polished facets of one or two plates cut out the slot corresponding to the shape of the saw blade. Putting the canvas into a finished nest, faces smeared with carpenter's glue or epoxy and tightly clamped boards in a vise. When the glue dries, the glued plates to form a monolithic wooden block, which is treated with a knife, trying to give the future the handle is comfortable and beautiful shape. You need to ensure that the handle is gradually narrowed in the direction of the blade, and the top had a beveled end is used to smooth glue Solomin.
Cutting out the handle, you have to try it to hand, so she could sit in it like a glove. Once the shape of the handle is found, its surface carefully grind.
When applied to encrusted the product of various parallel lines used cameras as factory made, and improvised (figure 39 b). The surface gauge consists of pads with through holes, into which is inserted one or two rods driven into the ends of solid needles. Perpendicular to the rods in the drilled hole, into which drive a wedge, the locking rods with the needles in the desired position.
For splitting straw into strips of equal width are special renacci (figure 39). Every rusachok is a round wooden stick at the end of which two thin needles with their points directed outwards. The distance between them should be equal to the width of the straw stripes. Such Rusakov having a different distance between the tips of the needles, you need to have several. To split a straw into two or three equal strips, apply rezachek with three or four needles, inserted at an equal distance from each other.
To cut a straw the same elements of pattern, having the shape of a circle, oval, flower, etc., using special punches of steel tubes (figure 39g). Straw elements pushed out of the punch ramrod of a thick wire. Glue or varnish on the encrusted surface is applied with a soft brush that is linked from squirrel hair (figure 39 d). The brush was comfortable to hold in hand, its length should be not more than 150 mm.
MATERIAL
For inlay use straw from the middle and upper parts of the trunk. By removing with a sharp knife knots, straw soaked in warm water for about an hour. Then break down each straw pointed scissors, unfold and iron the iron until, until it will roll into a large ring. All straw rings are rolled into one roll and store anywhere in a dry place. Before operation, the straw is moistened only slightly to become sufficiently plastic. Then put on a wooden plate in the lingua-side down, carefully cut with a knife-jamb internal surface (figure 40). This process is called planing straw. During planing of the blade-cant have at a minimum angle to the surface of the plank, which pressed straw stripe. If well chosen inclination of the knife out of continuous twisting in a roll chip, and the straw straightened. If individual sections of a loose layer could not be removed when planing, they scraped the tip of a knife-jamb (figure 40 b). Peeled strips of straw translucent. If you press one strip, say, to the newspaper, then it will be quite clearly visible letters.
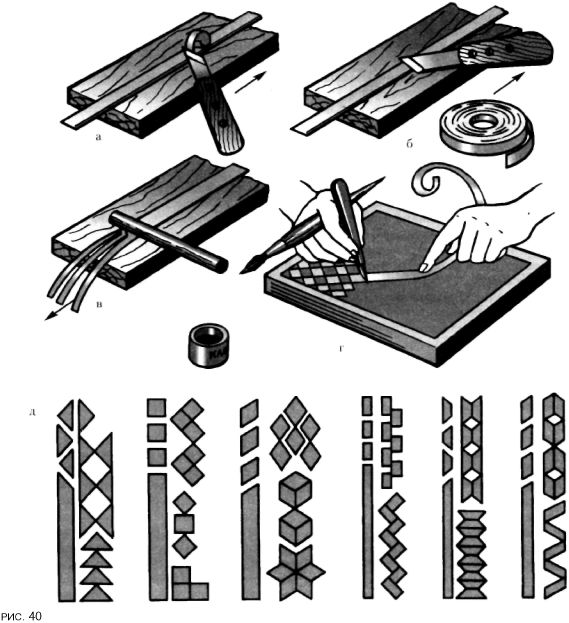
Using Razakov of the harvested material is cut into calibrated, that is, having a certain width, the strips (figure 40).
The same elements of future patterns (diamonds, triangles, squares, trapezoids and parallelograms) cut from grooved strips with a knife-jamb on a wooden cutting Board or directly on the encrusted surface. Straw strip is pressed against the wood surface with the left hand while the right held the knife at the same time-joint and brush (figure 40g).
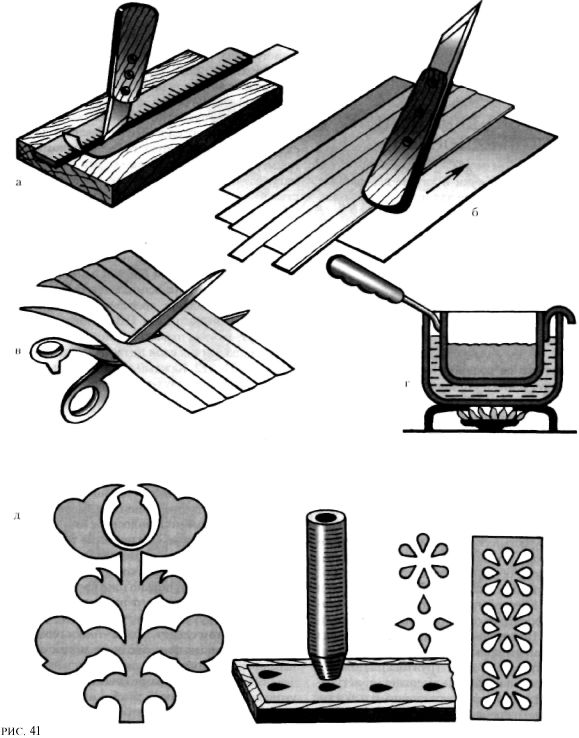
But not all inlays are made of geometric elements (figure 40 d). If necessary, the wizard can cut any shapes with curved contours. This expands the creative possibilities and allows you to perform complex compositions depicting various genre scenes and fairy-tale stories. Complex curved shapes cut out of the straws with scissors (figure 40) or a knife-jamb. But as fragile straw quite easily break and are of limited width, they stick close to one of the PA writing paper. To form a solid, without gaps straw covering, the edges of each straw is cut with a knife-jamb metal bar (figure 41 a). Then the paper applied to the adhesive (e.g., starch or IVA) and to one another as tightly as possible put straw strips (figure 41 b). Each strip carefully wipe the end part of the handle of a knife-jamb. Tread in the gaps the adhesive is carefully removed with a dry cloth. Top straw set covered with a clean sheet of paper and press the Board with the cargo. Once the glue has dried, the paper pasted on it with straw is removed from the press. If straw strips, well-trimmed around the edges and carefully docked, they seem to merge into a single straw film. It is possible to draw and then cut out with scissors or a knife-jamb almost any figure (figure 41).
Pasted on a paper straw required for the manufacture of small shaped parts using the punch (figure 41 d). For this purpose you can use leftovers from cutting out large shapes. Thanks to paper cutting from a straw film does not crumble and not poured. Their knock out punch ramrod not less than five or six strokes. By the way, left after cutting the mesh can also be used for finishing wood products.
PRIMING WOODEN SURFACES
Boxes, boxes and other wood items, prepared for inlaying, pre-painted and primed.
The adhesive primer used by Belarusian masters, consists of the following components: water 500 g carpenter's glue — 400 grams of aniline coloring (black or brown) — 8 g, glycerol — 40 g, soap — 8 g.
Cook it in a water bath (figure 41 g). In a saucepan put the tiles of wood glue and pour clean cold water. Very convenient to soak the glue over night — just in time for the morning, he will swell up and become soft. Scoop with a swollen adhesive is lowered into the pot of hot water. Watching that the water from the pan does not hit the scoop. Pan put on fire and boil the water. Once the glue is dissolved, in a glutinous solution add the glycerin and soap chips, and dye. The solution was thoroughly stirred and allowed to cool. Soap and glycerin are required in order to the ground from a light wetting with water was again mustered the necessary viscosity. By the way, is based on this technique of incrustation on the ground. Glue soil due to added simultaneously to the dye and stain the wood. After the first coat of primer dried, and then grind fine sandpaper and applied a second coat of primer. After the second coat also dries, proceed directly to frescoes, of the incrustation. Learn more about the process of inlay will be discussed later. For now, suffice to explain only the principle of the execution of the inlay on the ground. The place where you want to paste the element inlay, carved out of a straw, lightly moisten with water using a brush or your finger. Because it contained glycerin and soap, soaked the ground almost instantly swells and becomes sticky. While it retains the viscosity, it pressed and smooth detail, carved from a straw. Her grind on top of the handle end of a knife-jamb. After some time, the ground solidifies again and grasps firmly planted on his straw. For example, remember postage stamps and adhesive paper: adhesive applied to them, has the same properties as the soil.
In addition to the adhesive primer, it is possible to use a lacquer primer. As the lacquer used for the primer, transparent wood pre-okrashivanie stains, aniline (textile) dyes, gouache paints and ink. To enhance the adhesion of wood with gouache, it added a bit of PVA glue. When the dye dries, the surface of the wood alternately applied two thin coats of nitrocellulose lacquer NC 218, 221, 222. Each layer is carefully dried for two to three hours.
Method of gluing straws to the base is the same as the inlays on the adhesive primer. Only to soften the soil instead of water use thinner, which added a little Polish (in 3 parts of solvent No. 646 1 part varnish). The portion of the soil soaked with the brush with solvent again at some time sticky. At this point put on it the tip of the straw and cut strips from it (depending on need) diamond, square, triangle, etc. put on the varnish element of the pattern and smooth the handle end of a knife-jamb, trying as closely as possible to press it to the surface of the decorated object. Also paste the following and all other elements of the pattern. While maintaining that the angles of geometric straw figures coincide with printed guide lines.
Cutting at different angles from the strip of triangles, squares and diamonds, rectangles, trapezoids and parallelograms, get patterns in the form of various combinations. Combining these geometric shapes, you can get a variety of ornaments, from simple patterns in the strip to more complex rosettes and plant forms (figure 42).
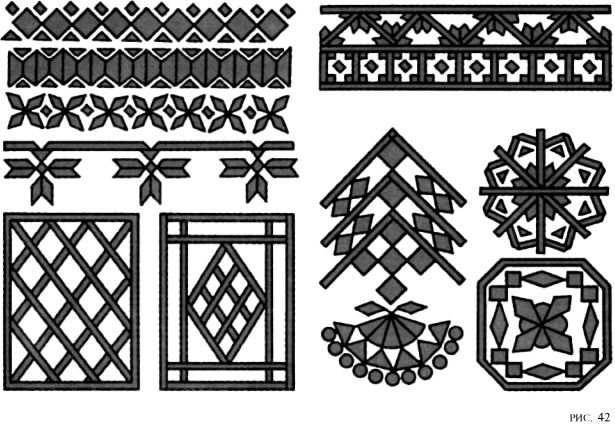
The composition of the ornament largely determines the mesh that vyklevyvajut of thin straw strips (1 to 3 mm). The mesh holds strong in a single regard, all details of the ornament, consisting of numerous geometrical figures.
Straw ornament, like a Golden lace covers the objects, especially good it looks running out of them, which have black or brown background, sometimes bright red, Burgundy or dark blue.
THE SEQUENCE INLAY BOX COVER
Box in front of the inlay is marked with a ruler and a surface gauge. Auxiliary lines is carried out so that after work they were plastered with thatched inlay elements. At some distance from the edges of the cover is carried out a surface gauge straight lines. Formed in the middle of a square divided into 9 small squares. In the middle of each small square, find the center. It lies at the intersection of the diagonals. Found via the centers have risks, parallel to the sides of the square.
Getting directly to the incrustation, alternately glued narrow stripes —first a horizontal and then vertical (figure 43 a). Then begin to be applied to the wall outlet in the middle of each square. Five sockets consist of diamonds and four of parallelograms and triangles. Each of these outlets begin to be applied to the wall from the center (figure 43 b—d). Following this, at the corners of the grid vyklevyvajut of diamonds octagonal stars. At the final stage, the edges of the cover glue the chains of the squares (figure 43 d).
After the inlaying, the surface of the cover varnish PF-283 (ex-4C). Lacquer film not only informs the brightness of the inlay, but also establishes another pound, especially if it is adhesive and protects the straw parts from the penetration of moisture, causing darkening.