


")
In the process of burning very subtly, surprisingly masterfully used the natural features, the texture of birch bark. All cracks, bogorotsky, nodules, growths, black spots and risucci — all so rich in birch bark, so fits in the drawings, that it seems that nature itself has specially taken care to ensure that the artist could create such amazing works of art.
Of course, before such a skill to go long, but the simple work force for beginners, the first step is still to be done. Themes can be a variety of animals, birds, architectural structures, and landscapes. The pattern may be taken from nature or from any other sources.
The work requires some training, so so simple, without a lot of desire nothing will happen. You need to consider many things, including the texture of the material. Pattern make specific blanks, to copy here anything except the idea itself. Start with the simplest, look at the bark, think that it is possible to draw a — the lonely tree on the mountain, which resembles a large black spot, or a mountain goat standing on a cliff. It can be an eagle soaring in the sky, or the hut that hid behind the trees.
It all depends on your imagination, only you and no one else will be able to play on a particular procurement invented figure. Using the samples, perform independent work.
Burning of the bark as the tree is performed using the electrical appliance, store-bought or homemade.
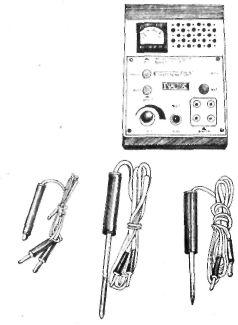
The instrument comes with a transformer required to lower the voltage from 127 to 2, which is the working voltage of the device. Power consumption is about 20 watts. A work tool holder (handle), at the end of which strengthened metal electrode nakalivaniya under the action of current passing through it.
Please observe the following rules: during the break, be sure to disconnect the transformer from the network, and the tool does not put on the stand until the wire has cooled.
During burning of the ornaments and of the same contour drawings, you can use templates: and stencils cut out of plywood or cut from heavy paper.
The first test drawings it is necessary to burn only points. Causing spots more or less densely, changing their size and depth, it is possible to obtain transitions from light to shadow, the depth of the depicted objects. The product during burning should be set at some angle above the plane of the table and at a distance of 30-35 cm from the eye. It is important that the treated surface was well lit. When burning relatively quickly tired eyes, so every 15-20 minutes it is necessary to take short breaks to relax.
The burned product can be dyed, painted or varnished. For coloring select the water-soluble dye (aniline dyes, colored ink, color ink). To paint products in the brown colour can stain. Aqueous solutions of dyes should not be too thick; to achieve the richness and density of color, enough to cover one and the same place with a weak solution of paint 2-3 times.
For painting the burnt products use a small soft brush. In the continuous color surface, the dye solution is applied with a swab of cotton wool, wrapped with a clean cotton cloth. To achieve uniformity of staining, it is recommended that immediately after applying the paint, wipe the painted surface of the fabricated product clean with a wet cloth.