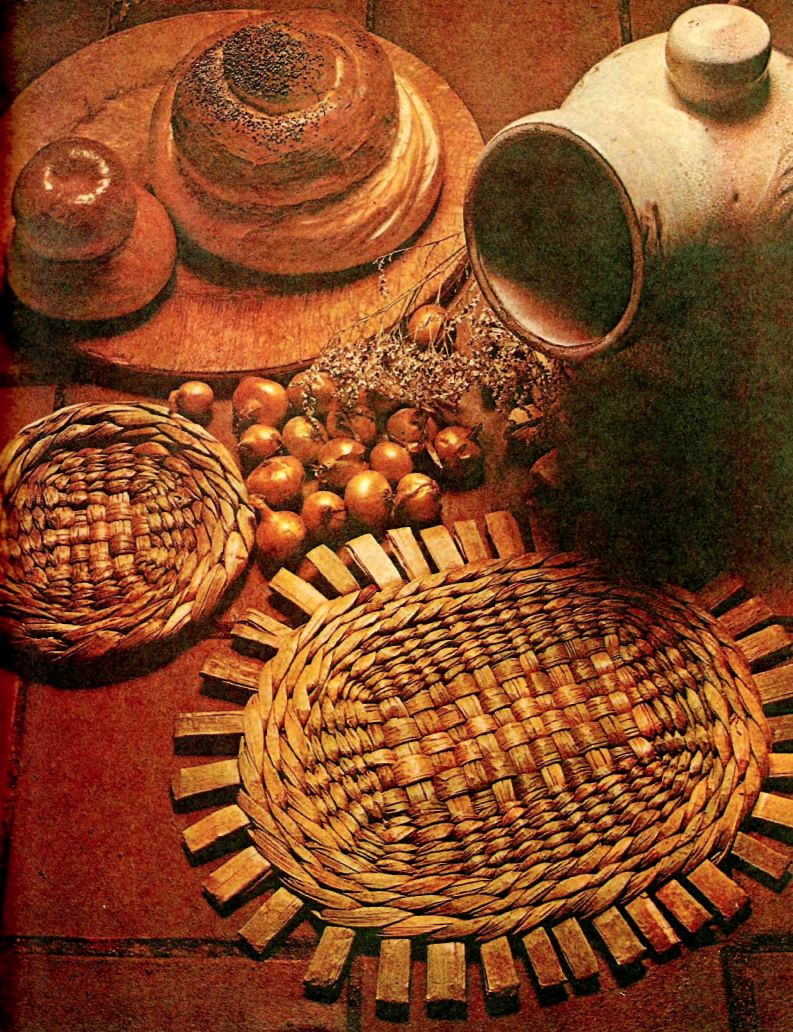
")
This is another good way to master the weaving of your material, and the stand will decorate your house.
You will need:
10 stems with a length of 300 mm and a width of approximately 12 mm for racks;
12-16 thin stems.
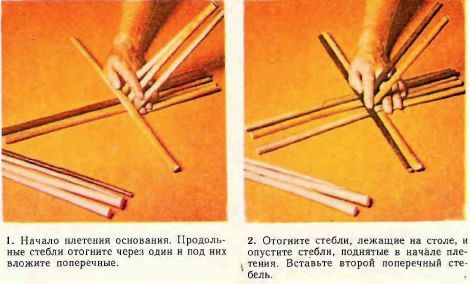
Twist between five transverse and five longitudinal struts. To do this, put in front of him along the table five cleaned and tapered stems. Do not put the thick ends on one side and alternate them. Press the stems with the left hand slightly to the left of the middle. Fold first, third and fifth stalk and catch them with the index finger of the left hand (figure 1).
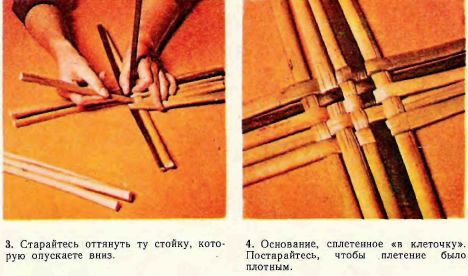
Take one stem and put it across the rest on the table. Now switch the longitudinal stems: bent press to the table, and lying on the table fold. (The netting will be more tight, if you bend the stem before you release the next from under the finger, i.e., the work order should be as follows: bend No. 2, press No. 1 bend No. 4 to pin No. 3 and 5.) Now put the second transverse stem, using the same method. Try to lay cross the stems as tightly as possible to do this when pulling away trailing stems retract it to the left. Lay thus all five lateral stems (resistant) (figure 4).
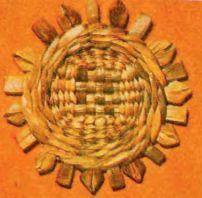
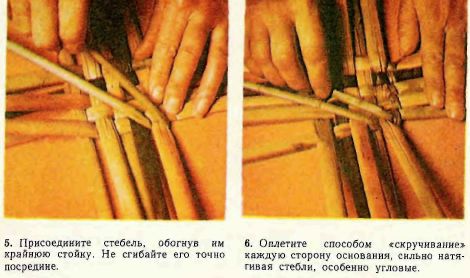
Choose a nice thin bars and they go around one corner of the transverse struts (to start netting more convenient to take upper left of the bar). One end of the rod should be longer than the other (figure 5). Proplatit way "twisting" along one side of the square. Pull on the bars as much as possible. Rotate the square a quarter turn and continue the weaving method of "twisting" (figure 6). All the time pull on the bars, especially in the corners — this will help to transform the stand to a round square. Try to dilute stands in the direction of the radius (figure 7).
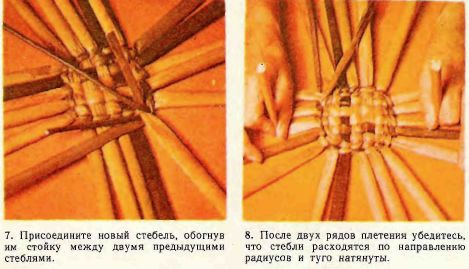
At the conclusion of the second row stop and check the quality of weaving:
1. Make sure desks are located uniformly on a circle, and a checkered weave is in the center. If not, pull the rack in one direction or another.
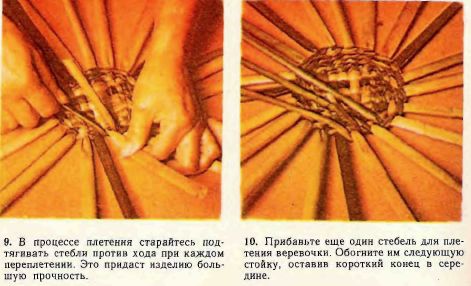
2. Plaid weave must be very tight. If not, then alternately pull each rack on both ends (figure 8).
Braid as long as the short end of the rod reaches about 75 mm (figure 7). Take the new rod and go around it stand between the two ends of the first rod, so that the short end of the new rod was also equal to 75 mm. Long end of the rod shall be left with the short end of the preceding bar and the short end of the new rod needs to be right next to the long end of the preceding (figure 7). And now braid, using both the short and long end. Gaining experience, you will see that the ends of the rods can be fully hidden by the netting, and later won't need anything to trim or cut.
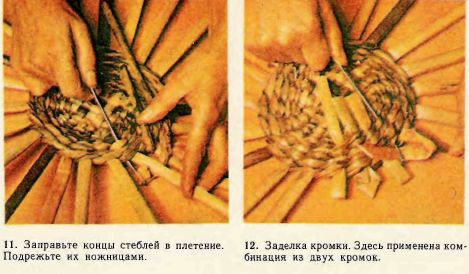
Make six rows by way of "twisting". Attach the third rod around its end around the rack, to the right of the right bar (figure 10) Proplatit three rows way to "rope". (Remember that in the rope netting of reeds or rushes transitions do not.) Finish the rope, align the ends of the rods in weaving. To do this, pass the threader through the last three rows of netting along the stands, which is near one of the bars. Thread the end of the rod into the eyelet and pull it through the ranks of the netting (figure 11). Finish a weave any of simple edges (figure 12) or a combination of the two.
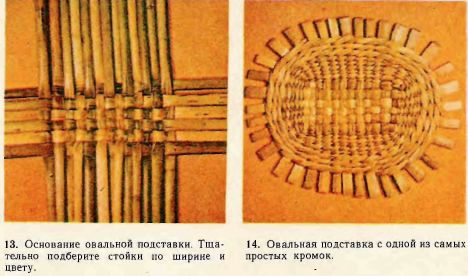
OVAL STAND
You will need:
6 stems with a length of 450 mm,
width of about 12 mm for racks;
12 stalks, length 300 mm, width of about 12 mm for racks;
15-20 thin rods.
Put in front of him along the table six long stems for racks and fold the first, third and fifth. Across them lay first short rack. Complete the weave in the same way as in the manufacture of round coasters. Cellular section of the netting will not be square, and rectangular (figure 13). Continue as with a circular stand, six rows method "twisting" three way "rope". Finish a weave any of simple edges (figure 14).
The end of the work
Stands look much better if they are put under a press (under a box, heavy object, or even under the carpet).Previously a stand must be wrapped with newspaper (to absorb moisture). Practice a little, you will be able to weave coasters of all sizes. Equally beautiful look and great coasters for glassware, and small coasters. When determining the width of the future stand in mind that for every kamyshino is about 12 mm.