


")
· Stand under the kettle. Lagging on the d-pad, 4 x 4 round bottom. First, the cross pletetsya one next to the rope in two bar, then four divide into pairs, proplata rope in two rod, and eight strings in two of the Prut river, separating the pair. Finish braiding two ropes of three rod. Get the bottom with a diameter of about 12 cm.
The tips of the chopsticks-pipes sticking out of the netting, cut off and substituted for each two additional pointed ends of the rod as deep as possible.
Then the first couple bendable at a height of 2.5-3 cm from the top and the second set up for the third and fourth pairs of rods, a fifth and a sixth trace from the top, moving the ends of the seventh pair of rods.
The rods of the second pair done in the same sequence your way between the other couples, clutching the bars of the first pair will be behind the eighth pair. The same is folded around the third couple, then fourth, etc.
The last three pairs of bars gently injected into the gaps remaining between the pairs of rods that formed the beginning of turning-in, strictly adhering to the chosen sequence according to the scheme on the second one, under two, over two. After this you need to pull the ends of each pair of bars of the stand so that they lay flat around the entire circumference and braid.
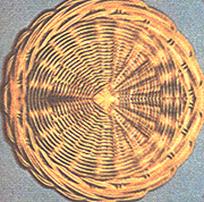
Figure 51
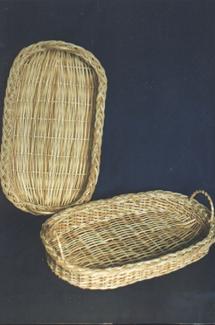
Figure 52
· Oval tray, running on the template. The pattern is an oval 500 x 250 mm, cut from plywood with a thickness of 9-12 mm, the Edge of the oval need to treat small skin, so he had no burrs. Stepping back from the edge 5-6 mm around the perimeter, draws the line, which is 2.5 cm note the location of future holes. In the marked areas drill (diameter 5-6 mm) making through holes.
On both sides of the plywood around the hole is also treated skin. A total of 48 holes.
Now select the required number of rods with a length of 60 cm for pipes, two ropes in the 4th rod on the walls of the tray (wall trailing ordinary way, all the bars should be of good quality).
The rods prepared for weaving and begin to prepare the tray with the installation of the struts into the holes of the template. Risers probleem the rope into four rod and make the wall in the ordinary way – just 4 rows. Top weave another rope into the 4th rod. Finish weaving the walls of tray cable 4 pair of rods.
Figure 53
· Braid around the clock. This braid can be done for hours with the protruding dial.
It is necessary to prepare a plywood circle exactly diameter of the dial. End template through a 2 cm drill an odd number of holes from 4 to 6 mm, depth 1.5 cm opening Diameter depending on the diameter of the used rods. In addition we will need the template for weaving the round holes of large size
(see figure 54), as well as the bars-risers for weaving ropes, short the wires on the pigtail, ribbon for the layered netting.
Prepared the circle with holes installed on the template. Rods-struts inserted into the holes of the template and proplete them two strings of three rod. Each riser is substituted on one same shaft, thus obtaining the dual risers. Next, weave 5 cm layerwise weaving of ribbon and weave another string. Then bend risers at a height of about 5 cm from the edge of the braid and to the right, making the edge according to the scheme: two – two – one – one for inside. While braiding, try turning that it is smooth around the edge.
Figure 54
Most of the work is done. Now thin sharp knife cut the ends of the struts along the edge of the plywood and remove the template. We got a circle with a diameter of 43 cm Left to doblesti to him the inner braid, which will close the place of the dial and braid, but also very decorated with all the product. Pigtail make short sticks are stuck into the rope between the bars of the framework, usually a braid of three pairs of rods. When you have finished weaving, cut all the speakers from the front side ends of struts of the spit, and from the opposite side ends of struts of a braid and coat those places with white glue.
Wait for braid to dry and just put it on the dial.
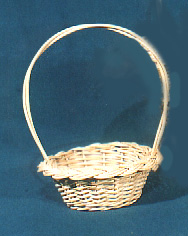
Figure 55
· Decorative basket with a pigtail. Especially this basket will decorate a festive table, filled with candy , nuts or small cookies, but it can also arrange flowers.
Manufacturer of baskets is very easy. It is woven on a round bottom diameter 9 cm, with a cross-piece 4 x 4 sticks, i.e. 16 radially extending ends. To each of them substituted on one strut with a diameter of 4-5 mm. risers above the bottom proplyene two strings three rod, and above them the ordinary way (weft length 30 cm) – divergent cone wall. Then weave two more rows of rope three rods and the ends of the rods of struts zaplatim "pigtail" in the three pairs of rods.
For the manufacture of such baskets are template with bottom diameter 8 cm, top 15 cm and a height of 8 cm (see figure 8(b)). It remains to insert the handle and basket ready.
· The lampshade. To weave this product, you need to prepare 48 carefully selected bars to the risers with a diameter of 4-4,5 mm and a length of at least 50 cm (24 of them are bogus), rods with a diameter of 3.5-4 mm rope as well as a template-the circle of plywood with a thickness of 8-10 mm with a through hole 24 of the riser is drilled to a diameter of 13 cm and a template-a circle with a diameter of 22 cm For the hood needs 64 selected rod with a diameter of 4-4,5 mm and a length of not less than 70 cm, and the rods on weave ropes of the same diameter and length. In addition, you will need a template-the circle of plywood with a diameter of 15 cm with 32 holes for front ends for struts.
First make the Central part of the lampshade. For this purpose set the universal template of the plywood circle with 24 holes, and the top is a circle with a diameter of 22 cm with a gap between 11 see Tighten nut.
Well-soaked bars to the risers with the tips inserted into the holes of the plywood circle, alternately dragging them up to a weak delay in the holes. Then, tightly clutching the bars to the plywood, probllem two strings three rod, and the rope into five bars with a thickening of several. Now substitute each riser one. From the obtained pairs of struts are doing OK, crossing over the risers, and at a height of 10 cm from the thickened probleem number two rope three bar. Thickened ends of the pair of struts razmazyvaem and bent to the right in a semicircle in front of three risers, pass them through the two ropes, pre-expanding the strings with an awl. The remaining top bars tightly Zapletal a simple path, and the loose ends cut flush.
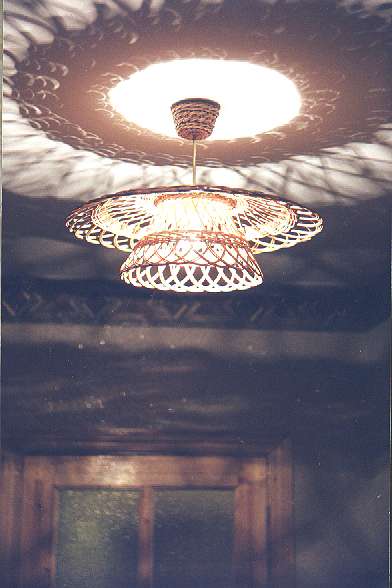
Figure 56
Now the product can be removed from the template together with a plywood circle, protruding over him comalike risers carefully cut along the plane of the plywood. After complete drying of the plywood circle should be careful to remove the butt ends of the riser.
Next, weave an umbrella diameter of 55 cm in the end holes of the 15-cm circle template insert 32 of the riser, and it probleem tight to a mug of six strings in three rod, and then injected to the main risers one additional. From the obtained pairs do openwork , overlapping risers, and stepping back from the ropes 11 cm probleem three rope three rod, securing the openwork.
The resulting ends of the risers again razmazyvaem and make them openwork familiar of semicircles (as in Central) – three tower to the fourth. The apical tips of the risers will pull through rope and tightly Zapletal simple track. After drying, the umbrella retrieved from the template, cutting comalike risers around the edge of the circle, and fixed on the Central part.
In the last turn, weave ceiling Cup for the wire. Its approximate sizes: diameter stems to 6 cm, upper diameter 8 cm, height 6 cm
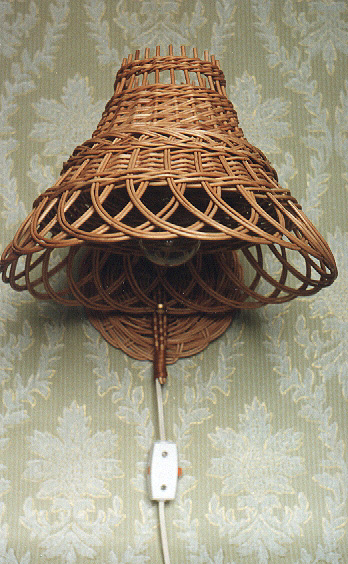
Figure 57
It now remains only to fix the shade on elektropitanie to screw in a light bulb. This shade fits perfectly in a kitchen or hallway made of wood.
· Desk lamp and sconce. Lampshade for table lamps and sconces weave using a template of the plywood circle with the through-holes 24 on a circle with a diameter of 9 cm Diameter through holes 4-5 mm, depending on used rods.
Plywood circle mounted on a universal template, and the top is a circle with a diameter of 20 cm with a gap between 12.5 cm to tighten nut.
In each of the holes of the lower circle of the inserted rods risers and proplate at him, holding tightly to the plywood, one rope of three of them, one in two rod, three in one rod. All three rope sealing.
Stepping back half an inch, probleem the same number of strings in the same sequence. Then the ordinary weaving of two rod CamelCase to the rope begin to build up the wall of the lampshade.

Figure 58
Making 6 rows, cut the excess ends of the twigs, and above them probleem rope three rod, and then continue with ordinary weaving, but single rods. After 9 rows cut off the excess weft ends and proplete two strings of three rod.
Prepare 24 additional riser of the same diameter and length sticking out as the main. Sharpen it and put a side each. From the resulting dual pipes will make a beautiful openwork zaplatka – in the form of a semicircle bend to the right before three, passing their ends through the last two ropes and one that separates the ordinary weave. The remaining edges tightly Zapletal a simple track and clip the ends.
Allow the lampshade to dry and pull it out from the template.
Now, for the sconces there is a circle with a diameter of 16 cm (lagging like thing under the kettle) and an arc length of 45 cm for the electrical wiring which connects the wall range and shade in one. Arc lagging so: take five thin but long sticks and a few thinly sliced ribbons. And rods and strips to soak. The butt ends of the alignment rods put in between the cord. And completely odletem tape on 2-2,5 cm, and then the same tape probleem rods according to the scheme: under one, on the second, third, fourth and fifth. Braid will quietly grow on sloping helix, forming a drawing checkers. Apical part odletem as before – to break off all five twigs. Ensure that the length of the ends of the electric wires was enough for the mounting of the cartridge. Next, the resulting billet arc razmazyvaem and on the Board give it the desired shape and secure it with nails. When the arc is dry and will keep the shape it is removed from the Board.
For a table lamp the base is needed. It can be: whether braided resistant bottle with high neck, or stand from an old, old table lamps, or a specially made stand.
Imagination and artistic taste of the weaver will cope with this task.